Just Dance 2023 Edition to Include Cybergoths-Under-the-Bridge Level

KYOTO, Japan — Today’s Nintendo Direct included confirmation of a long requested level coming to the 2023 Edition of Just Dance for the Nintendo Switch: the Cybergoth Dance party from the YouTube video.

“Oh shit, they did it,” said Dustin Malone, a longtime fan of the series. “I’ve been hoping they would do something fun like this to shake things up. Standing around under a bridge shadowboxing in broad daylight is probably the best location they’ve had in one of these rhythm games yet. And the best part is that literally any song kind of goes with it.” 

As of press time, Ubisoft had confirmed that if you don’t feel like dancing you can just kinda stand around and smoke cigarettes, if you want.

New Nintendo Direct Entirely Stardew Valley Rip-Offs

TOKYO — The newest Nintendo Direct revealed 40 minutes of rip-offs of the game Stardew Valley, according to those familiar with the situation.

“You fuckers like farming, right?” said a monotone English voice over the Nintendo CEO Shuntaro Furukawa speaking Japanese. “Well here’s a whole bunch of games that are just What If Stardew Valley Was in Ugly 3D. Some of them are new, some of them are old, but all of them have a thing where you can go into a cave and fight goblins. And if you’re still on the fence about buying it, boom: here’s some fishing. Try not putting 250 hours into that, asshole. The first Harvest Moon was on Super Nintendo so that Ape guy should be Concerned about ripping us off, if anything.”

Nintendo fans were conflicted about the announcement.

“That was a cool Direct,” said one fan. “I’m most excited for Fae Farm, Story of Seasons: A Wonderful Life, Rune Factory 3: Special, Mario Farm, FarmGo, Nintendo Farming Sports, Breath of the Harvest 2, and that one game that looked like Stardew Valley. Wait, that was a few of them, actually.”

“I really just wanted to see a clip of the new Mario movie,” said another fan. “I didn’t need to see 3 minutes of Chris Pratt silently farming.”

At press time, Furukawa admitted that the reason behind all the games was that his grandfather had just passed away and left him a large farm in a quiet little town in his will, but he was unsure of how to get started.

Velma MultiVersus Guide: Moves, Strategy, And Techniques

This old-school nerd was a bizarre addition to the MultiVersus cast of fighters, but she ends up being able to tangle with the best of them. In the first-ever MultiVersus tournament at EVO, Velma was the most-used character among the top 8 finalist teams. Of course that means she’s been nerfed since then, but she can still compete. Velma’s best moves are intimidating, but also unusual. Trying to play her as a regular fighter simply won’t work. Instead, get a clue by checking out this Velma MultiVersus Guide.

Velma MultiVersus Guide: Moveset Overview

Velma is classified as a “support” character, but don’t be fooled. All of the support characters in MultiVersus are capable of dishing out tons of pain. Velma’s best moves tend to be long-reaching projectiles, allowing her to easily engage the enemy from the back line. She also has several reliable melee attacks for the inevitable hand-to-hand combat. Several of Velma’s attacks spawn evidence, a collectible object that I’ll explain later. For the first section of the Velma MultiVersus guide, here’s an overview of her moves.

  • Neutral Ground Attack: Most characters have a heavy, charged melee attack for their neutral. Not so for Velma. Instead, she shouts a fast-moving projectile that tracks her ally. If it connects, and it usually does, the ally becomes marked. If someone’s marked, this attack changes. Pressing the button again will send out a speedy word bubble projectile that follows the marked target. If this hits your ally, it rebounds forward. It’s like making your ally throw a free projectile, which also applies a weakness debuff. There’s a lot going on with this attack. It has a low ammo count, so Velma has to wait a while in between sets of shots. The initial tracking shot can hit an enemy if they’re in between you and your ally, which lets you follow up with homing projectiles, but it can also get caught on the floor. Generally, though, it’s fine to use it as often as possible. Thanks to its tracking, it’ll almost always have some effect.
  • Side Ground Attack: This is Velma’s standard ground attack. She hits enemies with three close-range speech bubbles, one after the other. The speech bubbles are pretty big, and they have a disjointed hitbox; they don’t expose Velma to counterattack. On the other hand, they’re a little slow, and the three hits don’t combo. The enemy can sometimes escape between hits. One option is to follow a side ground attack with an up or down attack, which does count as a true combo.
  • Up Ground Attack: Velma has an idea, and a lightbulb appears over her head, which is the attack. It’s quick, it has decent knockback, and it can spawn evidence, but it only hits the area above her. There’s a trick to chaining into it that makes it more reliable: if you use this move right after a different attack or dodge, Velma slides across the ground as the lightbulb appears, greatly increasing the attack’s horizontal range and allowing it to end a combo string.
  • Down Ground Attack: Velma takes out a calculator and solves an equation, ending in a triumphant word bubble shout. This attack is slow, and only a bit larger than her reliable side attack, but it does the most damage of her single strikes when charged, and can spawn evidence. Good for a single, powerful strike, but it doesn’t have much kill power. Definitely not one of Velma’s best moves.
  • Neutral Air Attack: It’s the same as her neutral ground attack, allowing Velma to fire projectiles from midair.
  • Side Air Attack: Velma charges up a flashlight and turns it on. That’s not how flashlights work, but your enemies won’t have time to complain: this is a reliable close-range attack with some kill potential. Since it’s usable in the air, it’s possible to jump forward and charge, then release once you’re near the enemy. It can also spawn evidence.
  • Up Air Attack: It’s the same lightbulb as the ground version. It can’t slide, but it’s more likely to hit and to kill if used on enemies above you in the air.
  • Down Air Attack: Velma’s glasses fall off, and she reaches down and grabs them out of the air. For some reason, this does good damage and is a reliable spike. It can be used as a kill move onstage by bouncing a high-damage opponent against the ground, and it can chain into a follow-up move like the lightbulb or camera flash (up special) easily.

Velma’s regular attacks are already wacky, but her specials are even more so. Pay close attention to this part of the Velma MultiVersus guide.

  • Neutral Ground Special: Velma pulls out a megaphone and delivers an “inspirational speech”. This take the form of a very long beam, which can be angled up and down while firing. It does very little damage, but the object is to have it focused on your target when its full effect triggers, which happens after a couple seconds of use. If you’re shouting at an enemy, the trigger causes a big hit with good knockback and a stack of weakness. If you’re shouting at your teammate, the trigger heals them, gives them a little speed buff, and rebounds a second beam off of them – the same effect as shouting at an enemy, but stronger and with twice the debuff! This move does have a cooldown, but it’s extremely short. Give it a couple seconds and you’re good to shout some more. The real risk is that it leaves Velma vulnerable. The beam doesn’t make enemies flinch until the final hit, so anyone can walk right up to you and punish for free. Do it at range, or while the enemy’s preoccupied.
  • Side Ground Special: Velma does the Scooby-Doo run in place for a while, charging. Releasing the button sends her dashing forward, grabbing enemies in the way and throwing them at the end of the dash. Charging for longer extends the length of the dash, but it travels a fair distance even uncharged. Once you’re running, you can jump to cancel it. The move is very slow and obvious, and therefore hard to use… unless you coordinate. If a teammate jumps into Velma’s arms during the charge-up or dash, you both get an armor buff.
  • Up Ground Special: Velma throws a vial of blue stuff onto the ground beneath her. It’s not much on its own, but the puddle of blue persists, and enemies standing in it start to freeze very quickly. It’s a powerful trap, but has a long cooldown. Use whenever you can.
  • Down Ground Special: Velma activates Big Head Mode. For her, this cleanses debuffs and gives her a cooldown reduction buff (“educated”). It also throws a magical book, which rapidly seeks your teammate and applies those buffs to them as well (including the big head). It sticks around for a little while, spinning around your ally and hitting enemies like the Bible from Vampire Surv– I mean, from Castlevania. Since it reduces your other cooldowns, this move has a long cooldown of its own. Throw it out whenever you remember it exists.
  • Neutral Air Special: This is the same megaphone blast as her ground special. When she uses it in the air, she hovers in place, letting her shoot from a slightly safer position.
  • Side Air Special: Velma opens a big book. The knowledge inside bursts forth (?), propelling her a short distance through the air. It’s a weak attack, but it can land an extra hit in the air while keeping you away from the enemy. Just remember that the burst fires in the opposite direction as your input.
  • Up Air Special: Velma aims below her with a camera and takes a picture, causing a fair-sized camera flash explosion. It doesn’t help much for recovery, but the flash causes an armor break, an evidence spawn, and a decent amount of knockback. It’s not as powerful a spike as Velma’s down air attack, but it can send offstage opponents flying away at a deadly angle.
  • Down Air Special: This is the same book throw as the down ground special.

What’s all this evidence good for, you ask? When Velma and her teammate have collected five pieces, it enables her ultimate move: She reveals that an opponent is Old Man Jenkins, and summons the Mystery Machine to apprehend them. The van chases its target down automatically, and “busts” them on contact, which instantly does 40 damage and locks them inside. Then it drives off the edge of the stage for a kill. You can even attack it to damage an enemy inside!

It sounds like a devastating attack, but it’s often underwhelming. The van’s AI isn’t great, and it can’t chase targets into the air. Sometimes it leaps off the edge and dies as soon as it’s spawned. It can be destroyed by enemy attacks, which can free a captive inside or even prevent the arrest from happening. And after all that, a busted enemy can free themselves by mashing the dodge button to evade the instant death.

For these reasons, it’s best not to rely on the Mystery Machine. Don’t go out of your way to collect evidence as Velma if it would mean putting yourself or your team in a bad position. That said, definitely call the gang if you have the evidence for it: even if it usually fails, summoning the van forces the enemy to respond immediately and can disrupt them.

How to Win 2v2 Battles as Velma in MultiVersus

Velma team victory

This section of the Velma MultiVersus guide will review how to work with a teammate. Velma’s greatest strength is her wealth of teamplay abilities. Firing at your teammate with the neutral speech bubbles or the megaphone sends a stronger version at your enemies, so it’s always a good idea to aim at your allies first. Despite Velma’s strengths, she’s also light, and has some trouble scoring kills. Even her most reliable kill moves won’t work unless the enemy’s at very high damage.

Since Velma needs a teammate who can help on offense and defense, a good partner for her would be a Tank or a durable Brawler who can keep enemies away from Velma while taking advantage of her heals. Shaggy, appropriately enough, is a good option, as long as he doesn’t leave you in the cold while he powers up. LeBron is also a heavy Brawler, and can stack projectile-boosting perks with you. Any current Tank works well with Velma, each for different reasons: Wonder Woman has a lot of cooldown moves, and can make use of Velma’s down special. Iron Giant is huge, and is very easy to hit with healing beams. Superman can use his ice breath alongside Velma’s freezing up special, including the Break The Ice perk for bonus damage.

How to Win 1v1 Battles as Velma in MultiVersus

velma 1v1 victory

This section of the Velma MultiVersus guide detailes 1v1 strategy. Velma’s abilities are powerful, but most of them are designed to amplify her teammate. She’s not built for 1v1 at all. It’s not impossible, though, with some clever play. Her targeting speech bubble won’t track enemies, but it travels quickly and has a short cooldown, and if it connects, the follow-up speech bubbles do track. Her megaphone is extremely risky in 1v1, and is only safe if used at range.

As with most 1v1 confrontations, the best plan is to move quickly and threaten the enemy with large hitboxes. For Velma, an advancing side air will often catch an incoming enemy. Her side ground attack is also tough to contest, as long as you don’t rely on the full three hits. One hit cancelled into a different attack is safer. She still has issues securing kills, though. You could try for an early spike or offstage side air, but in a pinch, down air onstage will kill off the top around 130 damage.

Velma’s Best Perks

velma multiversus perks

For the last section of the Velma MultiVersus guide, let’s go over her perk options. She has two Signature Perks, and both of them affect the evidence that spawns from her attacks.

  • Studied starts Velma out with one free evidence, so she only needs to collect four instead of five to call the Mystery Machine.
  • Knowledge Is Power gives Velma’s teammate 3 points of grey health, absorbing damage, when they pick up a piece of evidence.

This one’s easy: Use Studied in 1v1 (because Knowledge Is Power will have no effect) and Knowledge is Power in 2v2 (because the Mystery Machine often fails and it’s better to have the guaranteed grey health).

For her minor perks, Velma can focus on strengthening her projectile offense or her dodge-based defense. These should be chosen based on which ones will also benefit your teammate.

  • Coffeezilla is great on Velma, lowering the cooldown of her healing megaphone from “practically nothing” to “almost nothing”.
  • Deadeye and Shirt Cannon Sniper are good general damage boosters if your teammate also uses projectiles.
  • Ice To Beat You and That’s Flammable, Doc are another way to boost projectile damage. It works well combined with Hit ‘Em While They’re Down and a teammate with debuff potential, like Batman or Taz.
  • Dodging remains the most effective defensive option, so dodge-strengthening perks like Slippery Customer and Hit Me If You’re Able are solid picks in all circumstances, especially for 1v1.
  • Lastly, Triple Jump is great when stacked, so your teammate might be mad at you if you don’t have it.

Splatoon 3 Rainmaker: How to Play and Improve

Rainmaker is one of four ranked modes available to players in Splatoon 3, accessible in the regular rotation of modes offered through the Anarchy Battles playlist accessible to players after reaching level 10 (or level 2 if you have save data for Splatoon 2 on your Nintendo Switch). It’s an objective-based mode where the aim of the game is to transport the special rainmaker weapon to the goal in your opponent’s side of the field, with the first to do so or take it the furthest within five minutes being crowned the winner.

These are the basics, but how does Rainmaker actually work, and how can you take your play from a B- rookie to an S+ master? That’s what this guide will introduce to you, with an explainer of all the basic rules and useful techniques needed to master Rainmaker in Splatoon 3 and its changes compared to earlier entries in the series.

What are the Rules of Rainmaker?

First things first, the basics. Rainmaker is a mode in Splatoon 3 where teams each have five minutes to take the rainmaker from the center of the arena to the goal, with the winner being crowned once a player has reached the goal. If no team has reached the goal at the end of the time limit, the player to have pushed the Rainmaker the furthest within the time limit will be crowned the winner.

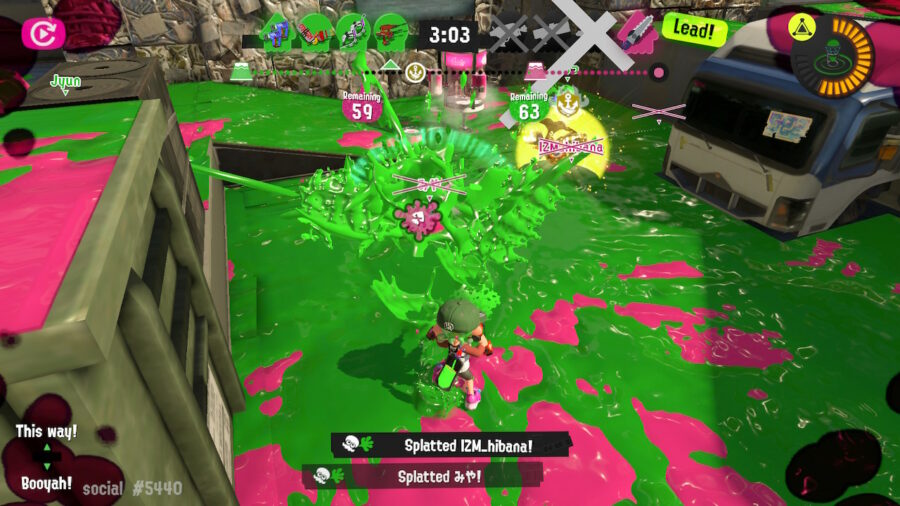
The rainmaker starts each match in the center of the arena encased in a shield that must be popped by shooting it using ink from your weapons and bombs. Once this shield has been shot enough team’s with one team’s ink, the shield will explode in a brief radius around the weapon before leaving the weapon exposed, allowing either team to collect the weapon from its location. The player holding the weapon can not relinquish control of the Rainmaker once they have collected it, and their goal is to transport the rainmaker to the opponent’s goal in order to win the match.

What Does the Rainmaker Do in Splatoon 3?

rainmaker mode in splatoon 3

The Rainmaker acts like a Special Weapon while in the player’s possession. You won’t be able to use your main weapon, but you will be able to fire super-charged shots from its mouth. Tapping the button will release a small trickle of ink directly in front of you, enough to make minor progress in any direction through enemy ink and potentially useful for a last-minute grab for the lead when death appears near-certain. By holding the fire button, you can fire a ball of ink in front of you, which will explode upon impact.

This means the player holding the Rainmaker isn’t powerless and solely reliant on your teammates to make a push towards the goal. You can assist your team, and indeed, should work together with them to use your superpowered shots alongside their dispatching of mobile enemies in order to clear a path to the goal.

The Rainmaker does have some disadvantages, however. Players carrying the weapon can’t use their Specials, nor can they move with as much speed either while working or traversing through ink as they could without carrying the weapon. This makes you more reliant on working with your team in order to make the best move towards victory.

How do Checkpoints Work in Rainmaker in Splatoon 3?

In a change from previous entries in the series, Rainmaker in Splatoon 3 is made up of checkpoints that a team must clear before reaching the final goal.

For example, in the level Hammerhead Bridge, the final goal each team must reach to win the match is situated close to the opposing team’s base. However, before teams can place the Rainmaker on that pedestal, players must first take the Rainmaker to a pedestal closer to the center of the map, where the Rainmaker will then reset and must be popped again before it can be recollected and taken to the goal.

This slows the match down and forces teams to take careful consideration of enemy location and strength before making a forward push. An effective push for victory in this mode should claim map control and push the enemy back so the Rainmaker can make its way to each pedestal unimpeded. Only pushing forward with player advantage unless the game is reaching the closing stages and you are in a losing position should ensure you can safely reach and move beyond these checkpoints without being stopped in your tracks by a well-timed sniper or blaster to the face.

What are the Best Weapons to Use for Rainmaker?

splatoon 3 rainmaker mode

Rainmaker is a mode reliant on map control similar to Turf War, with the best weapons being those that can quickly dispatch your opponent in offensive situations and slow your opponent when on the defensive.

The best weapons for Rainmaker in Splatoon 3 are the Dualie Squelchers, thanks to their versatility and ability to quickly traverse the map while being difficult for opponents to splat, as well as their special weapon. Dualies are two-handed weapons that fire shots from guns held in each of your Inkling’s hands, and have the added ability of allowing your character to dodge roll while shooting for improved accuracy and to dodge your opponent’s shots. Coupled with the new Squid Roll ability that allows players to jump roll out of the ink into the opposite direction of travel essentially offers all Dualie weapons an additional roll in offensive or defensive situations, making it even more difficult for opponents to lock on to you and splat you.

Furthermore the Wave Beacon is a particularly useful defensive item in Rainmaker. Due to the slower movement of the Rainmaker character it is more difficult for this player to dodge upcoming waves, making it a severe impediment when an opposing team is making an offensive push.

Another effective weapon in Rainmaker in Splatoon 3 is the Heavy Splatling, thanks to its heavy rate of fire from a distance. After charging the weapon it’s possible to completely wipe through the Rainmaker shield in a single charge. Typically a player using a Splatling won’t be charging into the action, standing and firing from a distance in order to clear enemy lines for the team and Rainmaker to advance. The weapon’s strength against the shield and in team fights from a distance make it an effective counter to your opponent’s actions.

Finally, we recommend using a Shooter like the N-Zap 85. Not only does the weapon’s rapid rate of fire make it effective in a 1v1 fight with another player, its Tacticooler special offering additional strength to your team and instant respawn is crucial in a mode where even a few second with all players off the field could result in an unassailable push from your opponent into your area of the field and towards your pedestal.

Controlling the Map in Rainmaker in Splatoon 3

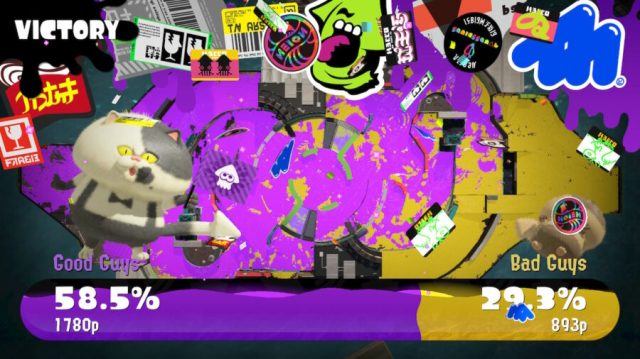
Map control is crucial in achieving victory in Rainmaker in Splatoon 3. Unlike Turf War, where the objective is to control as much of the map as possible to win, your objective is simply to carry the rainmaker to the goal. However, with the goal being situated deep inside your opponent’s area, it’s nearly impossible to make an effective and reliable game-winning push for the goal without the support of your team and control over the map.

Map control is important in Rainmaker as it allows you to swim through the ink to flank your opponent’s and make an offensive push, reducing the number of active players on the field by splatting them in order to create a clearing to take the Rainmaker forwards. A balanced team composition with players who can defend the rainmaker and pick off opponents from the back (using snipers or splatlings) or front (with shooters, blasters, brushes or dualies) makes it possible to assert control over the crucial center of the map where the Rainmaker spawns and resets and makes it difficult for your opponent to push forwards or mount a comeback.

What is important is that you create a degree of pressure on your opponent which stops them from being able to flank behind you and pick off key members of the team that will prevent you from earning points. Only by controlling the map can you control the opposing team.

Player Advantage and When to Push the Rainmaker in Splatoon 3

Similar to the importance of map control, understanding player advantage is key to understanding when is best to hold back and when is the moment to make a break for the Rainmaker checkpoint or objective in Splatoon 3 Anarchy Battles. What is easy to forget in the heat of the battle is the effectiveness, strength and range of the Rainmaker as a weapon, making it unnecessary for the player controlling the Rainmaker to lead the team from the front unless they are making an objective push.

Allowing close-range teammates to move forward and pick off opponents while using the Rainmaker to shoot charged shots from afar is an effective strategy to retain control over the objective and map as it forces the opponent to focus on putting a stop to your push rather than pressing for advantage.

There is nothing wrong with taking things slow and holding back with the Rainmaker until the time is right when you reach a 4v2 situation where your opponent only has two players available to stop your play before making a push for a checkpoint or the goal. Such a delay can be the difference between victory and defeat as it makes you more likely to earn more points or even reach the goal and end the match if you have less people standing in your way to stop you.

With a full map in play there is no need to narrow the playing field into a single strip. Flanking the side of the map in order to take out opponents by swinging along the map with the Zipcaster, or swimming through ink in order to swipe at an opponent when they least expect it, then making a jump for the objective, is a strategic way to claim victory in Rainmaker in Splatoon 3, even from the jaws of defeat.

How to Improve at Rainmaker in Splatoon 3

rainmaker splatoon

Ultimately, as with any game, practice makes perfect, and Rainmaker in Splatoon 3 is no different. By playing lots of matches, it’s possible to learn what is a good play and what weapons you are most effective with, and which are more likely to hold you back or that you should avoid direct confrontation with wherever possible.

Watching replays of your own matches in the game’s new replay system is a good way to learn from past mistakes, and watching the matches of higher-ranked is another method of learning what moves are good and which are more likely to send you down a spiral of defeat.

However, remembering when is the most opportune time to make an objective push using player advantage and learning how to take advantage of the Rainmaker’s own unique strengths as a weapon are important tools in your quest for Splatoon 3 ranked supremacy. In many matches, both teams will likely have one moment where the opportunity exists for one player to seize control over the match and guide their team to victory, if they can effectively assess the importance of player advantage, map control and the opportune moment to push for the checkpoint and goal.

Over time, practice and an understand of what works and what doesn’t will make it easier to spot how to secure victory in this complex mode. Only then can you turn your Splatoon 3 Rainmaker escapades from B- blues to S+ celebrations.

How to Get Better at Turf War In Splatoon 3

Splatoon 3, Nintendo’s latest entry in their popular mess-making series, is finally here. Coming on the heels of Splatoon 2, also on the Switch, this new shooter retains many features of its predecessor while adding some new stuff. The launch of a new game is a great time for new players to get in on the ink-soaked action, but like any multiplayer shooter, newcomers can have a tough time. Splatoon’s tutorial tells the player how to aim and fire, but that only helps so much when a team of rabid squids with guns is coming to kill you. Here are a few less-obvious tips to help you get better at Splatoon 3 Turf War (the game’s main mode).

Choose Your Controls

splatoon 3 turf war tree shoot

The first thing you should figure out, even before deciding which gun to use or t-shirt to wear, is how to set your controls. Unlike most console shooters, Splatoon includes the option to use motion controls. I’ll be blunt: you should use motion controls. You might have to tweak the sensitivity, but the fact is that aiming with motion is more accurate and much, much faster than holding a direction on a control stick. It might take some time to get used to, but it’s worth it. Consider trying a less intense game mode than Turf War to ease into things.

A common setup is to use motion controls for small adjustments, and the control sticks for large turns. Figuring out what works best for you will take several rounds of live fire. Be aware that getting caught from behind is deadly, and can happen often thanks to ink-based stealth. If you can’t turn and respond to threats from all angles, you’ll be dead before you can respond. As an aside, that also means you should attack enemies from the back or side whenever possible, to exploit slow-turning players who didn’t read this guide.

Stay With Your Turf War Team

splatoon 3 turf war victory

Three is less than four. With limited communication, you can’t easily identify and react to faraway threats during Splatoon 3 Turf War. Try to keep your team within gun’s reach, even if you’re tempted to paint some faraway corner. For example: there’s a healthy debate in the Splatoon community over “inking the spawn,” which is not as vulgar as it sounds. Should players stay behind and cover their starting area with ink, since the winning team is the one with the most coverage? There’s a middle ground here. It may be a good idea to spread out a little at the start, but not enough to break up the team. Consistently winning fights is vital to your team’s overall success, and the easiest way to do that is through sheer force of numbers. Control the center first, go for coverage second.

Keep Up With Things

splatoon 3 turf war aerial map

Birds, fish, and Jedi know it, and it’s true in Splatoon as well: Height is power. On several maps, there are alternate paths that lead above the crowd. It’s often worth taking these paths instead of just zerging down the center. From higher up, you can see farther, which helps with assisting your team as mentioned above. It also extends the range of your ink attacks, doubly so if you’re using a long-range weapon.

Pressing the X button pulls up an aerial view of the Turf War battlefield, including the locations of your allies and whether they’ve died recently. This is a good way to track your team, and is also a quick look at the “scoreboard,” since whichever color of ink shows up most is the team that’s ahead. It includes one other feature that’s less obvious: highlighting a teammate and pressing “A” lets you jump to their position!

This jump is a risky maneuver. The spot where you’ll land is visible, and eager enemies can wait to kill you as soon as you arrive. Don’t do it unless your teammate is in a relatively safe spot. Conversely, you should kill any enemy you notice trying to jump near you. If you see a teammate’s name flashing at the bottom of your screen, that’s someone who’s trying to jump to your position. Stay back for a bit and you’ll get an ally delivered to you. If you rush forward, you’ll be responsible for your teammate’s death as well as your own.

Test Everything

splatoon 3 ammo knights firing range

Knowing is half the battle, and there are a lot of battles in Splatoon. The tutorial might be lacking, but there are plenty of ways to learn more about the mechanics on your own. Most useful is the Lobby from which you usually enter Turf War. Its squid-shaped targets pop after taking 100 damage, the same as a player. Knowing this, it’s possible to use them to tell how quickly you can kill with different weapons, and at what range. There’s also a “copy machine” accessed in the room’s options. This is a dummy that attacks you with your chosen weapon. If you’re whining about getting got by a specific weapon, use this function to figure out how to evade it.

Another good test spot is the firing range at the weapon store, Ammo Knights. New players won’t have any idea which of the many weapons to get, but they’re all try-before-you-buy. That includes the ones outside your level range! If you’re not sure where to spend your limited licenses, make sure to experiment with anything that looks interesting before buying. Remember also that using a weapon long enough will earn more licenses for you. The more weapons you actively use, the more you’re allowed to buy.

Take Breaks From Splatoon 3 Turf War

splatoon 3 hero mode intro

Splatoon 3 Turf War is hard. If you lose too much and start to get tilted, you’ll play worse and feel worse. Take breaks when you need to. Even if you’re mainly in it for the team battles, the other modes are worth trying. Hero Mode, the game’s single-player campaign, is a great way to review basic mechanics and ease into those motion controls. Salmon Run is another option, a PvE challenge that’s more about good teamwork and less about being trolled by sweatlords. In a worst-case scenario, you could even consider turning the game off – only in order to get better at Turf War, of course.


Guy Who’s Pretty Good at Rocket League Advances to Next Round of America’s Got Talent

LOS ANGELES — A guy who’s pretty good at Rocket League has wowed the judges and successfully moved onto the next round of NBC’s long running competition show America’s Got Talent.

“Wow, that was really something,” said longtime judge Howie Mandel, after watching contestant Brad Morris win two out of three games in 2v2 at the platinum level. “You hit the ball out of the air a few times, and if I’m not mistaken there was a pass to your teammate at the end there that wasn’t a total lucky coincidence. Just wonderful stuff. You’re going to be a real tough one to beat in this competition, and I can’t wait to see some more of your moves.” 

Morris, who’s been focusing on his mediocre Rocket League game for five years, was surprised at how well the performance went over. 

“I know sometimes they can get a little overzealous with that buzzer when an act isn’t up their alley, so I was definitely worried at first,” he said. “But when I tied the game up at 3-3 with a minute left and Sofia Vargera told me to ‘Fuck their asses up’ as loud as she could, I knew they were into it. It was so cool. So now I’m wondering if I should switch to a different game for the next round, or just keep playing Rocket League for these guys.” 

The Rocket League team were overjoyed to see their game achieve such mainstream recognition. 

“We were ecstatic when Rocket League was so well received upon its release, and we’re even more ecstatic that it continues to be relevant seven years later,” said the game’s director, Thomas Silloway. “To think that years later we have a dedicated fanbase that are still playing regularly despite grappling with the basic mechanics of the game is really a sign that we did something right, I think. And having watched the episode, we’re confident that one day Brad will get the hang of aerial moves.” 

As of press time, Morris had lost in the semifinals to a guy that could play Super Mario Bros. 3 with his butt.

Gaming Convention Lets Fans Try Out This Year’s New Diseases Before Anyone Else

NEW YORK — A yearly gaming convention has drawn gamers from all over the world that are excited to try out next year’s new diseases before anyone else gets to. 

“Oh, now this is really exciting right here,” said games journalist Laurie Stockton of the fever-like symptoms she was experiencing after spending a few hours on the floor of the ButtonFest ’22 convention. “What I’m feeling here are a lot of the typical things associated with an open world disease, phlegm and fatigue and a sore throat, but it’s all been repackaged in such a way that it feels original. I think the breathing public is really going to take to whatever this illness is that I have contracted when it’s released to the public later this year.” 

Many have alleged that it was irresponsible to carry on with the convention as planned despite COVID-19 diagnosis still being prevalent. 

“I get that these conventions and expos have been planned and booked, and that they’ve always been in person in the past,” said Ethan Jones, a concerned games journalist. “But also, we’re still losing a 9/11s worth of people a week to this shit, and as much as we like to pretend it’s completely gone away, there’s just nothing responsible about gathering thousands of people into a big showroom so that they can play video games of all things.” 

“However, I wouldn’t miss it for anything,” he added, coughing on the showroom floor as he played a hands-on demo of Sonic Frontiers.

ButtonFest ’22 organizers have insisted that they’ve conducted this year’s show with the safety of everyone involved in mind. 

“We take the health of our attendees very seriously,” said Richard McKay, one of the festival’s organizers. “And as such, we are adhering closely to the CDC’s most recent guidelines of, ‘Wash your hands often,’ and ‘Hey, you know, maybe don’t sneeze into someone’s mouth while they’re yawning.’ We think if everyone pays close attention to these guidelines, maybe the infectious diseases won’t spread to everyone standing around next to each other here for three days.” 

As of press time, industry insiders confirmed that this year’s new diseases would be free-to-play and available across all regions. 

Stardew Valley Fishing Guide: How to Catch Every Fish, Catchable Item, and Legendary Fish

With a soothing storyline and a slew of activities to enjoy, Stardew Valley can be a haven for gamers who crave a low stress gaming experience. For others, especially those who want to obsessively collect every item in the game, Stardew Valley fishing can be a source of endless frustration. With a total of 72 fishes and catchable items, it can be daunting to complete the collection and earn the Master Angler achievement. Luckily, we’ve got you covered. This guide will cover the locations, weather conditions, time, and equipment needed to successfully catch every fish in Stardew Valley, from albacore to woodskip.

How to Fish in Stardew Valley

Before we dive in and learn how to fish in Stardew Valley, we need to obtain a fishing rod. On the second day of any new game, Willy will ask you to visit the beach before 5:00 pm. After a cutscene, you will receive a bamboo pole from Willy. You can purchase the fiberglass rod after reaching fishing level 2 and the iridium rod at fishing level 6. There is also the training rod, which can make fishing easier but you’ll only be able to catch common fish.

Stardew Valley implements a fishing minigame that can be difficult to grasp at first. After casting your fishing rod in a body of water and getting a bite, the minigame will appear. To catch the fish, you will need to click your left mouse button (or the Use Tool button on consoles) to keep the green bar over the fish icon long enough to fill your progress bar. Holding the mouse button will raise the bar, while letting go of the button will lower the bar. Since the fish icon is somewhat unpredictable and the green bar can be tough to control, many players struggle with fishing. 

It may be helpful to rapidly tap and release the left mouse button instead of holding, as you’ll be able to control the upward motion in minor increments. Additionally, the size of the green bar will increase as you level up. At level 6, the iridium rod will allow you to use different bobbers which can make the fishing minigame easier. Finally, there’s no shame in using mods to make catching fish easier. 

How to Catch Every Fish in Stardew Valley

Now that you know how to fish in Stardew Valley, here’s how to catch every fish in the game. Stardew Valley fish have specific locations (see map below), time, seasons, weather conditions, and equipment requirements in order to be caught. Every fish and their respective catch condition can be found in the tables below.

Name Location Time Season Weather Equipment
Albacore Ocean 6am – 11am, 6pm-2am Fall, Winter Any Bamboo, Fiberglass, and Iridium Poles
Anchovy Ocean Anytime Spring, Fall Any Any Fishing Pole
Blobfish Night Market 5pm – 2am Winter 15-17 Any Bamboo, Fiberglass, and Iridium Poles
Blue Discus Ginger Island Anytime All Seasons Any Bamboo, Fiberglass, and Iridium Poles
Bream River (Town & Forest) 6pm – 2am All Seasons Any Any Fishing Pole
Bullhead Mountain Lake Anytime All Seasons Any Any Fishing Pole
Carp Mountain Lake, Secret Woods Pond, The Sewers Anytime All Seasons Any Any Fishing Pole
Catfish River (Town & Forest), Secret Woods Pond, Witch’s Swamp 6am – 12am Spring, Fall, (Spring, Summer in Secret Woods Pond) Rain Bamboo, Fiberglass, and Iridium Poles
Chub River (Forest), Mountain Lake Anytime All Seasons Any Bamboo, Fiberglass, and Iridium Poles
Cockle Ocean Anytime All Seasons Any Crab Pot
Crab Ocean Anytime All Seasons Any Crab Pot
Crayfish Freshwater Anytime All Seasons Any Crab Pot
Dorado River (Forest) Anytime All Seasons Any Bamboo, Fiberglass, and Iridium Poles
Eel Ocean 4pm – 2am Spring, Fall Rain Bamboo, Fiberglass, and Iridium Poles
Flounder Ocean, Ginger Island (Ocean) 6am – 8pm Spring, Summer, (All Seasons on Ginger Island) Any Bamboo, Fiberglass, and Iridium Poles
Ghostfish Mines (20F, 60F), item drop from Ghost Anytime All Seasons Any Bamboo, Fiberglass, and Iridium Poles
Green Algae Freshwater, item drop from Green Slime Anytime All Seasons Any Any Fishing Pole
Halibut Ocean 6am – 11am, 7pm – 2am Spring, Summer, Winter Any Bamboo, Fiberglass, and Iridium Poles
Herring Ocean Anytime Spring, Winter Any Any Fishing Pole
Ice Pip Mines (60F) Anytime All Seasons Any Bamboo, Fiberglass, and Iridium Poles
Largemouth Bass Mountain Lake 6am – 7pm All Seasons Any Bamboo, Fiberglass, and Iridium Poles
Lava Eel Mines (100F), Ginger Island (Volcano Caldera) Anytime All Seasons Any Bamboo, Fiberglass, and Iridium Poles
Lingcod River (Town & Forest), Mountain Lake Anytime Winter Any Bamboo, Fiberglass, and Iridium Poles
Lionfish Ginger Island Anytime All Seasons Any Bamboo, Fiberglass, and Iridium Poles
Lobster Ocean Anytime All Seasons Any Crab Pot
Midnight Carp Mountain Lake, Forest Pond, Ginger Island 10pm – 2am Fall, Winter, (All Seasons on Ginger Island) Any Bamboo, Fiberglass, and Iridium Poles
Midnight Squid Night Market 5pm – 2am Winter 15-17 Any Bamboo, Fiberglass, and Iridium Poles
Mussel Ocean Anytime All Seasons Any Crab Pot
Octopus Ocean 6am – 1pm Summer Any Bamboo, Fiberglass, and Iridium Poles
Oyster Ocean Anytime All Seasons Any Crab Pot
Perch River (Town & Forest), Forest Pond, Mountain Lake Anytime Winter Any Any Fishing Pole
Periwinkle Freshwater Anytime All Seasons Any Crab Pot
Pike River (Town & Forest), Forest Pond Anytime Summer, Winter Any Bamboo, Fiberglass, and Iridium Poles
Pufferfish Ocean, Ginger Island (Ocean) 12pm – 4pm Summer, (All Seasons on Ginger Island) Sunny Bamboo, Fiberglass, and Iridium Poles
Rainbow Trout River (Town & Forest), Mountain Lake 6am – 7pm Summer Sunny Any Fishing Pole
Red Mullet Ocean 6am – 7pm Summer, Winter Any Bamboo, Fiberglass, and Iridium Poles
Red Snapper Ocean 6am – 7pm Summer, Fall, Winter (Rain Totem) Rain Any Fishing Pole
Salmon River (Town & Forest) 6am – 7pm Fall Any Bamboo, Fiberglass, and Iridium Poles
Sandfish The Desert 6am – 8pm All Seasons Any Bamboo, Fiberglass, and Iridium Poles
Sardine Ocean 6am – 7pm Spring, Fall, Winter Any Any Fishing Pole
Scorpion Carp The Desert 6am – 8pm All Seasons  Any Bamboo, Fiberglass, and Iridium Poles
Sea Cucumber Ocean 6am – 7pm Fall, Winter Any Any Fishing Pole
Seaweed Ocean Anytime All Seasons Any Any Fishing Pole
Shad River (Town & Forest) 9am – 2am Spring, Summer, Fall Rain Any Fishing Pole
Shrimp Ocean Anytime All Seasons Any Crab Pot
Slimejack The Sewers (Mutant Bug Lair) Anytime All Seasons Any Bamboo, Fiberglass, and Iridium Poles
Smallmouth Bass River (Town), Forest Pond Anytime Spring, Fall Any Any Fishing Pole
Snail Freshwater Anytime All Seasons Any Crab Pot
Spook Fish Night Market 5pm – 2am Winter 15-17 Any Bamboo, Fiberglass, and Iridium Poles
Squid Ocean 6pm – 2am Winter Any Bamboo, Fiberglass, and Iridium Poles
Stingray Ginger Island (Pirate Cove) Anytime All Seasons Any Bamboo, Fiberglass, and Iridium Poles
Stonefish Mines (20F) Anytime All Seasons Any Bamboo, Fiberglass, and Iridium Poles
Sturgeon Mountain Lake 6am – 7pm Summer, Winter Any Bamboo, Fiberglass, and Iridium Poles
Sunfish River (Town & Forest) 6am – 7pm Spring, Summer Sunny, Windy Any Fishing Pole
Super Cucumber Ocean, Ginger Island (Ocean) 6pm – 2am Summer, Fall, (All Seasons on Ginger Island) Any Bamboo, Fiberglass, and Iridium Poles
Tiger Trout River (Town & Forest) 6am – 7pm Fall, Winter Any Bamboo, Fiberglass, and Iridium Poles
Tilapia Ocean, Ginger Island (Rivers) 6am – 2pm Summer, Fall, (All Seasons on Ginger Island) Any Bamboo, Fiberglass, and Iridium Poles
Tuna Ocean, Ginger Island (Ocean) 6am – 7pm Summer, Winter, (All Seasons on Ginger Island) Any Bamboo, Fiberglass, and Iridium Poles
Void Salmon Witch’s Swamp Anytime All Seasons Any Bamboo, Fiberglass, and Iridium Poles
Walleye River (Town & Forest), Forest Pond, Mountain Lake 12pm – 2am Fall, Winter (Rain Totem) Rain Any Fishing Pole
White Algae Underground Locations, item drop from several monsters Anytime All Seasons Any Any Fishing Rod
Woodskip Secret Woods Pond, Forest Farm Anytime All Seasons Any Bamboo, Fiberglass, and Iridium Poles

*Information retrieved from https://stardewvalleywiki.com/Fish*

How to catch legendary fish

To complete the fish collection and earn the Master Angler achievement, there are 5 legendary fish that need to be caught. These fish are rarer and harder to catch than the fish above. Additionally, they can only be found in specific locations and can only be caught once per save file. 

With the latest 1.5 update, Stardew Valley has added five more legendary fish, bringing the total to 73 catchable items. These fish can only be caught during Mr. Qi’s Extended Family Quest, but they are not required to earn the Master Angler achievement. These will be marked below with asterisks. 

Name Location Time Season Weather Equipment
Angler River (Town), above JojaMart on plank bridge Anytime Fall Any Any Fishing Rod, requires fishing level 3
Ms. Angler* River (Town), above JojaMart on plank bridge Anytime All Seasons Any Any Fishing Rod, requires fishing level 3

Name Location Time Season Weather Equipment
Crimsonfish East Pier on Beach Anytime Summer Any Any Fishing Rod, require fishing level 5
Son of Crimsonfish* East Pier on Beach Anytime All Seasons Any Any Fishing Rod, require fishing level 5

Name Location Time Season Weather Equipment
Glacierfish Southernmost tip of Arrowhead Island in Cindersap Forest Anytime Winter Any Any Fishing Rod, requires fishing level 6
Glacierfish Jr.* Southernmost tip of Arrowhead Island in Cindersap Forest Anytime All Seasons Any Any Fishing Rod, requires fishing level 6

Name Location Time Season Weather Equipment
Legend Mountain Lake, near underwater log Anytime Spring Rain Any Fishing Rod, requires fishing level 10
Legend II* Mountain Lake, near underwater log Anytime All Seasons Any Any Fishing Rod, requires fishing level 10

Name Location Time Season Weather Equipment
Mutant Carp The Sewers Anytime All Seasons Any Any Fishing Rod
Radioactive Carp* The Sewers Anytime All Seasons Any Any Fishing Rod

*Information retrieved from https://stardewvalleywiki.com/Fish*

Other Helpful Fishing Tips

Now that we’ve gone over where and how to catch every fish in Stardew Valley, we can discuss some helpful tips to complete your collection. From constructing Stardew Valley fishing ponds to learning how to put bait on your fishing rod, we’ve got you covered.

How to Put Bait on Fishing Rods in Stardew Valley

Once you upgrade to the Fiberglass rod, you will have the option to use bait. Bait can be crafted with Bug Meat or bought at Willy’s Fish Shop. To equip the bait on your rod, open your inventory and pick up your bait using the left click. Then hover over your fishing rod and right click to equip the bait. Additionally, you can put bait in crab pots by right clicking the pot once it’s placed in the water. 

There are four types of bait. Regular bait will shorten the time it takes for a fish to bite. The magnet will increase your chances to fish up some treasure. Like regular bait, wild bait will shorten the time it takes for a fish to bite. And lastly, magic bait can be used to catch fish from any season, time, and location, from the water you casted in. 

Tackles

Once you have purchased the iridium rod, you will be able to use both bait and tackles. There are few different tackle options, starting with the Spinner and the Dressed Spinner, which both increase the bite rate of fish. The Trap Bobber lengthens the time it takes for a fish to escape. The Cork Bobber increases the size of your fishing bar and the Lead Bobber prevents the green bar from bouncing at the bottom. The Treasure Hunter bobber increases your chances to find treasure. The Barbed Hook makes it easier to catch fish by having the green bar follow the fish. Finally, the Curiosity Bobber increases your chances to catch a rare fish and the Quality Bobber increases the quality of caught fish. 

Stardew Valley Fish Ponds

Fish ponds can be built using Robin’s carpentry shop for the price of 5,000 gold, 200 stone, 5 seaweed, and 5 green algae. Once constructed, you can place a fish into the pond and it will begin reproducing. The fish produce various items depending on which fish are in the pond. Additionally, you can fish in the pond to remove the reproduced fish and sell them for a profit. 

Bubbles and Fishing Stat Buffs from Recipes

Occasionally, bubbles will appear in a body of water. If you cast your line into these bubbles, fish will bite much faster. These bubbles are rare and eventually dissipate, so it’s important to get the most out of it while it lasts.

Some recipes can temporarily increase your fishing level. With a higher fishing level, the green bar in the minigame will increase in size. Recipes for Dish O’ The Sea and Seafoam Pudding can be learned after reaching fishing level 3 and 9, respectively. Chowder, Escargot, Fish Stew, Lobster Bisque can be learned from Willy after reaching certain heart levels. Linus will share his Fish Taco recipe once you have 7 hearts with him. Finally, you can learn Maple Bar, Shrimp Cocktail, and Trout Soup from The Queen of Sauce on the television. 

And that’s that! Completing the fish collection is a tough task, but it’s one of the most rewarding experiences in Stardew Valley. Additionally, you’ll receive the Master Angler achievement, which you can proudly boast to all your friends. Now, go out and channel your inner Ash Ketchum to catch them all!

Persona 5 Royal: How to Defeat the Reaper

Across the Persona series, there are plenty of incredibly tough enemies. Perhaps the most feared is The Reaper, an entity that shows up again in Persona 5 Royal when the Phantom Thieves stay too long on any floor in Mementos. In the original Persona 5, players could exploit the game’s Flu Season to defeat The Reaper with embarrassing ease. For Persona 5 Royal, this crippling weakness has been fixed and The Reaper is at full power. Luckily, it isn’t too difficult to exploit another key weakness in the Persona 5 Royal Reaper and defeat it with minimal casualties. We’re here to tell you everything you need to know to beat The Reaper.

The Reaper in Persona 5 Royal is level 85, but players can be fit to challenge it from around level 60 if they’re well-prepared and equipped with the right items. This would place the ideal time to face The Reaper as anytime after the sixth Palace. The Reaper has no weaknesses or resistances, so there should be no reservation about going all out. To get The Reaper to appear, go to any floor in Mementos and find a spot to just wait. It may help to go to an early floor so that the weak enemies run away from you so you don’t accidentally reset the clock with a fight.

When you hear those ominous chains start rattling and Morgana tells you to be careful, that means The Reaper is somewhere on the floor. Drive around and find him, but do not initiate a battle. Against all logic, you should let The Reaper ambush you. This will cause The Reaper to get one turn instead of two turns in a row.

How to Prepare for The Reaper

There is only one item or skill you really need to have in the bag to take on Persona 5 Royal’s Reaper and that’s something that repels any magic except Almighty. The skill Makarakarn does exactly this. It can be learned by Haru at level 44. If she has forgotten it, she can be sent to the confessional at the Chapel in Kanda (where you regularly meet Star Confidant, Hifumi). If Joker needs to summon a Persona that knows the spell, it is a default skill of Arahabaki, who can be found in Okumura’s Palace or Mementos. It is also a default skill of Scathach and Lilith, who need to be created by fusion. To see what you need to make these Personas, we recommend using the Persona 5 Royal Fusion Calculator created by chinhodato

The even easier alternative is to have an item called Magic Ointment. It does the exact same thing as Makarakarn and can be used by anyone. The catch is that it is only regularly available from Takemi’s Clinic if you get the Death Confidant to Rank 10. If you manage to do so, they only cost 4,000 yen. 

Finally, because you’ll need The Reaper to ambush you, a Persona that knows Thermopylae can be clutch for extra help. Thermopylae allows you to pump up everyone in the party’s ATK, DEF, and Accuracy/Evasion at once if you’re surrounded.

Fighting The Reaper

Once The Reaper ambushes you, it will pump itself up with Concentrate. Your first move should be to block the incoming charged attack. From there, use Thermopylae and heal up if needbe. At least one party member should cast Makarakarn or use the Magic Ointment. It does not matter who you choose to give the shield to.

Normally, The Reaper would attack the party with elemental skills that target specific weaknesses. However, with the Makarakarn/Magic Ointment shield up, it will get stuck in an indefinite loop of using Concentrate and then Megidolaeon, which deals Almighty damage to the whole party. This makes it incredibly easy to to attack it with everything you have after it uses Megidolaeon and then block after it uses Concentrate. Restore health and SP when needed, most likely with Morgana or items like Leblanc Coffee.

In addition to all the buffs you can give yourself, a new wrinkle in any Persona 5 Royal Reaper fight is that your Showtime finishers can become more frequently available. They usually activate when an enemy is near death, but they also can be prompted when your back is against the wall or in a tight spot, i.e. getting ambushed. These should allow you to do even more massive damage to The Reaper. This cycle, when paired with your ability to massively increase EXP gained in Mementos via Jose, can make the Persona 5 Royal Reaper prime farming and level grinding material.

Upon defeat, The Reaper will sometimes drop the Divine Pillar accessory, which halves all damage done to the wearer.

Persona 5 Royal is now available on PlayStation 4 and releases on PlayStation 5, Xbox One, Xbox One Series X/S, Nintendo Switch, and PC October 21st.  

Nintendo Announces Next Direct Will Be Scheduled for the Exact Time Your Boss Checks In for a One-on-One

REDMOND, Wash. — Nintendo announced today that their next Nintendo Direct will be streamed live precisely when your boss shoots you a request to hop on a call. 

“We love how much our fans are anticipating our next exciting Nintendo Direct, and we can’t wait to show off our upcoming releases for the Nintendo Switch system,” said Nintendo of America President Doug Bowser. “That’s why we’re so excited to be working with bosses across the nation to schedule check-ins right as the Direct presentation begins so we can draw out that anticipation for an extra 15 to 30 minutes. This next direct’s gonna be 40 minutes, too, so don’t even think about trying to just show up late to your meeting to catch the whole thing. You’ll have to just half pay attention to what’s trending on Twitter like all the other chumps.”

Managers and supervisors are eagerly printing quarterly sales and customer feedback reports to go over as Nintendo potentially reveals rumored games like a Switch release of The Legend of Zelda: The Wind Waker HD or the long awaited Metroid Prime remaster.

“We’re headed into the end of the third quarter here, so let’s hop on a Zoom and chat generally about how things are going,” said your boss, Kurt, currently taking a quick scroll through your availability. “Nintendo has been an amazing partner in helping to set this up, and we’re narrowing in on a time between 9:00am PST/11:00am CST/12:00pm EST and 2:00pm PST/4:00pm CST/5:00pm EST. Do any of those times work for you?”

Bowser reassured Nintendo fans feeling frustrated that they are going to be unable to view the Direct presentation live because of work obligations.

“Here at Nintendo, we’re keenly aware of how tough it can be to balance everyday work and the fun, inviting portfolio of games coming to the Nintendo Switch system in the first half of 2023, which is why we’re going to keep the fun going with a Treehouse Live presentation directly after the conclusion of the Direct in which I will conduct a performance review of our Head of Marketing.”

At press time, the CEO of your company just sent out an invite to an All Hands Business Update scheduled to begin halfway through the next PlayStation State of Play.