There are tons of rare pokemon to find in Pokemon Scarlet and Violet, along with the series staple of shinies. Hunting these critters down can be tricky and time consuming, but luckily, the game has a mechanic built in to help with this: food. There are a variety of restaurants across Paldea that serve scrumptious goodies which can boost various stats while you’re out capturing monsters. To make the most of these boosts, make sure you’re buying the Pokemon Scarlet & Violet restaurant meals that will benefit your quest the most, whether it’s training a certain Pokemon type up, raising eggs, or searching for rare mons.
Pokemon Scarlet & Violet Restaurant Meals: Go-For-Broke Grill

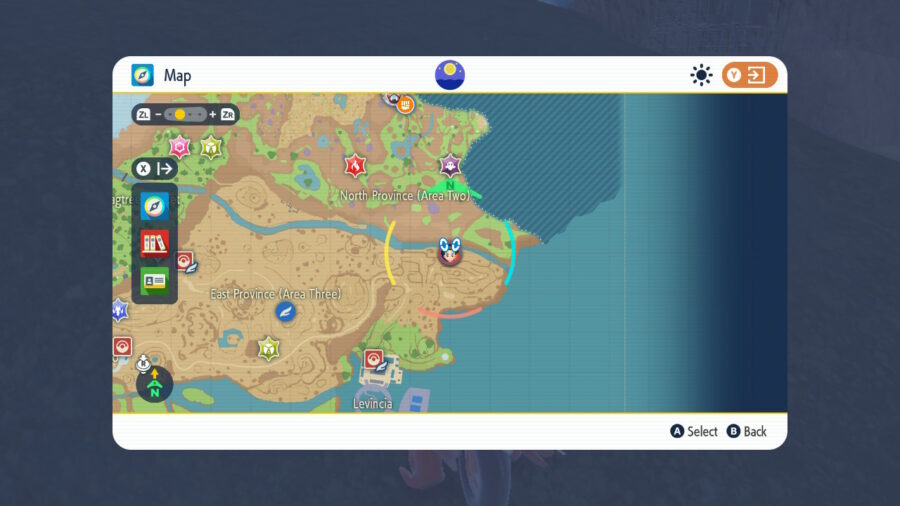
Locations: Cascarrafa, Mesagoza, Artazon, Levincia, Medali
- Paella de Paldea – P1,800
- Humungo Power: Dark Lv. 1
- Egg Power: Lv. 1
- Item Drop Power Water: Lv. 1
- Fruit Punch – P950
- Catching Power: Psychic Lv. 1
- Encounter Power: Fairy Lv. 1
- Teensy Power: Water Lv. 1
- Escalivada – P1,500
- Raid Power: Ice Lv. 1
- Encounter Power: Dragon: Lv. 1
- Exp. Point Power: Psychic Lv. 1
- Potato Tortilla – P1,600
- Item Drop Power: Poison Lv. 1
- Humungo Power: Grass Lv. 1
- Egg Power: Lv. 1
- Klawf al Ajillo – P1,500
- Encounter Power: Electric Lv. 1
- Exp. Point Power: Rock Lv. 1
- Raid Power: Fairy Lv. 1
Gastronomie en Famille Meals
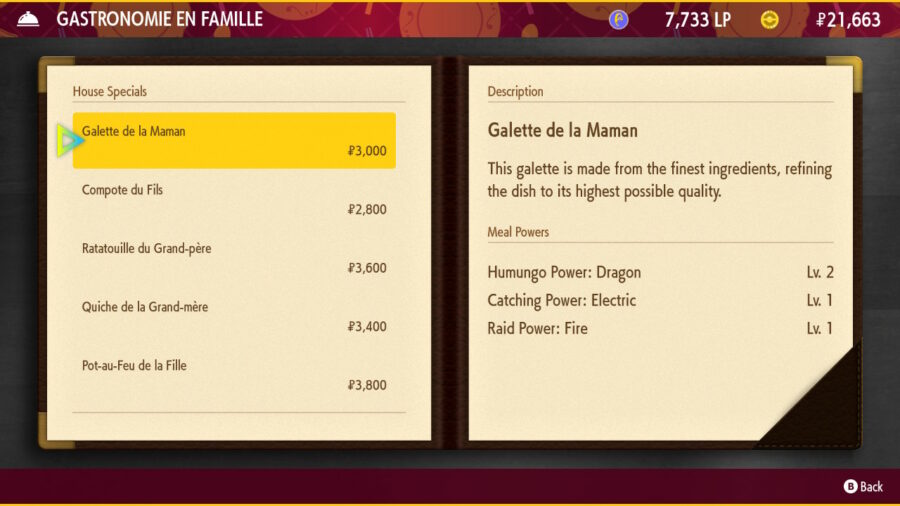
Locations: Cascarrafa, Medali, Alfornado
- Galette de la Maman – P3,000
- Humungo Power: Dragon Lv. 2
- Catching Power: Electric Lv. 1
- Raid Power: Fire Lv. 1
- Compote du Fils – P2.800
- Egg Power: Lv. 2
- Exp. Point Power: Flying Lv. 1
- Encounter Power: Fairy Lv. 1
- Ratatouille du Grand-père – P3,600
- Item Drop Power: Psychic Lv. 2
- Encounter Power: Ice Lv. 1
- Catching Power: Rock Lv. 1
- Quiche de la Grand-mère – P3,400
- Catching Power: Ice Lv. 2
- Exp. Point Power: Fairy Lv. 1
- Egg Power: Lv. 1
- Pot-au-Feu de la Fille – P3,800
- Teensy Power: Steel Lv. 2
- Item Drop Power: Fire Lv. 1
- Exp. Point Power: Flying Lv. 1
Jade Palace Garden – Pokemon Scarlet & Violet Meals
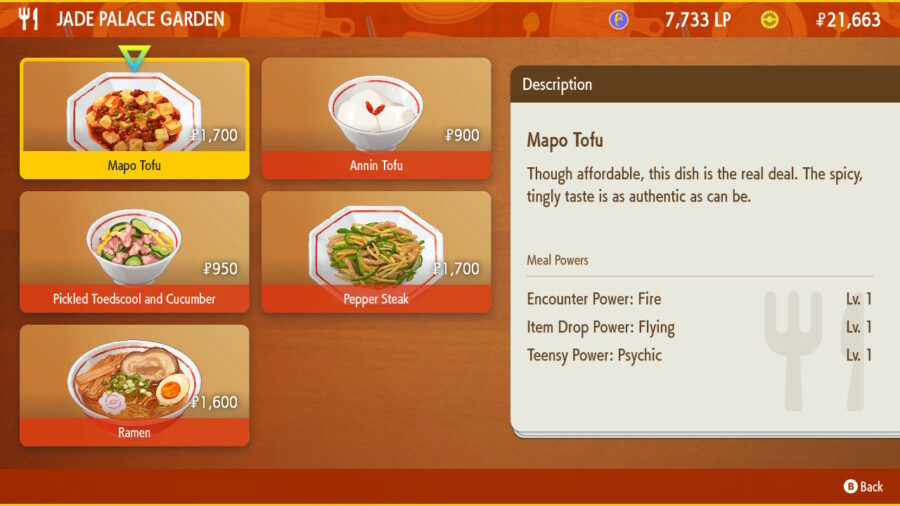
Locations: Cascarrafa, Levincia, Medali
- Mapo Tofu – P1,700
- Encounter Power: Fire Lv. 1
- Item Drop Power: Flying Lv. 1
- Teensy Power: Psychic Lv. 1
- Annin Tofu – P900
- Egg Power: Lv. 1
- Raid Power: Ghost Lv. 1
- Teensy Power: Ice Lv. 1
- Pickled Toedscool and Cucumber – P950
- Teensy Power: Ghost Lv. 1
- Egg Power: Lv. 1
- Item Drop Power: Rock Lv. 1
- Pepper Steak – P1,700
- Item Drop Power: Poison Lv. 1
- Teensy Power: Grass Lv. 1
- Egg Power: Lv. 1
- Ramen – P1,600
- Humungo Power: Ground Lv. 1
- Catching Power: Normal Lv. 1
- Raid Power: Dark Lv. 1
Sugar-N-Ice
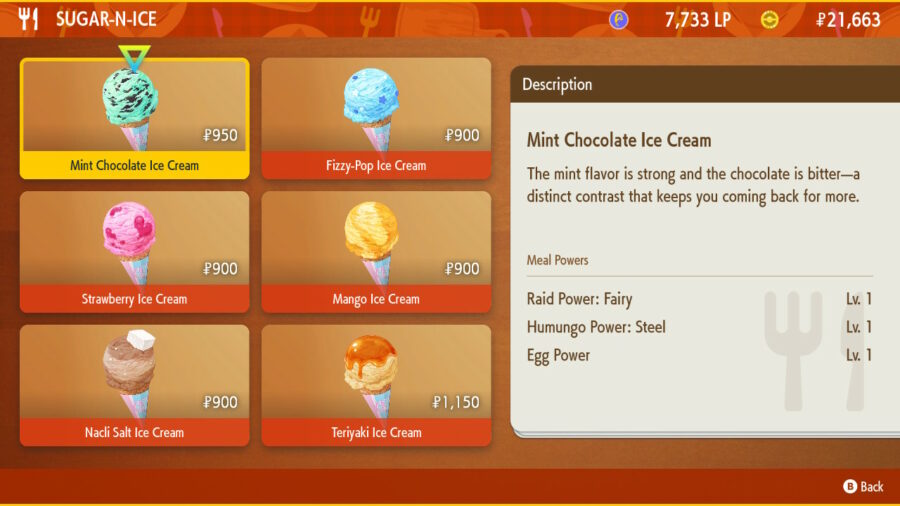
Locations: Cortondo, Cascarrafa, Mesagoza, Los Platos, Artazon, Levincia, Medali
- Mint Chocolate Ice Cream – P950
- Raid Power: Fairy Lv. 1
- Humungo Power: Steel Lv. 1
- Egg Power: Lv. 1
- Fizzy Pop Ice Cream – P900
- Exp Point Power: Normal Lv. 1
- Catching Power: Water Lv. 1
- Humungo Power: Fire Lv. 1
- Strawberry Ice Cream – P900
- Egg Power: Lv. 1
- Exp. Point Power: Water Lv. 1
- Raid Power: Rock Lv. 1
- Mango ICe Cream – P900
- Teensy Power: Normal Lv. 1
- Raid Power: Dragon Lv. 1
- Catching Power: Electric Lv. 1
- Nacli Salt Ice Cream – P900
- Humungo Power: Ice Lv. 1
- Item Drop Power: Grass Lv. 1
- Catching Power: Dark Lv. 1
- Teriyaki Ice Cream – P1,150
- Humungo Power: Ice Lv. 1
- Item Drop Power: Grass Lv. 1
- Catching Power: Dark Lv. 1
Chic Kebab: Pokemon Scarlet/Violet Restaurant Meals

Locations: Cascarrafa, Mesagoza, Artzon, Levincia, Zapapico
- Pinchitos – P1,200
- Item Drop Power: Dark Lv. 1
- Teens Power: Dragon Lv. 1
- Exp. Point Power: Rock Lv. 1
- Grilled Rice Balls
- Encounter Power: Fairy Lv. 1
- Teensy Power: Electric Lv. 1
- Egg Power: Lv. 1
Every Wich Way

Locations: Cortondo, Cascarrafa, Mesagoza, Artazon, Levincia, Zapapico, Medali, Montenevra, Alfornada
- Zesty Sandwich – P1,750
- Humungo Power: Psychic Lv. 1
- Exp. Point Power: Fighting Lv. 1
- Encounter Power: Water Lv. 1
- Jam Sandwich – P850
- Catching Power: Fighting Lv. 1
- Item Drop Power: Psychic Lv. 1
- Egg Power Lv. 1
- Tropical Sandwich – P1,450
- Egg Power: Lv. 1
- Encounter Power: Fighting Lv. 1
- Catching Power: Dragon Lv. 1
- Marmalade Sandwich – P950
- Item Drop Power: Fighting Lv. 1
- Catching Power: Rock Lv. 1
- Egg Power: Lv. 1
- Avocado Sandwich – P1,200
- Exp. Point Power: Dragon Lv. 1
- Encounter Power: Electric Lv. 1
- Catching Power: Dark Lv. 1
All Pokemon Scarlet & Violet Meals: Kanto Crepes
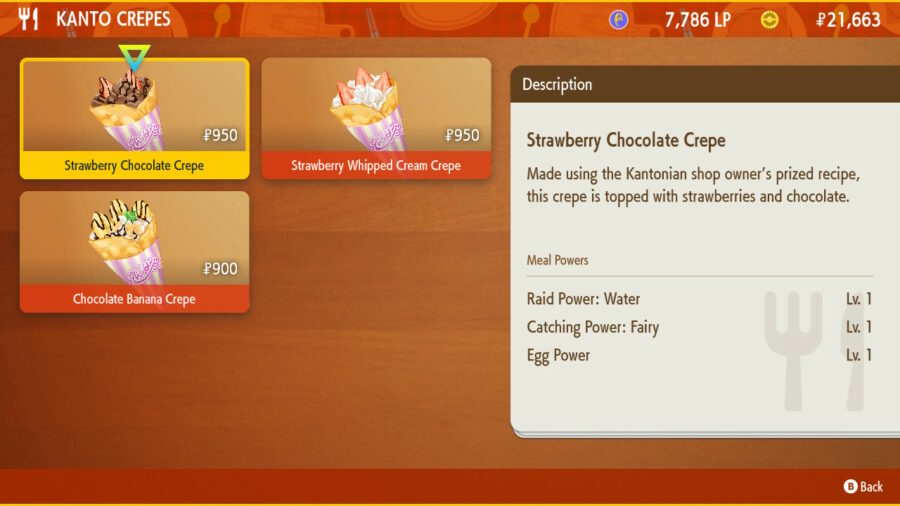
Locations: Mesagoza, Artazon, Levincia, Zapapico, Medali
- Strawberry Chocolate Crepe – P950
- Raid Power: Water Lv. 1
- Catching Power: Fairy Lv. 1
- Egg Power Lv. 1
- Strawberry Whipped Cream Crepe – P950
- Exp. Point Power: Ground Lv. 1
- Humungo Power: Ice Lv. 1
- Encounter Power: Electric Lv. 1
- Chocolate Banana Crepe – P900
- Egg Power: Lv. 1
- Encounter Power: Water Lv. 1
- Teensy Power: Steel Lv. 1
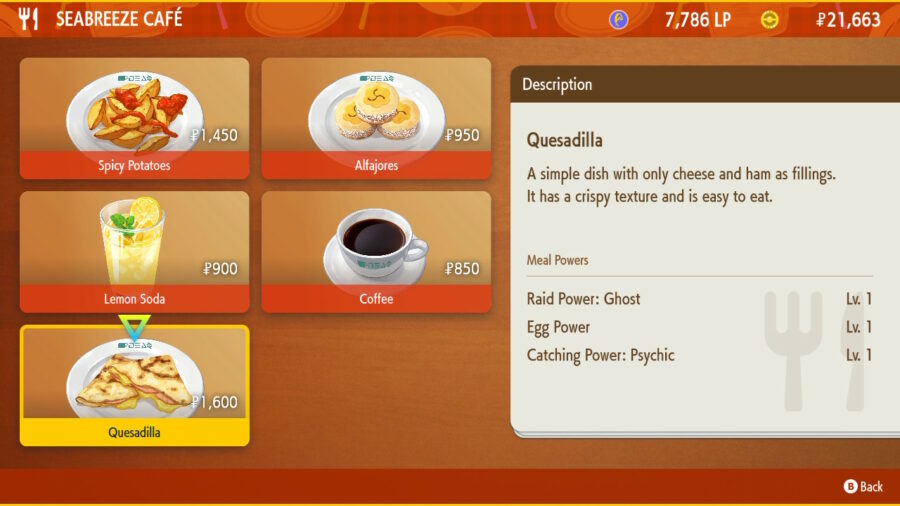
Seabreeze Cafe
Locations: Mesagoza, Artazon, Levincia, Zapapico, Medali, Alfornado
- Spicy Potatoes – P1,450
- Encounter Power: Dragon Lv. 1
- Teensy Power: Dark Lv. 1
- Exp. Point Power: Grass Lv. 1
- Alfajores – P950
- Raid Power: Fighting Lv. 1
- Catching Power: Steel Lv. 1
- Hunungo Power: Dark Lv.1
- Lemon Soda – P900
- Teensy Power: Dark Lv. 1
- Egg Power: Lv. 1
- Exp. Point Power: Water Lv. 1
- Coffee – P850
- Item Drop Power: Water Lv. 1
- Exp. Point Power: Grass Lv. 1
- Humungo Power: Steel Lv. 1
- Quesadilla – P1,600
- Raid Power: Ghost Lv. 1
- Egg Power: Lv. 1
- Catching Power: Psychic Lv. 1
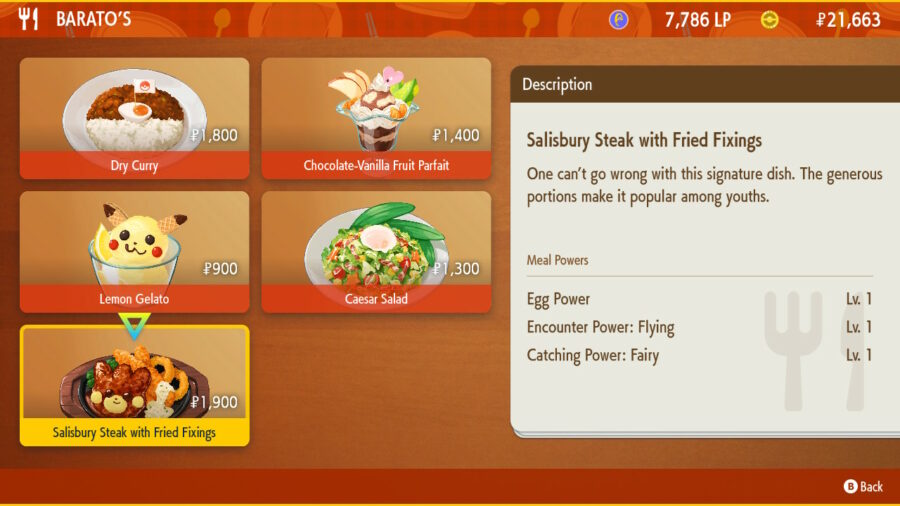
Pokemon Scarlet & Violet’s Restaurant Meals – Barato’s
Locations: Mesagoza, Artazon
- Dry Curry – P1,800
- Humungo Power: Fairy Lv. 1
- Raid Power: Ground Lv. 1
- Catching Power: Water Lv. 1
- Chocolate-Vanilla Fruit Parfait – P1,400
- Catching Power: Ground Lv. 1
- Item Drop Power: Dark Lv. 1
- Exp Point Power: Poison Lv. 1
- Lemon Gelato – P900
- Item Drop Power: Ghost Lv. 1
- Humungo Power: Rock Lv. 1
- Exp. Point Power: Normal Lv. 1
- Caesar Salad – P1,300
- Exp. Point Power: Flying Lv. 1
- Teeny Power: Normal Lv. 1
- Item Drop Power: Fire Lv. 1
- Salisbury Steak with Fried Fixings
- Egg Power: Lv. 1
- Encounter Power: Flying Lv. 1
- Catching Power: Fairy Lv. 1
Smoochurro Restaurant Meals – Pokemon Scarlet & Violet

Locations: Mesagoza, Artazon, Lavincia, Medali
- Churro – P 850
- Exp. Point Power: Psychic Lv. 1
- Catching Power: Ground Lv. 1
- Teensy Power: Fire Lv. 1
- Chocolate Churro – P950
- Encounter Power: Psychic Lv. 1
- Item Drop Power: Bug Lv. 1
- Raid Power: Normal Lv. 1
- Cinnamon Churro – P900
- Catching Power: Dragon Lv. 1
- Egg Power: Lv. 1
- Teensy Power: Grass Lv. 1
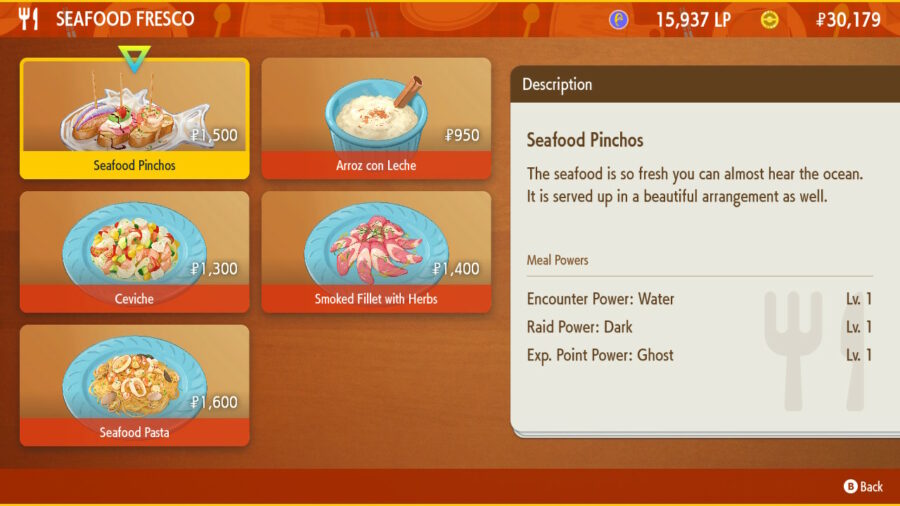
Seafood Fresco
Locations: Lavincia, Medali, Montenevra
- Seafood Pinchos – P1,500
- Encounter Power: Water Lv. 1
- Raid Power: Dark Lv. 1
- Exp. Point Power: Ghost Lv. 1
- Arroz con Leche – P950
- Item Drop Power: Steel Lv. 1
- Catching Power: Grass Lv. 1
- Humungo Power: Ground Lv. 1
- Ceviche – P1,300
- Humungo Power: Bug Lv. 1
- Exp. Point Power: Fighting Lv. 1
- Item Drop Power: Ground Lv. 1
- Smoked Fillet with Herbs – P1,400
- Egg Power: Lv. 1
- Teensy Power: Ghost Lv. 1
- Exp. Point Power: Fairy Lv. 1
- Seafood Plate – P1,600
- Teensy Power: Grass Lv. 1
- Item Drop Power: Rock Lv. 1
- Raid Power: Flying Lv. 1
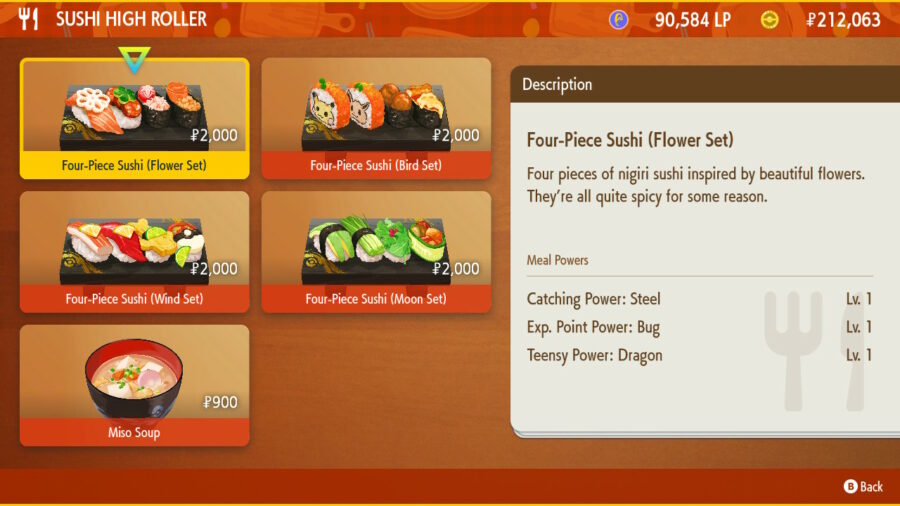
Pokemon Scarlet/Violet Meals: Sushi High Roller
Locations: Lavincia, Medali
- Four-Piece Sushi (Flower Set) – P2,000
- Catching Power: Steel Lv. 1
- Exp. Point Power: Bug Lv. 1
- Teensy Power: Dragon Lv. 1
- Four-Piece Sushi (Bird Set) – P2,000
- Teensy Power: Electric Lv. 1
- Catching Power: Dragon Lv. 1
- Raid Power: Grass Lv. 1
- Four-Piece Sushi (Wind Set) – P2,000
- Item Drop Power: Rock Lv. 1
- Teensy Power: Ice Lv. 1
- Exp. Point Power: Bug Lv. 1
- Four-Piece Sushi (Moon Set) – P2,000
- Exp. Point Power: Fighting Lv. 1
- Raid Power: Ground Lv. 1
- Egg Power Lv. 1
- Miso Soup – P900
- Humungo Power: Flying Lv. 1
- Item Drop Power: Water Lv. 1
- Catching Power: Ice Lv. 1
Treasure Eatery Meals in Pokemon Scarlet & Violet

Locations: Medali
- Mustard Rice Ball – P750
- Encounter Power: Rock Lv. 1
- Catching Power: Ice Lv. 1
- Humungo Power: Electric Lv. 1
- Sweet Adzuki Bean Soup – P800
- Exp. Point Power: Normal Lv. 1
- Item Drop Power: Steel Lv. 1
- Encounter Power: Poison Lv. 1
- Homemade Umeboshi – P500
- Teensy Power: Fire Lv. 1
- Exp. Point Power: Ghost Lv. 1
- Egg Power: Lv. 1
- Bitter Melon Stir-Fry – P950
- Item Drop Power: Ground Lv. 1
- Humungo Power: Ghost Lv. 1
- Encounter Power: Rock Lv. 1
- Soba Noodle Soup – P920
- Egg Power: Lv. 1
- Encounter Power: Fire Lv. 1
- Raid Power: Grass Lv. 1
Kofu Lounge

- Dandan Noodles – P3,600
- Item Drop Power: Fire Lv. 2
- Humngo Power: Grass Lv. 1
- Egg Power: Lv. 1
- Tofu Pudding – P3,000
- Exp. Point Power: Poison Lv. 2
- Encounter Power: Psychic Lv. 1
- Raid Power: Ice Lv.1
- Hot and Sour Soup – P3,200
- Egg Power: Lv. 2
- Item Drop Power: Fairy Lv. 1
- Humungo Power: Fighting Lv. 1
- Oolong Tea – P2,800
- Teensy Power: Dragon Lv. 2
- Catching Power: Ghost Lv. 1
- Item Drop Power: Ice Lv. 1
- House Special Hot Pot – P3,800
- Humungo Power: Rock Lv. 2
- Exp. Point Power: Psychic Lv. 1
- Catching Power: Steel