Resident Evil 4 Photo Mode Guide: How to Use Photo Mode

There’s no denying that anyone picking up the brand-new Resident Evil 4 remake is looking for some classic survival horror vibes and new features, including a photo mode. And while the game is partially aimed at bringing a beloved entry in the franchise to a new era of fans, those who grew up with the original are in for a nostalgic treat unlike anything Capcom’s remakes have achieved thus far. 

All of that being said, there are new memories to make in this updated version of the game, which is why you may want to snap a few screenshots of your time in its creepy Spanish village. If you’re confused as to how to access the photo mode, though, don’t feel bad – it’s easy to miss. Here’s how to use it.

How to use Photo Mode in Resident Evil 4

How to use Photo Mode in Resident Evil 4 Remake.

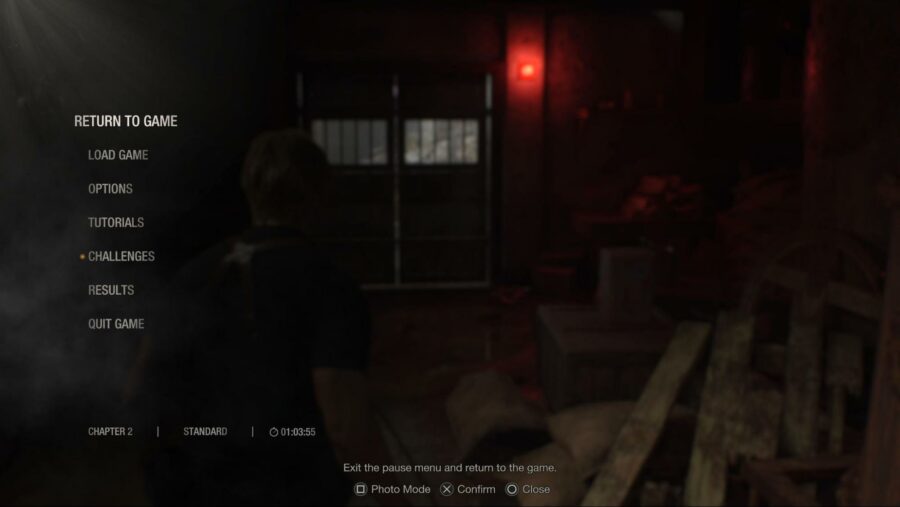
To access Resident Evil 4‘s photo mode, simply pause the game and look down at the bottom of the screen to see a prompt for it. While that sounds easy enough, it’s rather easily overlooked for those used to being able to engage with photo modes by pressing a certain button mid-action. Either way, once you press the corresponding button, you’ll be free to start playing around with quite a lot of options.

Resident Evil 4 comes packing a pretty standard but well-implemented photo mode. You have the ability rotate the camera freely, zoom in and out, and adjust the height to line up slick shots. Of course, you can also adjust the brightness and contrast, apply effects, and even remove main character Leon or certain enemies from the shot if you’d like. With so many features at your disposal, there’s no shortage of fun to be had when you’re ready to try your hand at photography in Resident Evil 4.

Want a palate cleanser after a night in a creepy village? Check out our take on a game with totally different vibes but the same release window, Atelier Ryza 3.

MrBeast Asks Homeless Man to Save Begging Until Shot Is in Focus

WICHITA, Kan. — YouTube personality and online philanthropist Jimmy Donaldson, also known as MrBeast, reportedly snapped at a local homeless man while filming a video, asking him to stop begging until his shot was in focus.

“Oh my God, can you shut the fuck up? Stop asking me for change, I’m trying to do my sound check,” an unhinged Donaldson said in a damning behind the scenes video. “Honestly, some of these homeless bums act like they’ve never been on camera before. I’m just trying to give him a huge sum of cash and see him dance around as I change his life with what is merely pennies of my fortune, but he’s being a real pain in the ass about it. If he could just save his good groveling for when we’re actually shooting, we could finally get some damn footage.”

Jackson Richards, the homeless gentleman who ended up being in the influencer’s video, said he was ultimately glad for Donaldson’s philanthropy

“I was sitting on the pavement downtown panhandling for change when this young man came up and started setting up cameras and lighting rigs,” Richards said. “I asked him if he could spare any change, and he started freaking out because the boom mic wasn’t set up yet. He did eventually give me $1000 and some branded MrBeast chocolate bars, so I just feel lucky because I watched him pass up a couple other homeless people that he said didn’t look pathetic enough for his video.”

Audiences appreciated Donaldson’s behavior in the benevolent video.

“It was so cool how MrBeast totally changed that guy’s life, he gave him a thousand dollars and only made a cool 200 grand off pimping out his misery,” MrBeast subscriber Ryan Tensley said. “He was also very patient with that homeless man who kept messing with his lav mic and kept interrupting MrBeast’s epic video intro by begging for food. MrBeast is such a professional.”

At press time, sources reported that MrBeast attempted to help a single mother who had lost her house, but unfortunately she chose the mystery box containing a bar of soap instead of the $10,000.

Critics Slam MrBeast for Helping Old Woman Cross the Street

WICHITA, Kan. — In the wake of a recent act of kindness from YouTube influence Jimmy Donaldson, a.k.a. MrBeast, critics were outraged to see pictures of the internet personality helping an old woman cross the street.

“That sick son of a bitch, where does he get off just guiding an elderly woman across that busy intersection?” said Twitter user Sean Francis. “He’s just going to take her arm and gingerly steer her through traffic without acknowledging the problems in society that make old women unable to cross the street in the first place? Sure, the woman seemed very thankful and MrBeast was gentle and polite, but I think he should be put in jail.”

Other social media posts condemned MrBeast for his previous good deeds. 

“It’s depressing to see someone shamelessly make a video of themselves doing random acts of charity to those in need,” said Marilyn King. “I can’t wait for people to realize that this MrBeast character is some demented freak who just wants to use his wealth and influence to help the less fortunate, and I can’t believe the internet is rewarding him for being so generous and kind. He may be doing something nice, but he made a profit off of it, and then even worse donated the profits to one of his food banks he funded. Why can’t he just use his riches and power to be a self-obsessed asshole who flaunts expensive cars and hawks boner pills like a good influencer?”

Despite negative attention, various MrBeast fans praised the YouTuber.

“Please be my friend MrBeast,” said one fan, Cyrus May. “I love you so much and I think we would be best friends. I have located your home and I am coming to it!!!”

At press time, sources reported that MrBeast had stirred up another online controversy when the YouTuber maliciously gave a homeless man a loaf of bread.

Like Borderlands But Wish the Characters Would Shut Up? Play Roboquest

There has always been a trend in first-person shooters of annoying protagonists who won’t stop talking, from Duke Nukem’s declarations of ass-kicking and bubblegum-chewing to the “crispy critters” cringe of Atomic Heart‘s P-3. For certain gamers, when dumb dialogue is brought up, they immediately think of the Borderlands series.

For all the good things about the running, gunning, and item collection of the Borderlands games, there’s still the characters some people wish would stop talking. The inconspicuously-named Roboquest is for you if you want a random-gun-grabbing experience where you won’t have to mute your screen.

If you go scrolling through Xbox Game Pass, you’d be forgiven for skipping something named Roboquest. The game, though it has a title reminiscent of a TRS-80 floppy, is a roguelike shooter currently in Early Access that deserves to be followed until its full release.

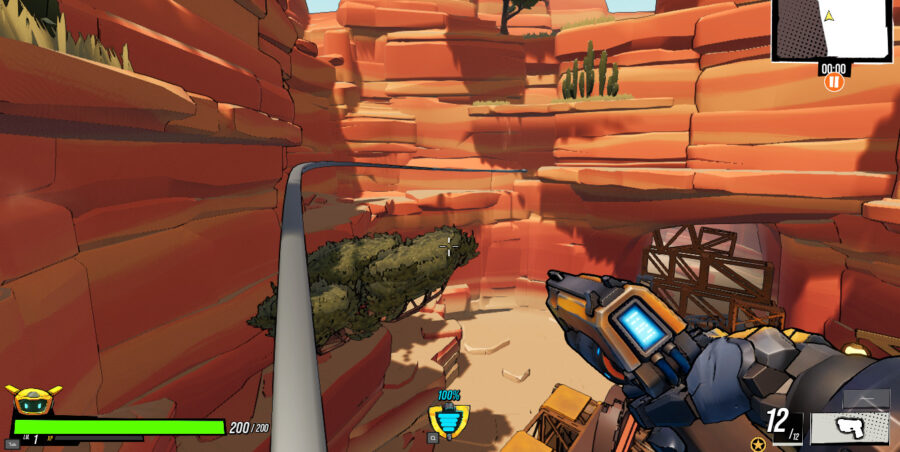
Roboquest starts with a girl finding you, a broken down robot, in the middle of the desert. From there the game has you bounding through canyons and cityscapes (and a few soon-to-be-announced levels), destroying hordes of robots and picking up increasingly-wild weaponry. You begin at an upgradeable base camped and choose any of the 5 unlockable base classes to dive into the next run.

Those runs are reminiscent of the Titanfall Gauntlet challenges, where you’re grenade-jumping and wall-running your way to the end as quickly as possible. Speed is key to dodge attacks, destroy power-up stuffed enemies that disappear quickly, and bound from enemy to enemy thanks to a Mario-esque damaging head jump. 

Along with that jump, your robo has a double-jump, sprint, and ducking dodge as standard kit. Classes differentiate themselves with abilities from going invisible, teleporting, and access to a free rocket barrage. Offensive capabilities include a base pistol, a melee attack that changes per class, and whatever guns you find lying around.

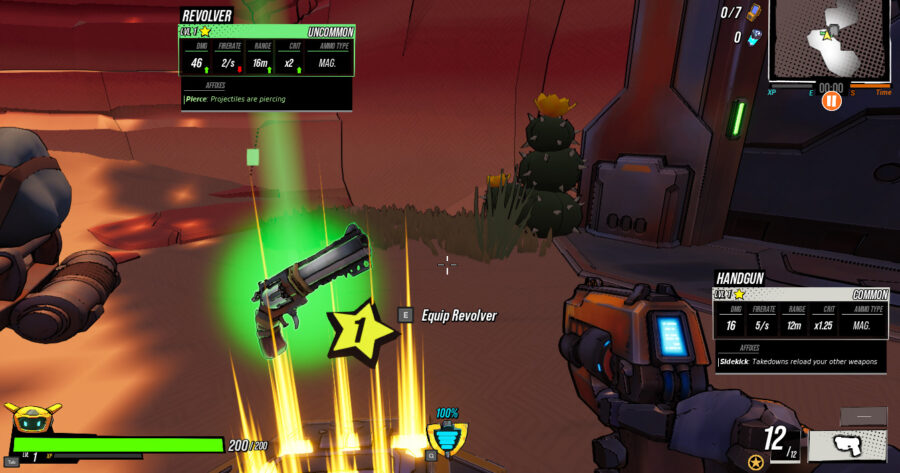
And you will find guns. In the starting area, hidden around the stages, and at mid-area break rooms you can find an array of armaments. Common shooting implements like Western revolvers, sawed-off shotguns, and sniper rifles are joined by boxing gloves, cryo-launchers, and bubble cannons. 

The guns change drastically as you go along. Buffs vary from elemental damage add-ons to nebulous increases of various stats to entire new secondary firing modes. The revolver you found in level one can be kept and upgraded to a whole new beast, or can become a completely new weapon when you find it in a future run.

All of this, and the game is just in early access. There’s still plenty of equippable items and boss encounters to discover at this point. The team at RyseUp Studios is keeping fans up to date with a road map available on the title screen, and it’s worth trying out Roboquest now to see how well they improve on it.

You might like Roboquest if:

  • You enjoy speed-running. This game allows players to really pick up the pace, and there’s enough freedom of movement to allow for quick runs through the environment.
  • You love varied guns. Each weapon you pick up has stats and modifiers that can completely change its capabilities. Half the fun of this game is just seeing what crazy new death-dealer you’ll find next.

You should stay away from Roboquest if:

  • You do not like roguelikes. While there’s a lot of Borderlands flavor, the open world aspect is gone, replaced with randomly-generated levels meant to be quickly sprinted through. 
  • You want a full experience. The game is still in Early Access, but it’s worth keeping an eye on for the eventual full release.

You can find Roboquest on Xbox Game Pass or Steam.

Atelier Ryza 3 Tool Crafting Guide: How to Get All Initial Tools

Since not only crafting, but gathering is also a central activity in your adventure, you should have every Atelier Ryza 3 tool ready for action. They are essential to progress in the game and prepare your party to face all the – cute – enemies only an Atelier game can throw at you. 

Although following Ryza and her friends is a quite chilling experience, part of the challenge of the game comes in the form of finding crafting tools – and eventually upgrading them – to collect materials that you will use to create more items. To make your life easier, we’ve come up with this guide explaining what Atelier Ryza 3 tools you need and how to craft them!

How to Get All Initial Tools in Atelier Ryza 3

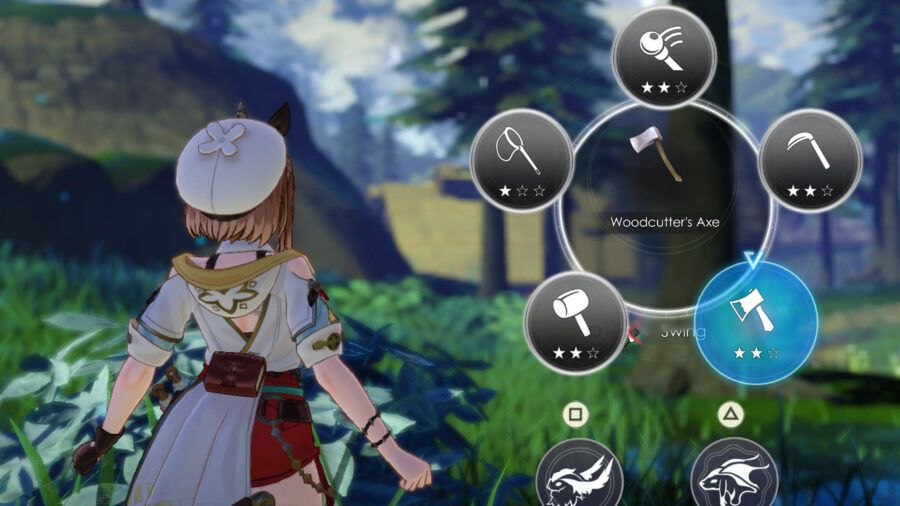
Just like in previous games in the Atelier franchise, basically, every tool must be crafted in Ryza’s atelier. Before you have them, you can gather only a few types of material whether by hand or using Ryza’s staff. But you don’t need to worry too much about that, since most items you need to craft some basic tools – Woodcutter’s Axe, Hammer, and Grass Sickle – are accessible to you through both methods. 

In the following section, you will find the recipe for each tool, a list with all the items you need to craft them, and a brief explanation regarding what they are used for. In Ryza 3, every recipe will require specific materials to be completed as well as it might also need second materials – the ones in brackets –  of certain types to improve the item you’re crafting. In the lists below, we’re going to put the names of materials that are required by the recipe, suggestions for the secondary group of materials, and where you can find them. 

Woodcutter’s Axe

This is just a regular axe that allows you to gather materials from certain trees, tree trunks laying on the ground, and even break small rocks as well as crystals. 

  • Eiche – Found near Ryza’s Home, In front of the Hideout, Beach of Far Bank, Blue Life Spring
  • (Lumber) Eiche
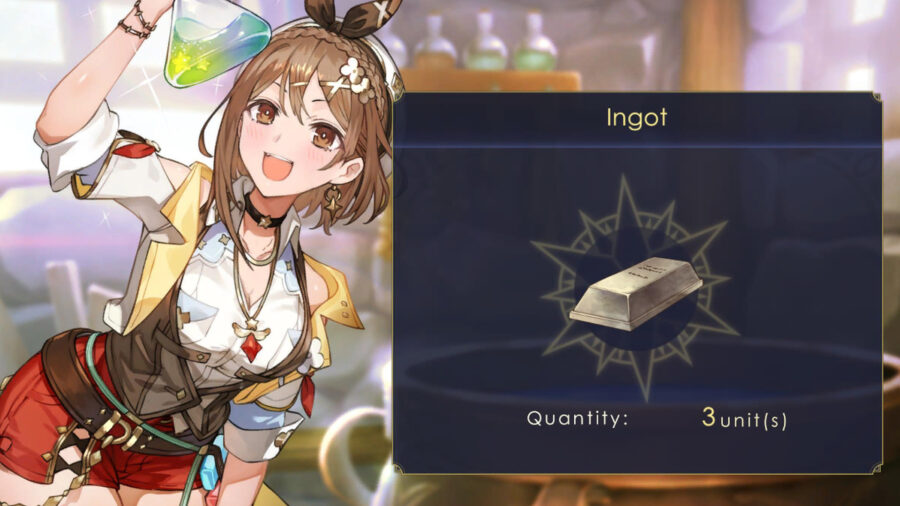
  • (Metal) Ingot – Craftable
  • (Threads) Restraint Silk – Found near Ryza’s Home, Relaxing Plaza, Beach of Far Bank.

Hammer (Atelier Ryza 3 Initial Tools)

There isn’t anything special about this item, but it’s one of the most useful tools you have at your disposal. With it, you can not only break big rocks, and crystals, but also other materials, such as some types of mushrooms. 

  • Eiche – Found near Ryza’s Home, In front of the Hideout, Beach of Far Bank, Blue Life Spring
  • Amatite Ore – Found near In front of the Hideout, Beach of Far Bank, Big Lighthouse
  • (Lumber) – Eiche
  • (Ore) – Amatite Ore

Grass Sickle

With the Grass Sickle, you can gather different items from some landscape elements you could interact with only using Ryza’s staff. Bushes and trees, as well as some flowers, can be gathered using this tool.

  • Large Bone – Found near Ryza’s Home, Lighthouse, Blue Life Spring
  • Polishing Powder – Craftable
  • (Ore) Amatite Ore – Found near In front of the Hideout, Beach of Far Bank, Big Lighthouse
  • (Lumber) Eiche – Found near Ryza’s Home, In front of the Hideout, Beach of Far Bank, Blue Life Spring

Fishing Rod

It’s a rod that you use to fish. Simple and efficient. It’s also not a secret that you can get fish – and other marine materials – with the fishing rod. 

  • Tough Log – Found near Ryza’s Home, Beach of Far Bank, In front of the Hideout, Big Lighthouse, Blue Life Spring
  • Alchemy Fibers – Craftable
  • (Lumber) – Tough Log
  • (Gases) – Foamy Water – Found near Big Lighthouse, Blue Life Spring

Crafting All Initial Atelier Ryza 3 Tools: Catcher’s Net

In case you need bugs for your recipe, the Catcher’s Net is the tool you need. While it interacts with environmental elements that Ryza’s staff and the Glass Sickle do too, the Catcher’s Net gives you the option to gather other types of materials that the other two tools can’t get.  

  • Tough Log – Found near Ryza’s Home, Beach of Far Bank, In front of the Hideout, Big Lighthouse, Blue Life Spring
  • Alchemy Fibers – Craftable
  • (Marine) Sardines – Found near Beach of Far Bank, Big Lighthouse,
  • (Bugs) Narwhal Grasshopper and Seven Stars – Found near Ryza’s Home, Beach of Far Bank, In front of the Hideout, Big Lighthouse

Wind Shoes

Different from the previous tools, Wind Shoes are not used to gather materials. They will, on the other hand, improve exploration, because, by having it equipped, you can slide down slopes at high speed. 

  • Bestial Air – Craftable
  • (Puni) – Pink Puniball dropped by Flower Puni in Faurre Region
  • Spirit Bottle – Craftable
  • (Animal Mat.) Mythical Hide – Dropped by Loppy Ear in Faurre Region

Emerald Band – Atelier Ryza 3 Initial Tools

Because exploration is a big part of your routine in Atelier Ryza 3 when discovering sources of specific materials, Emerald Band is going to be extremely helpful. With this item, you can reach certain locations by using crystals you see floating in the air. 

  • Emerald Glass – Found Near: Big Lighthouse, Giant Water Wheel, Mine Resthouse
  • Ingot – Craftable
  • (Threads) Restraint Silk – Found near Ryza’s Home, Relaxing Plaza, Beach of Far Bank. 
  • (Magical) Fairystone Fragment or Lightning Tree – Found near Big Lighthouse, Old Mining Site Ruins, Giant Water Wheel, Mine Resthouse, 

Air Drop

Although you can easily swim in the game, you can only dive to explore under the water, with the Air Drop equipped. 

  • Honey – Craftable
  • (Neutralizers) Blue Neutralizer – Craftable
  • Foamy Water – Found near Big Lighthouse, Erupting Hill, Blue Life Spring, Star Gazing Hill, Tree of Light
  • (Puni) Blue Puniball – Dropped by Blue Puni found near Big Lighthouse, Blue Life Spring, Beach of Far Bank.

Summoner’s Bell

Just like the previous games, you will walk a lot in Atelier Ryza 3. The Summoner’s Bell gives you the ability to summon a mount that not only walks faster but can also dig in specific locations and find items. There’s more than one type of mount in the game that you can tame using the Summoner’s Bell.

  • Large Bone – Found near Ryza’s Home, Lighthouse, Blue Life Spring
  • Ingot – Craftable
  • (Magical) Sapling Branch – Found near Ryza’s Home, In front of the Hideout, Big lighthouse
  • (Puni) Red Puniball – Dropped by Red Puni which is found near Big Lighthouse, Blue Life Spring, Old Mining Site Ruins

Once you have crafted Atelier Ryza 3 tools, you will be more than ready to explore the game’s magical world and craft even better items. You can do that even faster by using our Atelier Ryza 3 SP Farm Guide.

Atelier Ryza 3 SP Farm Guide: Best Ways to Earn Skill Points Fast

In order to become the best alchemist you can be, you must know about Atelier Ryza 3 SP Farm. In Atelier Ryza 3, there are a lot of activities for you to do, but not everything will reward you with skill points. Learning the best ways you have to earn SP makes a lot of difference when progressing in the game. 

In the new Atelier game, skill points are used to unlock some passive abilities as well as recipes for specific items in the Skill Tree. While you do gain some points when you finish synthesizing items, this is not the only source of SP you have in the game. To help you in this journey to turning into a master alchemist, here are the best ways to farm skill points. 

How to Farm SP in Atelier Ryza 3 – Complete Quests

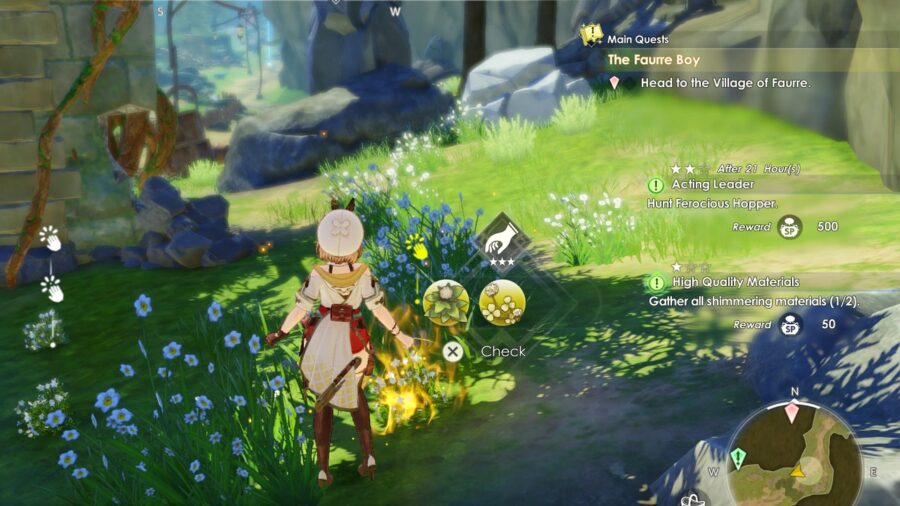
One of the best ways to farm SP in the game is by completing Character Quests, Normal Quests, and Random Quests. Character Quests are goals that each character in your party might have, going from finding items to crafting new pieces of equipment. Normal Quests are quests given by side characters in all the regions you visit during the game. Since not every Normal Quest rewards you with SP, you should focus on the ones that do! And the Random Quests, just like the name suggests, are missions that will randomly appear for you. This may happen inside a city or in the middle of a forest. It’s important to keep in mind that they disappear after some time, so if a good one rewards you with SP try to complete it as soon as possible.  

Unlock the SP Up Skill to Earn SP Faster (Atelier Ryza 3)

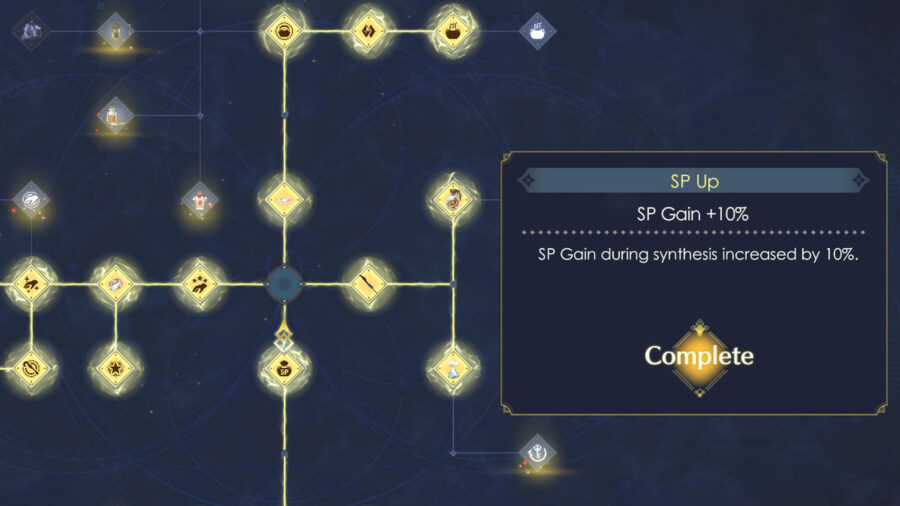
Right when the Skill Tree becomes accessible to you, focus on unlocking the SP Up skill. This is a passive skill you can have which will increase by 10% the SP you gain when crafting items. Although it doesn’t sound like a huge improvement, this skill is amazing when you’re preparing materials for a more complex recipe. 

How to Farm SP in Atelier Ryza 3 – Build a Laboratory

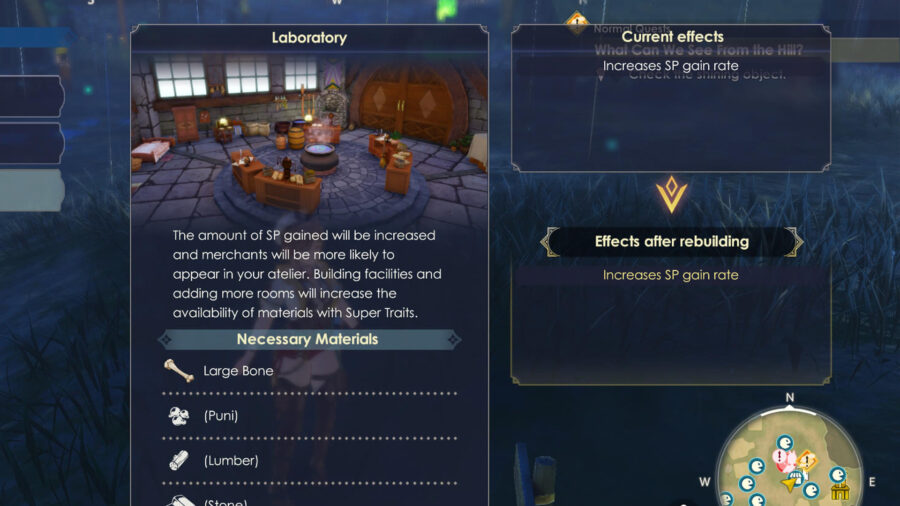
In case you want more SP, you should build a laboratory as your atelier. As expected in this game, you have an atelier, which you’re going to visit constantly because it’s the only place you can craft items. Once you progress a little bit in the story and travel to a new region, you will have the chance to build a new atelier and the game gives you three types to choose from. The laboratory is the one to go because of the effect of increasing the SP gain rate it has. A great combination with your SP Up skill! And you don’t need to worry if after some time you have enough SP. You can remodel your atelier at any time!

Craft Cheap Items & Previous Gear to Earn SP Quickly

Craft cheap items or previous gear as a way to farm SP Atelier Ryza 3.

Now, to produce even more SP, craft new items or better versions of the ones you already have. In a game with so much to do, many quests to complete, and materials to gather, we sometimes forget to work with the basics. Sure you don’t need more ingots after some time or cloth pieces. But they are easy to craft and use common materials! Craft them as much as you can to gain extra Skill Points. On the other hand, in case you forgot, you can always craft items you have already created in order to get higher quality or better skills. Both ideas work as a sort of routine you should go through regularly.

And with all the best ways to Farm SP in Atelier Ryza 3 you’re ready to take the most out of Atelier Ryza 3’s crafting system by having every skill possible unlocked in your Skill Tree. Still feel behind? Check out our guide on how to craft every starting tool!

Too Scared to Play Resident Evil 4 Remake? Atelier Ryza 3 is Your Safe Haven

If you’ve been paying attention to titles released this year, you’ve seen titles that range from a strategy game in which your characters might permanently die, to a survival game that puts you and a NPC in a forest full of weird creatures and cannibals. If all this tension and stress is not for you, don’t fret! Atelier Ryza 3: Alchemist of the End & the Secret Key is the game for you.

The basic premise of most Atelier games is to focus on the crafting mechanic in a fantasy world. In Atelier Ryza, games that have the energetic and curious Ryza as the protagonist, players have everything the fantasy genre can offer: dragons, fairies, old civilizations destroyed by their own greed, and hordes of evil beings from different dimensions ready to kill every human they find. And in Atelier Ryza 3, we can keep following the girl’s adventure together with her faithful friends, now looking for answers about an island that appeared out of nowhere and some mysterious keys.

Although this might sound like the backdrop for an epic adventure, Atelier Ryza 3 was still capable of conducting me through this experience without causing me any stress. For example, I knew how important figuring out the mysterious island is because it is affecting the whole region where Ryza lives. The game, however, has the remarkable capacity to lay down such information and yet put me in a position that I feel comfortable in. Instead of rushing my way through the mysterious land, I was spending hours gathering every type of wood, fruit, and flower I could find. In contrast to other games of the same genre, Atelier Ryza 3 is not constantly putting me in long chains of quests where I might die and lose hours of gameplay because I hadn’t the chance to save between cutscenes, or having huge spikes of difficulties to make me feel impotent and justify more hours of grinding as well. In Atelier Ryza 3, I was allowed to keep up with the adventure at my own pace.

The whole game has elements to make your time in Ryza’s world calm and relaxing. There aren’t dark corridors full of places from where enemies can jump and scare you or super difficult bosses that give you the creeps. What you’re going to find are colorful forests and beaches and villages where the children are laughing out loud. As in previous Atelier games, Atelier Ryza 3 is great to look at and comes with pretty good art pieces representing specific moments of the adventure. On the other hand, there is too much blur applied to the background of this game, making it weird for the eyes during the first hours. 

The design of some characters may look a little bit over the top to new players, but it’s clear that the team behind them wanted to give each character a very distinctive identity. Enemies were also designed following the same philosophy, since many of them are far from looking like vicious creatures that will rip you apart. They’re actually quite cute! Added to all of this, the background songs – some already known by those who played the first two games – that play during the game are gentle. Even during the boss fights, when the tune changes, it changes in such a subtle way that only instigates the smallest level of tension in the player. 

Let’s not forget about one of the Atelier series traits: the crafting system. Sure, crafting sounds quite complicated when you begin Atelier Ryza 3, and there aren’t as many hints nor moments where everything about it is carefully explained, such as what some types of upgrades you find in the items’ recipes mean. But, once you get used to the crafting system, creating a better version of a piece of equipment or a healing item becomes a puzzle you will want to solve. The fact you can’t lose materials when only trying to craft something new already takes off part of the pressure behind the process of experimentation. At the same time, gathering materials is almost therapeutic. With simplified animations to smash rocks or chop trees, Atelier Ryza 3 makes the task of farming thirty logs an easy and fast one.

Now, in terms of Atelier Ryza 3’s narrative, you should know that it is as calm and slow-paced as other aspects of the game. The story is structured as a big adventure split into smaller arcs and in each of them Ryza is not only going to get a little bit closer to solving the main mystery, but she and her companions will meet new people and learn about different places. While some occasions are used for character development, others are barely adding anything substantial to the main plot. On the good side, even though some events from the previous games are mentioned, Atelier Ryza 3’s story won’t require you to know everything about the first two games. You will be ready to play the game by only watching the short retrospective in the main menu.

In Atelier Ryza 3, the combat system is maybe one of the few moments in the game you may feel overwhelmed. This can happen because of the number of systems the game has operating when you’re fighting a cute giant blue blob. Besides attacking with normal attacks as skills, you can also use offensive and defensive items or call one of Ryza’s teammates that are outside of the battle to change places with the character you’re controlling. Added to all of that, there are super attacks triggered after you use specific skills based on the companions’ orders as well as the creation and usage of magical keys that can buff. Because of all of that, your screen might eventually look like the cockpit of a mech with many alerts, glowing buttons, and exaggerated animations.

All of these aspects make Atelier Ryza 3: Alchemist of the End & the Secret Key a great game if you’re too afraid to play the newest entry in the famous franchise of zombie games, or if you just want a relaxing me-time. So…

Go for Atelier Ryza 3 if:

  • You’re looking for a stress-free experience in gaming
  • Love colorful scenarios
  • Enjoy the fun behind picking digital representations of real (or almost real) materials and using them to create new and more powerful items

Avoid Atelier Ryza 3 if:

  • You want a dramatic narrative
  • You can’t stand slow-paced plots
  • You hate battles in games with so many systems happening that it seems as if you’re actually piloting a giant robot. [lasso ref=”atelier-ryza-3-alchemist-of-the-end-the-secret-key-nintendo-switch” id=”23209″ link_id=”3947″]

Diablo 4 Beta Ashava World Boss Guide: How to Stagger & Loot

Are you one of the many players that couldn’t beat the Diablo 4 beta world boss Ashava? Here are all of her secrets laid bare! Take down Ashava with our helpful world boss guide.

Ashava’s Moveset

Ashava, the Pestilent has an array of normal attacks consisting of:

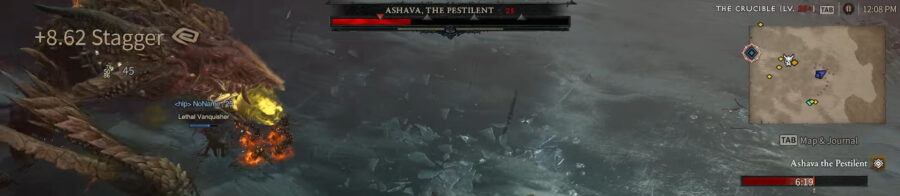
  • Ground Pound. Telegraphed by a quick backstep, before winding an elbow all the way back and up, then hammering the spot she was previously standing on. Panel one below.
  • Lunging Chomp. Telegraphed very briefly by dipping her head low and snapping her neck to gaze at a target right before biting. Often an insta-kill. Panel two below.
  • Pounce Stomp. A leap followed by a heavy landing on a target. Telegraphed by crouching low and back on her hindquarters, like a cat. Knockdown effect.
  • All while dealing persistent poison damage, hence the titular ‘Pestilent.’

Area attacks include:

  • Sweep. A near 360 degree circular plow of a wide zone, using either one of her forearm blades, that sweeps backwards. This is immediately followed by a partially overlapping 180 degree second sweep forwards with the other arm’s blade, in the same direction; the latter starts more or less where the previous one ended.

This attack knocks around unshielded players at best, and is an outright insta-kill at worst if caught in the sweep. Telegraphed by drawing an arm almost all the way back to her opposite shoulder, elbow tucked under chin, like a shinobi, before lunging far outward to stake the ground. If she leads with the right arm, then the sweep will be clockwise; if the left, then counter-clockwise.

  • Exhaled/Vomited Poison Clouds that become…
  • …Poison Pools on the ground, and both of which do sustained damage. Telegraphed by raising herself almost upright with green bile drooling heavily from her gaping maw; her torso and the ground beneath her will also radiate a bright glow briefly.

Spewed in a short arc directly in front of her. These two moves will always occur in tandem, and appear to unlock only when her health is reduced below the first inverted red triangle (which flips and turns gray) above her health bar.

  • Plow Back. As seen in the title image, Ashava stakes the ground with both blades and rapidly plows it up all the way back towards her hind legs, like a skier, thus ripping up any players on her flanks. If not an insta-kill, this pulls or drags players around for a knock around effect.

Telegraphed by rearing up almost upright with both blades raised. This move appears to unlock only when her health is reduced below the second inverted red triangle (which flips and turns gray) above her health bar. Panel three above.

How To Beat Ashava

Every single attack can be evaded merely by staying behind and between her hind legs as much as possible. For melee fighters, this is the Plow Back’s only safezone. Even the Sweep attack’s damage is confined to the middle and outer edges of the circle. When she leaps away, close the gap as quickly as you can. Be mindful of her rapidly stepping back into you and immediately pounding the ground, i.e. the Ground Pound, which happens on occasion.

If you have gear or skills with any kind of barrier, bubble, dome, or shield, use them to tank most of Ashava’s physical attacks. This includes weapons that confer short-term protection for dealing damage to Elite enemies. Stepping into an ally’s dome is also possible, in a pinch. You can be shoved out of the dome by the Sweep attack, or any move that can knock you around.

Poison resistance gear, gem enhancements, and elixirs will also mitigate the near persistent poison effects.

In the inevitable event of death, prefer to revive and be revived by allies. That way you won’t lose the 10% durability on gear like when you opt to use the checkpoint resurrection system instead. Once your gear durability is completely exhausted, you will be forced to town portal in order to repair. If you’re solo, or with no party member present in the arena to anchor you to that particular shard (session/instance/zone), you will lose all damage progress performed so far.

The task of reviving fallen allies should be relegated to underpowered players for maximum efficiency.

How To Stagger Ashava (Diablo 4 Beta World Boss Guide)

Under Ashava’s health bar is a slender secondary bar in gold that can be filled–from the center outwards in either direction–by dealing Crowd Control damage to her. The Crowd Control status effects are:

  • Chill
  • Daze
  • Fear
  • Freeze
  • Immobilize
  • Knockdown
  • Knockback
  • Slow
  • Stun
  • Taunt
  • Tether

Fill this bar to stagger the Diablo 4 beta world boss.

While Crowd Control is normally intended to cause an immediate status effect on large groups of lesser enemies, its effect is different on Ashava and World Bosses in general. Once this gold Stagger bar is filled, she will flop forward on her belly and be incapacitated for twelve seconds, and also permanently shatter one of her forearm blades. The latter effect appears to be simply cosmetic and doesn’t prevent further use of Sweep or Plow, nor does it negate the damage from them. Use the opportunity to whale on her with anything and everything you’ve got.

How To Loot Exploit Ashava For Legendaries

As mentioned, Ashava normally spawns four times over the course of the Open Beta, dropping Legendaries each time. When the event begins and after Ashava appears, a fifteen minute timer will begin counting down on the right side of the screen, at the end of which she will escape. This timer is global, which means every other shard with an ongoing Ashava encounter is at the same point in that countdown. After slaying Ashava as quickly as possible, pick up your drops and immediately town portal, and then return through it to the Crucible before the event window closes. You will most likely be in a fresh shard with a different set of random players that haven’t slain Ashava yet, thus giving you a second opportunity at farming her for drops, in the same event window. When doing this with a party, all of you must leave (but not necessarily return) together, in order to reset the shard correctly–anyone partied up that hangs back in the Crucible acts as a shard anchor of sorts.

https://old.reddit.com/r/diablo4/comments/11v3dof/world_boss_zones/jcr6oot/

If it fails to give you a shard with an ongoing boss battle, try town portalling again. Rinse and repeat. If it keeps failing, it’s most likely because either all potential shards still battling Ashava are full, or the event window itself has closed. It might help to make note of how much time is left on the countdown right before you finish off Ashava the first time, so you can determine how much more time to invest in searching for a shard to farm. Even better, you can simply add fifteen minutes to the World Boss spawn times for your time zone.

If in a party, disband it before individually town portalling back and forth–this will give each of you a chance of stumbling upon an ongoing boss battle, thus spreading your bets. Once successful, just invite everyone back into the party and finish the fight. Ashava battles often come down to the wire, so don’t hesitate to persist till the last few seconds.

This might be patched out at some point, though it’s difficult to see how, given the shared open world design of Diablo 4. Exploit it to your heart’s content while you still can.

Diablo 4 Beta World Boss Guide – Tips And Thoughts
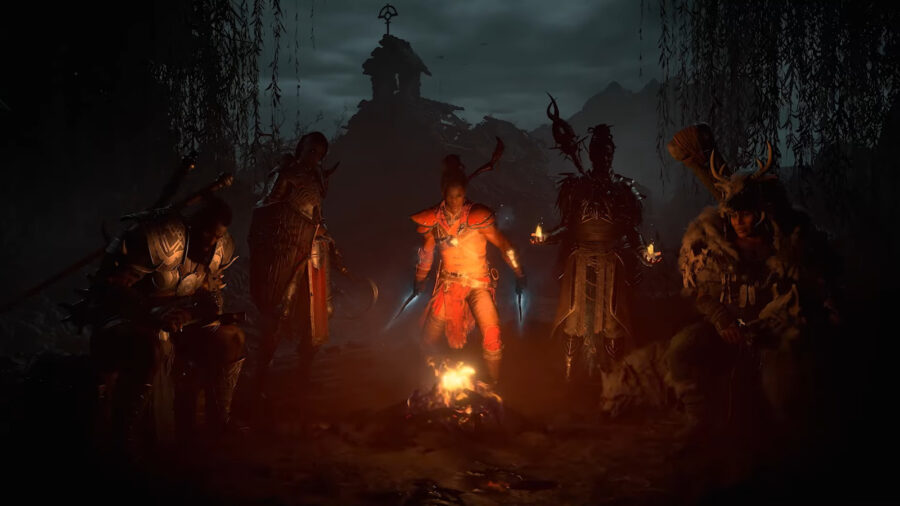
  • With up to 12 allies allowed in The Crucible to take on Ashava, her power scales based on the number of players, rather than their level. Even a less than full stack of competent players chaining Crowd Control can accomplish this kill fairly quickly.
  • If you fail to pick up your weekly “Ashava’s Spoils” or if it fails to drop for any reason, check the lost and found in your Stash in town. This may also hold true for players that get disconnected right at the end of a boss battle, which happens fairly often.
  • Based on the exploit above, if you town portal for any reason during an ongoing battle with Ashava, you will most likely not return to the same encounter (your slot in that shard having been cleared for someone else to join), thus losing your progress with her HP meter. As stated previously, having at least one party member remaining in the arena as an anchor will mitigate this.
  • This may actually be a legitimate (and cheesy) exploit in its own right–if you’re not having much luck with slaying Ashava in one shard, keep town portalling between shards till you find an instance where she’s closer to being downed. Cheap and filthy, but alleviates the pain and suffering of a World Boss run with little to no aid from allies. You should be able to make a judgment call based on the amount of damage done versus time elapsed, with top tier teams downing her in just over seven of the fifteen minutes allotted.
  • Shard-surfing–to coin a term–could also be used to shop around for the composition of an Ashava kill-team at the very start of the timer: greater or fewer players, higher or lower leveled, class synergy, Crowd Control bar fill rate, etc. Helpful if you happen to get a bad hand in the shard you’re in when the event begins.

  • Ashava’s health bar has four inverted red triangles above it, at equidistant points. As her health is whittled down below each, the triangles flip over and turn gray, dispensing health potions onto the ground (as with any boss). These points could also be used as indicators for the deployment of new moves in her attack routine; although nothing yet apparent seems to trigger from the final two triangle inversions.
  • What happens when you fail to kill Ashava within the fifteen minute countdown? She just flees the same way she entered the Crucible, leaving you with nothing to show for your time and effort.

Happy hunting and farming!

Diablo 4 Beta World Boss Event Guide: Times and Location

Diablo 4 has a second public beta this week featuring a much-hyped event in-game to kill a screen dominating World Boss. You won’t want to miss it, so learn everything you need to know about it here.

Diablo 4 Beta – What Is A World Boss Event?

The Ashava World Boss event is an optional quest in Diablo 4 with a fixed location and window for beginning and completing, that tasks you with slaying the monstrous Ashava, the Pestilent. First attaining the beta’s level cap of 25–the same as that of Ashava herself–would be ideal, but not mandatory. A group of up to 12 players total, of any level can band together to take her down. Couch co-op, online co-op, and shard (session/instance/zone) randoms in the arena can all combine forces to slay her, and lay claim to the sizable loot drop.

Diablo 4 Beta World Boss Event Times And Developments

The World Boss event will be available four times over the course of each beta, with the Public Open Beta spawns starting on March 25th at 10AM PDT, followed by 12PM PDT, then 10PM PDT, and finally at midnight PDT on March 26th.

In the Early Access Open Beta last week, the very first spawn event was delayed by an hour due to technical difficulties, leading to all subsequent events being set back by an hour as well. This may or may not hold true again for this week’s upcoming Public Open Beta.

Consult each of the official Twitter accounts for updates in the event of another delay in Ashava spawning:

Here are the localized times for major regions based on the original announcement:

Time Zone Spawn #1 Spawn #2 Spawn #3 Spawn #4
Hawaii-Aleutian Time [HST] UTC-10 Saturday, March 25th 7AM Saturday, March 25th 9AM Saturday, March 25th 7PM Saturday, March 25th 9PM
Alaska Daylight Time [AKDT] UTC-8 Saturday, March 25th 9AM Saturday, March 25th 11AM Saturday, March 25th 9PM Saturday, March 25th 11PM
Pacific Daylight Time [PDT] UTC-7 Saturday, March 25th 10AM Saturday, March 25th 12PM Saturday, March 25th 10PM Sunday, March 26th 12AM
Mountain Daylight Time [MDT] UTC-6 Saturday, March 25th 11AM Saturday, March 25th 1PM Saturday, March 25th 11PM Sunday, March 26th 1AM
Central Daylight Time [CDT] UTC-5 Saturday, March 25th 12PM Saturday, March 25th 2PM Sunday, March 26th 12AM Sunday, March 26th 2AM
Eastern Daylight Time [EDT] UTC-4 Saturday, March 25th 1PM Saturday, March 25th 3PM Sunday, March 26th 1AM Sunday, March 26th 3AM
Atlantic Daylight Time [ADT] UTC-3 Saturday, March 25th 2PM Saturday, March 25th 4PM Sunday, March 26th 2AM Sunday, March 26th 4AM
Brasília Summer Time [BRT] UTC-3 Saturday, March 25th 2PM Saturday, March 25th 4PM Sunday, March 26th 2AM Sunday, March 26th 4AM
Greenwich Mean Time [GMT] UTC+0 Saturday, March 25th 5PM Saturday, March 25th 7PM Sunday, March 26th 5AM Sunday, March 26th 7AM
Central European Time [CET] UTC+1 Saturday, March 25th 6PM Saturday, March 25th 8PM Sunday, March 26th 6AM Sunday, March 26th 8AM
Eastern European Time [EET] UTC+2 Saturday, March 25th 7PM Saturday, March 25th 9PM Sunday, March 26th 7AM Sunday, March 26th 9AM
Moscow Standard Time [MSK] UTC+3 Saturday, March 25th 8PM Saturday, March 25th 10PM Sunday, March 26th 8AM Sunday, March 26th 10AM
Gulf Standard Time [GST] UTC+4 Saturday, March 25th 9PM Saturday, March 25th 11PM Sunday, March 26th 9AM Sunday, March 26th 11AM
Indian Standard Time [IST] UTC+5.5 Saturday, March 25th 10:30PM Sunday, March 26th 12:30AM Sunday, March 26th 10:30AM Sunday, March 26th 12:30PM
China Standard Time [CST] UTC+8 Sunday, March 26th 1AM Sunday, March 26th 3AM Sunday, March 26th 1PM Sunday, March 26th 3PM
Japan Standard Time [JST] UTC+9 Sunday, March 26th 2AM Sunday, March 26th 4AM Sunday, March 26th 2PM Sunday, March 26th 4PM
Australian Eastern Daylight Time [AEDT] UTC+11 Sunday, March 26th 4AM Sunday, March 26th 6AM Sunday, March 26th 4PM Sunday, March 26th 6PM
New Zealand Daylight Time [NZDT] UTC+13 Sunday, March 26th 6AM Sunday, March 26th 8AM Sunday, March 26th 6PM Sunday, March 26th 8PM

Where Is Ashava Located?

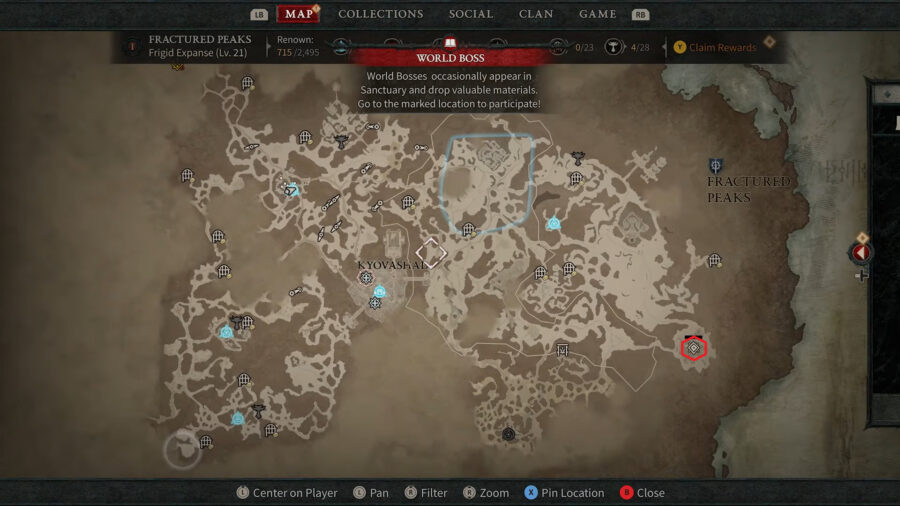
The Crucible area in the Region of Fractured Peaks, far east of the settlement town of Kyovashad, close to the eastern shoreline of the continent. Once in-game, a map icon and countdown timer will appear 30 minutes prior to the beginning of the event. Potential rewards will also be displayed, specifically the Weekly Bonus Spoils, if applicable. Map location marked with a red hexagon in the image above.

How Co-op Works in Diablo 4 World Boss Events

Unlike the majority of co-operative content in the game, as many as 12 players can challenge Ashava in The Crucible. Once both friends and strangers are assembled at the spawn location, and the timer hits zero, the battle begins. Soloing is not recommended, and doesn’t appear to even be possible given the open world, drop in drop out design of Diablo 4 that forces players into shared shards. Leveraging and exploiting a Strict NAT might be possible, but there have not been any glitched solo lobby reports so far.

Ashava is level 25 herself, but her power scales to the number of players in the arena, regardless of their individual level. This also means that under-leveled allies can be a burden rather than a blessing, buffing her damage output, while failing to mete out significant damage themselves.

Couch Co-op

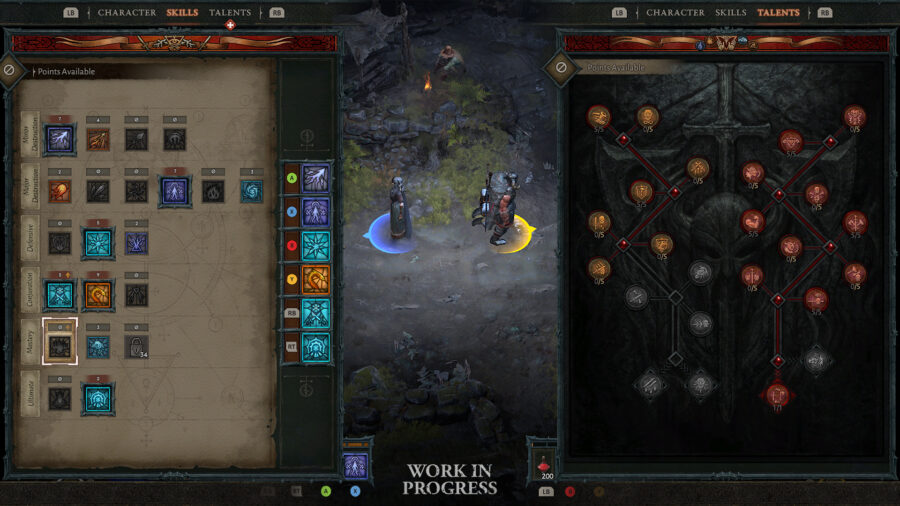
All consoles supporting couch co-op will allow one additional player to join in onscreen. The second player will simply have to establish a link between their Battle.net account and console account, if not already existing in Blizzard’s ecosystem. After that, just hop in by invitation of player one. The interface has been designed to accommodate the interfaces of both players being on screen simultaneously, as seen above. Bonus XP is granted for not being solo: 5% while near random players, and 10% near explicit party members. Couch co-op can be combined with online co-op to increase party size to a total stack of four players.

Online Co-op

This mode allows for up to four players to party up remotely in a single shard. On top of that, region-locking is absent in Diablo 4, and crossplay between all platforms is now possible, providing the opportunity for some really diverse team-ups, across territories and hardware. Bonus XP rates are the same: 5% from non-party members and up to 10% from proximity to sworn allies.

Still can’t take Ashava down? Check out how to beat Diablo 4 beta’s World Boss !

Incarcerated Gamer Whiles Time Away by Searching for Unlocked Air Vent Grates

LEAVENWORTH, Kan. — An incarcerated gamer at Leavenworth Federal Penitentiary has raised the ire of facility guards and fellow inmates alike by searching relentlessly for an openable vent that might provide an escape route.

The prisoner in question, Nicholas Mancini, 36, has been seen prying at metal grating with a handcrafted toothbrush shiv in every accessible area of Leavenworth, claiming that at least one of the ventilation shafts must lead to freedom, or at worst, a puzzle-based block-shifting mini-game that will allow him to shave years off his sentence. 

“I’ve been a gamer ever since 1998, when I stole a Nintendo 64 and a copy of Goldeneye from KB Toys,” Mancini explained. “I stole a Sega Saturn from a JC Penny a year later, but ended up hucking it off a bridge onto a Budweiser truck. Thing had no games on it. Piece of crap. But if I know anything about prison from gaming, it’s that there’s always a secret passage around here somewhere. I just have to keep pushing weird-looking bricks, completing drugs-up-the-butt side quests, and surviving quicktime events — which is what I call it when I try to block the guards from beating the ever-loving shit out of me.”

Some inmates, however, are frustrated that Mancini’s constant vent-prying and lock-jimmying has resulted in increased guard scrutiny, making it difficult to find a moment’s peace.

“Man’s lost his goddamned mind,” said JuanCarlo Salinas, 43, current inmate and former friend estranged by Mancini’s attempts to glitch his way through solid matter. “Last week he spent six hours jumping into a brick wall, trying to find an ‘exploit,’ whatever that is. Then yesterday during our kitchen shift, his dumb ass managed to rip a cafeteria exhaust fan off the wall. I saw him crawling around in there, feet sticking out the wall like some crack addict Winnie the Pooh. When I pulled his ass out and told him to stop fucking around, he held up a bunch of rat bones and said, ‘Look! I found a collectible.’ Motherfucker thinks he’s going to get a PlayStation trophy for stuffing his pants with dead horse flies and used band-aids. He’s a goddamn liability.”

Despite his lack of success and the numerous attempts on his life, Mancini remains convinced that eventually his hard work will pay off.

“Everyone’s going to be jealous as hell when I twist my toilet just the right way and a big green magic pipe comes out the wall,” says Mancini. “Still, there’s gonna be a bunch of booby-traps in there, moving platforms, mudmen that fire shit globs out their mouths, and I swear to God! If the whole thing ends up at some haunted amusement park with a minecart section, I’m turning around and locking myself right back in my cell. I’m a B&E guy, not some fuckin’ track-hopping super ape. Classic case of criminal justice run amuck.”

At press time, Mancini was killed by guards during an attempted escape. According to those familiar with the situation, he did not respawn.

Stay Updated on The Latest Punk News

Get the latest punk news delivered straight to your inbox

We'll store and process this information to provide you our products and services. You may opt out of this at any time.