Resident Evil 4 Farm Blue Medallion Location Guide

If you’re looking to 100% Resident Evil 4, your first tough task may come in the form of the Blue Medallions on the farm. First available in Chapter 1, you can get these shortly after you follow the path past the village square. Here are the locations of all five blue medallions on the farm.

Resident Evil 4 Remake: All Farm Blue Medallions

Where to find your first farm blue medallion in RE4.

Start at the small building with the typewriter. Go on the other side of it and you should see your first blue medallion. It’s a bit obscured by branches, but you should easily be able to pick out the blue hue.

The location of one of the blue medallions in Resident Evil 4 remake.

Next, head towards the rear of the barn towards the middle of the map. Vault over the small fence and look into the barn. On the back of a wooden beam, you’ll see the second blue medallion.

A Farm blue medallion location in Resident Evil 4.

In another small building, you’ll be able to find your third medallion. Look for a small windmill and well to find your way to this building. Once you’re in, look towards the ceiling and you’ll find the third blue medallion on the farm.

For the last two medallions, you’re going to want to head to the main building at the north end of the farm. Climb the ladder and head up to find the last two Farm blue medallions from our vantage point indicated in the map image. For the first one, you’ll want to look a bit lower. You may have been able to see it earlier, but this is the best position to destroy it from.


A location of one of the blue medallions in Resident Evil 4.

Lastly, walk a little further from your vantage point facing the other direction until you see a large barn. This one can be a bit harder to see. Look in the area circled in our second picture, and you should be able to find it.

And that’s all of the Farm blue medallions in Resident Evil 4 remake! Enjoy your reward of Spinel, a resource that will be very helpful as you meet our friend the merchant. Want to improve your combat potential in RE4? Check out our guide on how to get the Red9 Pistol for free!


Call of Duty MW2 Finishing Moves Guide: How to Unlock & Use

Call of Duty Modern Warfare 2 features a plethora of finishing moves that can be used to quickly eliminate your enemies. When sneaking up behind an enemy, you have the ability to unleash a finishing move to instantly kill them on the battlefield. This can be extremely tricky to pull off as you must be stealthy, however, if successfully performed you will be met with a finishing move animation. You have the ability to customize this depending on which finishing moves you have unlocked and selected.

It can be tricky to find out the various ways to unlock finishing moves, so we have outlined each of them below for your convenience!

Call of Duty MW2 – How to Unlock Finishing Moves

The easiest way to unlock new finishing moves in MW2 is to complete the battle pass. Each season, Activision puts in multiple new finishing moves and new Operators (who have unique finishing moves as well). This is a great way to gain new killer attacks to utilize against your opponents. The only trouble with this option is that it will take quite a bit of grinding to earn, as you have to work your way up the battle pass to unlock said finishing moves.

If you don’t feel like grinding out the battle pass, however, you can always just buy tiers if you feel like spending money on that. Additionally, you could look to buying bundles in the shop itself. Each of these bundles that include Operators always offer brand new finishing moves that you can unlock after purchasing.

How to Perform Finishers in Modern Warfare 2

It’s important to once again highlight what exactly a finishing move is. Technically, you do not need to “unlock” them as you will have a standard finishing move when you buy the game. To activate this, once again just sneak up behind an enemy and hold the melee button.

Looking for other cosmetics to fancify your Call of Duty experience? Check out our guide on how to unlock & change loading screens in MW2!

Looking For The Perfect Indie RPG To Replace Earthbound? Don’t Bother. Instead, Try Yakuza: Like A Dragon

Earthbound, or Mother 2 if you’re a real one, is a classic example of videogame “soul”. The JRPG and its series is known for being wacky, charming, and dead. It left a strong impression on gamers worldwide, an impression that didn’t actually translate into sales. Its final game, Mother 3 (you may have heard of it) was never localized, marking the end of the series. Several indie devs have tried to take up the Earthbound banner, with mixed results. The most successful is Undertale, worldwide phenomenon and proof that there really is an audience for Mother-likes. Other successes include OFF, Lisa: The Painful, Hylics, Omori, and more.

But none of these fully satisfy the need for soulful, quirky JRPG. Undertale comes closest to matching the charm and style of Earthbound, but falls short when it comes to the RPG side. There’s virtually no character progression, and most of the game is a straight path from scene to scene. Instead, a strong alternative came from an unexpected source: the Japanese crime drama series, Yakuza (also called Like A Dragon).

yakuza 7 like a dragon ichiban hero

The series is unusual to begin with. On the surface, it’s about the hardships of Tokyo’s criminal underworld, but it’s known for flipping rapidly between heartwrenching drama and absurd comedy, paired with a massive wealth of side content. The seventh mainline title, Yakuza: Like A Dragon (or Yakuza 7 if you prefer) is strange even by its own standards, abandoning the other six games’ action-brawler gameplay in favor of becoming a full-fledged JRPG. It’s mostly a homage to Dragon Quest (the protagonist Ichiban is a series fan who hallucinates his life as a similar game), but playing it feels a lot like Mother 7, a game from an alternate timeline in which Earthbound was wildly successful.

Earthbound is a charming blend of fantasy adventuring and real-life experience in which you can order a pizza delivery for HP, or withdraw your battle earnings from the ATM. Yakuza: Like A Dragon takes that concept and amplifies it. The characters’ roles in battle, often called “jobs” in JRPGs, are actual jobs from the employment center. Summoning magic is available in the form of a messaging app. Ichiban can attend supplementary school to raise his stats – if he can afford tuition. His enemies, which take the form of troublesome citizens, feel like an echo of Earthbound’s. The “Neo Hippie” enemy type is a blatant reference!

Even the games’ core themes are similar. Earthbound is about a kid facing the hazards of the modern world, with his friends to aid him. Yakuza 7 is the same, but from the perspective of adult life. Ichiban uses his RPG mechanics to face legitimate threats of homelessness, gang violence, and political corruption, and just as with Earthbound, it’s his friends that make it all possible. It’s as if Earthbound hero Ness grew up and joined the mafia, complete with absentee father.

yakuza 7 party

Yakuza: Like A Dragon feels strangely close to Earthbound in many ways, but exceeds it in others. For one thing, it delivers the content and quality of a well-made Playstation 4 game instead of a well-made SNES game. Another important difference: unlike Mother, the Yakuza series is actually alive. A second Yakuza RPG is in development now.

Yakuza: Like A Dragon is worth a try if:

  • You love the Mother series, especially Earthbound.
  • You like JRPGs, but are tired of medieval fantasy.
  • You want to invest hours into a high-quality soap opera.

You can give it a pass if:

Yakuza: Like A Dragon is available on all modern non-Switch platforms. During a Steam sale, it can go for less than $20, which is nuts. Don’t worry if you haven’t played the other Yakuza games. You’ll miss out on some references, but the plot stands alone. That’s why they try not to call it “Yakuza 7“. [lasso ref=”yakuza-like-a-dragon-playstation-4″ id=”23257″ link_id=”3973”]

Resident Evil 4 Remake Red9 Pistol Guide: How & Where to Get it

The Resident Evil 4 Remake has a lot of weapons for players to use and upgrade. Although most can be purchased straight from the Merchant’s inventory, some can be found a little earlier and not cost a single Peseta. A great example of this in Resident Evil 4 is the Red9 Pistol.

This pistol packs a lot of firepower and can be upgraded into a real force to be reckoned with. Unfortunately, the opportunity to find this strong weapon for free can be missed. This is everything you need to know about where to find the Red9 Pistol.

When is the Red9 Pistol Available in Resident Evil 4?

If you don’t mind paying for it, the Merchant will begin selling it starting with Chapter 5. He’ll even offer a limited-time sale as well to knock off a bit of the price.

Your only chance to get it for free is in Chapter 4. It needs to be in this chapter since you’ll need free access to the lake and the walkways between the Church and the Quarry will have collapsed with Chapter 5, preventing you from returning to the area.

Where to Find the Red9 Pistol

Where to get the Red9 Pistol in Resident Evil 4 Remake.

Similar to the Golden Egg that’s available in this chapter, you’ll need to do a little bit of exploring across the lake. The difference here is that your destination isn’t on the outskirts, but right in the middle with the wrecked ship.

Once you have access to a working boat, you’ll want to approach this ship from the south side. There are two large pieces of debris close to the boat and you will have to move between them to dock. The wreckage on board will lead you into the cabin. A red treasure chest will be found here, but that’s not all the ship has to offer.

Move through the cabin and turn left to walk towards the front of the ship. This is where you’ll come across a large blue chest. Open it and you’ll find the Red9 Pistol. The handgun is a bit unwieldy, but it’s a powerhouse that can make a difference and will look great when you pose Leon with it in Photo Mode. There’s also no denying how great unlocking it for free feels.

If you want to carry this handgun comfortably across the remaining chapters of Resident Evil 4, consider investing some of those Pesetas you saved into upgrades and definitely put aside some Spinels for the Red9 Stock attachment that becomes available in a couple of chapters. You’ll thank me later.

Resident Evil 4 Remake Golden Egg Guide: Where to Get It

The new Resident Evil 4 Remake has plenty of familiar content to tickle your nostalgia but also features some new content. One of the latest is in the form of side quests that you can take on and turn in to the Merchant for rewards. This includes an egg hunt, which will task you with finding a golden egg in Resident Evil 4.

While some quests require you to destroy a certain number of blue medallions or find a particularly large fish, the Egg Hunt quest requires you to find a Golden Egg. This item is pretty rare and missable to boot, but it can be found pretty early on. Here’s where to find it and finish the quest.

Where to Find a Golden Egg in Resident Evil 4

Where to find a Golden Egg in Resident Evil 4 Remake.

Your first chance to grab a Golden Egg will be during Chapter 4. Once you’ve got access to a new boat to travel across the now safer waters, head to the east side of the lake. There’s a very small area where you can dock the boat at.

Unless you have the Village Treasure Map which reveals a small treasure here, it can be easy to assume there isn’t anything valuable here. The fact that the Golden Egg won’t pop up on the map until you come across it either only makes it easier to miss.

Once you leave the boat you’ll find a bunch of chickens running around. Multiple eggs can be found on the ground and you can even wait around for a bit to see if any of the chickens will lay some more for you.

The Golden Egg you’re looking for is near the back of the area. Walk around the little mountain of crates and shrubbery to find a shiny Golden Egg on the ground. It only takes up one space in your Attaché Case like other eggs, so it should be easy to make room if you have to. Feel free to examine it or even equip it if you want to make use of the Photo Mode to take some nice pictures of Leon holding an egg – just make sure not to eat it or throw it.

How to get a golden egg in Resident Evil 4 Remake.

If you happen to have passed this part already, you’ll be able to find another one in the castle’s Throne Room. That won’t come up until Chapter 12 though, so it’s much easier to get it out of the way here.

Either way, return to the Merchant when you can and sell the Golden Egg to complete Resident Evil 4‘s Egg Hunt quest. You’ll earn three Spinels for completing the quest and 9,000 Pesetas for the sale.

Resident Evil 4 Photo Mode Guide: How to Use Photo Mode

There’s no denying that anyone picking up the brand-new Resident Evil 4 remake is looking for some classic survival horror vibes and new features, including a photo mode. And while the game is partially aimed at bringing a beloved entry in the franchise to a new era of fans, those who grew up with the original are in for a nostalgic treat unlike anything Capcom’s remakes have achieved thus far. 

All of that being said, there are new memories to make in this updated version of the game, which is why you may want to snap a few screenshots of your time in its creepy Spanish village. If you’re confused as to how to access the photo mode, though, don’t feel bad – it’s easy to miss. Here’s how to use it.

How to use Photo Mode in Resident Evil 4

How to use Photo Mode in Resident Evil 4 Remake.

To access Resident Evil 4‘s photo mode, simply pause the game and look down at the bottom of the screen to see a prompt for it. While that sounds easy enough, it’s rather easily overlooked for those used to being able to engage with photo modes by pressing a certain button mid-action. Either way, once you press the corresponding button, you’ll be free to start playing around with quite a lot of options.

Resident Evil 4 comes packing a pretty standard but well-implemented photo mode. You have the ability rotate the camera freely, zoom in and out, and adjust the height to line up slick shots. Of course, you can also adjust the brightness and contrast, apply effects, and even remove main character Leon or certain enemies from the shot if you’d like. With so many features at your disposal, there’s no shortage of fun to be had when you’re ready to try your hand at photography in Resident Evil 4.

Want a palate cleanser after a night in a creepy village? Check out our take on a game with totally different vibes but the same release window, Atelier Ryza 3.

MrBeast Asks Homeless Man to Save Begging Until Shot Is in Focus

WICHITA, Kan. — YouTube personality and online philanthropist Jimmy Donaldson, also known as MrBeast, reportedly snapped at a local homeless man while filming a video, asking him to stop begging until his shot was in focus.

“Oh my God, can you shut the fuck up? Stop asking me for change, I’m trying to do my sound check,” an unhinged Donaldson said in a damning behind the scenes video. “Honestly, some of these homeless bums act like they’ve never been on camera before. I’m just trying to give him a huge sum of cash and see him dance around as I change his life with what is merely pennies of my fortune, but he’s being a real pain in the ass about it. If he could just save his good groveling for when we’re actually shooting, we could finally get some damn footage.”

Jackson Richards, the homeless gentleman who ended up being in the influencer’s video, said he was ultimately glad for Donaldson’s philanthropy

“I was sitting on the pavement downtown panhandling for change when this young man came up and started setting up cameras and lighting rigs,” Richards said. “I asked him if he could spare any change, and he started freaking out because the boom mic wasn’t set up yet. He did eventually give me $1000 and some branded MrBeast chocolate bars, so I just feel lucky because I watched him pass up a couple other homeless people that he said didn’t look pathetic enough for his video.”

Audiences appreciated Donaldson’s behavior in the benevolent video.

“It was so cool how MrBeast totally changed that guy’s life, he gave him a thousand dollars and only made a cool 200 grand off pimping out his misery,” MrBeast subscriber Ryan Tensley said. “He was also very patient with that homeless man who kept messing with his lav mic and kept interrupting MrBeast’s epic video intro by begging for food. MrBeast is such a professional.”

At press time, sources reported that MrBeast attempted to help a single mother who had lost her house, but unfortunately she chose the mystery box containing a bar of soap instead of the $10,000.

Critics Slam MrBeast for Helping Old Woman Cross the Street

WICHITA, Kan. — In the wake of a recent act of kindness from YouTube influence Jimmy Donaldson, a.k.a. MrBeast, critics were outraged to see pictures of the internet personality helping an old woman cross the street.

“That sick son of a bitch, where does he get off just guiding an elderly woman across that busy intersection?” said Twitter user Sean Francis. “He’s just going to take her arm and gingerly steer her through traffic without acknowledging the problems in society that make old women unable to cross the street in the first place? Sure, the woman seemed very thankful and MrBeast was gentle and polite, but I think he should be put in jail.”

Other social media posts condemned MrBeast for his previous good deeds. 

“It’s depressing to see someone shamelessly make a video of themselves doing random acts of charity to those in need,” said Marilyn King. “I can’t wait for people to realize that this MrBeast character is some demented freak who just wants to use his wealth and influence to help the less fortunate, and I can’t believe the internet is rewarding him for being so generous and kind. He may be doing something nice, but he made a profit off of it, and then even worse donated the profits to one of his food banks he funded. Why can’t he just use his riches and power to be a self-obsessed asshole who flaunts expensive cars and hawks boner pills like a good influencer?”

Despite negative attention, various MrBeast fans praised the YouTuber.

“Please be my friend MrBeast,” said one fan, Cyrus May. “I love you so much and I think we would be best friends. I have located your home and I am coming to it!!!”

At press time, sources reported that MrBeast had stirred up another online controversy when the YouTuber maliciously gave a homeless man a loaf of bread.

Like Borderlands But Wish the Characters Would Shut Up? Play Roboquest

There has always been a trend in first-person shooters of annoying protagonists who won’t stop talking, from Duke Nukem’s declarations of ass-kicking and bubblegum-chewing to the “crispy critters” cringe of Atomic Heart‘s P-3. For certain gamers, when dumb dialogue is brought up, they immediately think of the Borderlands series.

For all the good things about the running, gunning, and item collection of the Borderlands games, there’s still the characters some people wish would stop talking. The inconspicuously-named Roboquest is for you if you want a random-gun-grabbing experience where you won’t have to mute your screen.

If you go scrolling through Xbox Game Pass, you’d be forgiven for skipping something named Roboquest. The game, though it has a title reminiscent of a TRS-80 floppy, is a roguelike shooter currently in Early Access that deserves to be followed until its full release.

Roboquest starts with a girl finding you, a broken down robot, in the middle of the desert. From there the game has you bounding through canyons and cityscapes (and a few soon-to-be-announced levels), destroying hordes of robots and picking up increasingly-wild weaponry. You begin at an upgradeable base camped and choose any of the 5 unlockable base classes to dive into the next run.

Those runs are reminiscent of the Titanfall Gauntlet challenges, where you’re grenade-jumping and wall-running your way to the end as quickly as possible. Speed is key to dodge attacks, destroy power-up stuffed enemies that disappear quickly, and bound from enemy to enemy thanks to a Mario-esque damaging head jump. 

Along with that jump, your robo has a double-jump, sprint, and ducking dodge as standard kit. Classes differentiate themselves with abilities from going invisible, teleporting, and access to a free rocket barrage. Offensive capabilities include a base pistol, a melee attack that changes per class, and whatever guns you find lying around.

And you will find guns. In the starting area, hidden around the stages, and at mid-area break rooms you can find an array of armaments. Common shooting implements like Western revolvers, sawed-off shotguns, and sniper rifles are joined by boxing gloves, cryo-launchers, and bubble cannons. 

The guns change drastically as you go along. Buffs vary from elemental damage add-ons to nebulous increases of various stats to entire new secondary firing modes. The revolver you found in level one can be kept and upgraded to a whole new beast, or can become a completely new weapon when you find it in a future run.

All of this, and the game is just in early access. There’s still plenty of equippable items and boss encounters to discover at this point. The team at RyseUp Studios is keeping fans up to date with a road map available on the title screen, and it’s worth trying out Roboquest now to see how well they improve on it.

You might like Roboquest if:

  • You enjoy speed-running. This game allows players to really pick up the pace, and there’s enough freedom of movement to allow for quick runs through the environment.
  • You love varied guns. Each weapon you pick up has stats and modifiers that can completely change its capabilities. Half the fun of this game is just seeing what crazy new death-dealer you’ll find next.

You should stay away from Roboquest if:

  • You do not like roguelikes. While there’s a lot of Borderlands flavor, the open world aspect is gone, replaced with randomly-generated levels meant to be quickly sprinted through. 
  • You want a full experience. The game is still in Early Access, but it’s worth keeping an eye on for the eventual full release.

You can find Roboquest on Xbox Game Pass or Steam.

Atelier Ryza 3 Tool Crafting Guide: How to Get All Initial Tools

Since not only crafting, but gathering is also a central activity in your adventure, you should have every Atelier Ryza 3 tool ready for action. They are essential to progress in the game and prepare your party to face all the – cute – enemies only an Atelier game can throw at you. 

Although following Ryza and her friends is a quite chilling experience, part of the challenge of the game comes in the form of finding crafting tools – and eventually upgrading them – to collect materials that you will use to create more items. To make your life easier, we’ve come up with this guide explaining what Atelier Ryza 3 tools you need and how to craft them!

How to Get All Initial Tools in Atelier Ryza 3

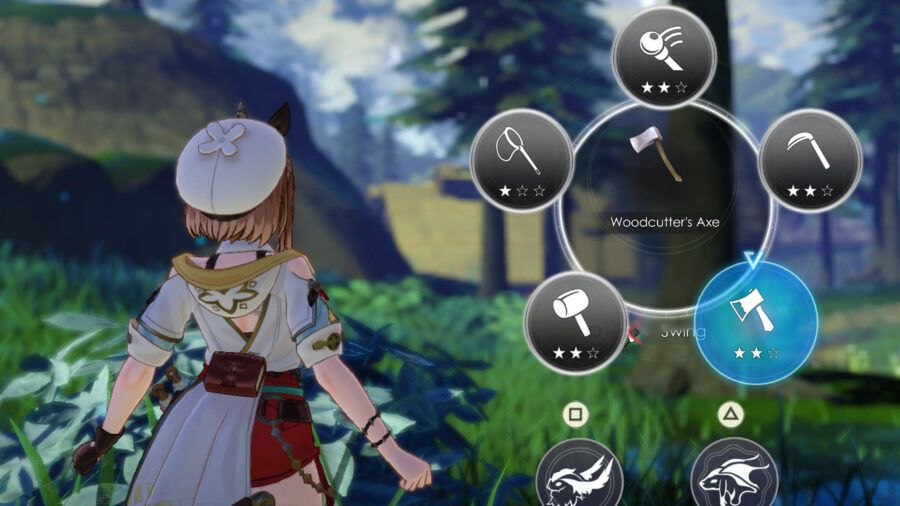
Just like in previous games in the Atelier franchise, basically, every tool must be crafted in Ryza’s atelier. Before you have them, you can gather only a few types of material whether by hand or using Ryza’s staff. But you don’t need to worry too much about that, since most items you need to craft some basic tools – Woodcutter’s Axe, Hammer, and Grass Sickle – are accessible to you through both methods. 

In the following section, you will find the recipe for each tool, a list with all the items you need to craft them, and a brief explanation regarding what they are used for. In Ryza 3, every recipe will require specific materials to be completed as well as it might also need second materials – the ones in brackets –  of certain types to improve the item you’re crafting. In the lists below, we’re going to put the names of materials that are required by the recipe, suggestions for the secondary group of materials, and where you can find them. 

Woodcutter’s Axe

This is just a regular axe that allows you to gather materials from certain trees, tree trunks laying on the ground, and even break small rocks as well as crystals. 

  • Eiche – Found near Ryza’s Home, In front of the Hideout, Beach of Far Bank, Blue Life Spring
  • (Lumber) Eiche
  • (Metal) Ingot – Craftable
  • (Threads) Restraint Silk – Found near Ryza’s Home, Relaxing Plaza, Beach of Far Bank.

Hammer (Atelier Ryza 3 Initial Tools)

There isn’t anything special about this item, but it’s one of the most useful tools you have at your disposal. With it, you can not only break big rocks, and crystals, but also other materials, such as some types of mushrooms. 

  • Eiche – Found near Ryza’s Home, In front of the Hideout, Beach of Far Bank, Blue Life Spring
  • Amatite Ore – Found near In front of the Hideout, Beach of Far Bank, Big Lighthouse
  • (Lumber) – Eiche
  • (Ore) – Amatite Ore

Grass Sickle

With the Grass Sickle, you can gather different items from some landscape elements you could interact with only using Ryza’s staff. Bushes and trees, as well as some flowers, can be gathered using this tool.

  • Large Bone – Found near Ryza’s Home, Lighthouse, Blue Life Spring
  • Polishing Powder – Craftable
  • (Ore) Amatite Ore – Found near In front of the Hideout, Beach of Far Bank, Big Lighthouse
  • (Lumber) Eiche – Found near Ryza’s Home, In front of the Hideout, Beach of Far Bank, Blue Life Spring

Fishing Rod

It’s a rod that you use to fish. Simple and efficient. It’s also not a secret that you can get fish – and other marine materials – with the fishing rod. 

  • Tough Log – Found near Ryza’s Home, Beach of Far Bank, In front of the Hideout, Big Lighthouse, Blue Life Spring
  • Alchemy Fibers – Craftable
  • (Lumber) – Tough Log
  • (Gases) – Foamy Water – Found near Big Lighthouse, Blue Life Spring

Crafting All Initial Atelier Ryza 3 Tools: Catcher’s Net

In case you need bugs for your recipe, the Catcher’s Net is the tool you need. While it interacts with environmental elements that Ryza’s staff and the Glass Sickle do too, the Catcher’s Net gives you the option to gather other types of materials that the other two tools can’t get.  

  • Tough Log – Found near Ryza’s Home, Beach of Far Bank, In front of the Hideout, Big Lighthouse, Blue Life Spring
  • Alchemy Fibers – Craftable
  • (Marine) Sardines – Found near Beach of Far Bank, Big Lighthouse,
  • (Bugs) Narwhal Grasshopper and Seven Stars – Found near Ryza’s Home, Beach of Far Bank, In front of the Hideout, Big Lighthouse

Wind Shoes

Different from the previous tools, Wind Shoes are not used to gather materials. They will, on the other hand, improve exploration, because, by having it equipped, you can slide down slopes at high speed. 

  • Bestial Air – Craftable
  • (Puni) – Pink Puniball dropped by Flower Puni in Faurre Region
  • Spirit Bottle – Craftable
  • (Animal Mat.) Mythical Hide – Dropped by Loppy Ear in Faurre Region

Emerald Band – Atelier Ryza 3 Initial Tools

Because exploration is a big part of your routine in Atelier Ryza 3 when discovering sources of specific materials, Emerald Band is going to be extremely helpful. With this item, you can reach certain locations by using crystals you see floating in the air. 

  • Emerald Glass – Found Near: Big Lighthouse, Giant Water Wheel, Mine Resthouse
  • Ingot – Craftable
  • (Threads) Restraint Silk – Found near Ryza’s Home, Relaxing Plaza, Beach of Far Bank. 
  • (Magical) Fairystone Fragment or Lightning Tree – Found near Big Lighthouse, Old Mining Site Ruins, Giant Water Wheel, Mine Resthouse, 

Air Drop

Although you can easily swim in the game, you can only dive to explore under the water, with the Air Drop equipped. 

  • Honey – Craftable
  • (Neutralizers) Blue Neutralizer – Craftable
  • Foamy Water – Found near Big Lighthouse, Erupting Hill, Blue Life Spring, Star Gazing Hill, Tree of Light
  • (Puni) Blue Puniball – Dropped by Blue Puni found near Big Lighthouse, Blue Life Spring, Beach of Far Bank.

Summoner’s Bell

Just like the previous games, you will walk a lot in Atelier Ryza 3. The Summoner’s Bell gives you the ability to summon a mount that not only walks faster but can also dig in specific locations and find items. There’s more than one type of mount in the game that you can tame using the Summoner’s Bell.

  • Large Bone – Found near Ryza’s Home, Lighthouse, Blue Life Spring
  • Ingot – Craftable
  • (Magical) Sapling Branch – Found near Ryza’s Home, In front of the Hideout, Big lighthouse
  • (Puni) Red Puniball – Dropped by Red Puni which is found near Big Lighthouse, Blue Life Spring, Old Mining Site Ruins

Once you have crafted Atelier Ryza 3 tools, you will be more than ready to explore the game’s magical world and craft even better items. You can do that even faster by using our Atelier Ryza 3 SP Farm Guide.