Best DBD Killer Perks: Everything You Need to Know

BHVR’s Dead by Daylight has a wide range of killers and perks alike. They can aid a variety of playstyles within the game. If you’re a stealth killer, there is something for you. Or, if you like to go running and rampaging, there are perks specifically for that kind of build too. In this guide, we’ll have a look at some of the best DBD killer perks you can choose so that you can please the Entity and win your matches to get all the bloodpoints you need.

Since the huge update, it has changed the meta considerably. It means that a lot of the perks aren’t as universally good across all killers, and players have had to resort to playing builds tailored to their unique killer. However, there are still a few perks out there that can be used fantastically across any killer, and here they are.

DBD Killer Perks

Hex: No One Escapes Death

NOED is one of the most powerful and used perks in the current meta by Dead by Daylight killers. It’s one of the most well known perks and one that survivors hate. There are five Dull Totems throughout the map. It’s necessary for survivors to take the totems out if they want a better chance to survive, as the Dull Totems give the Killer a 4% speed boost once the gates are open, as well as giving the Survivors an exposed status effect, meaning they will be downed in one hit if caught by the Killer. 

Pop Goes The Weasel

This perk makes it incredibly difficult for Survivors to get the generators done, depending on how good the Killer is at finding them. Pop Goes The Weasel allows the Killer to attack a generator and regress the generator by 20% once they have hooked a Survivor. With how many hooks they get to work with, that’s a lot of generator progress they get to steal away from the Survivors. 

DBD Killer Perks: Corrupt Intervention

Corrupt Intervention is one hell of a DBD killer perks, and makes the survivors job very difficult. This perk blocks the three furthest generators from the Killer for 120 seconds, meaning the Survivors can’t work on them. Despite being nerfed in the newest patch update, it still remains one of the strongest perks in a Killer’s weaponry.

However, Corrupt now deactivates early if a survivor is put into the dying state in under 120 seconds. Although this is now a feature, it still remains one of the strongest perks, and is one of the best perks a Killer can take into their matches.

DBD Killer Perks screen

Barbecue & Chilli

Barbecue & Chilli is one of the most well-known DBD killer perks in the game. It remains essential, and has done since the release of the perk in 2017. The perk reveals the aura of all Survivors over 40 meters away once a Survivor has been hooked. It has no cooldown whatsoever and can be used as many times as you like during your killing spree. 

Hex: Haunting Ground

This perk is absolutely a run ruiner. When this perk is equipped, two active totems are placed on the map. When one of them is cleansed, the Survivors are immediately given the Exposed status effect. This means the Killer can then down the Survivors in a single hit, allowing them to go on a killing spree and win the match.

These are the top five perks any Killer can use in their Dead by Daylight matches. With the right combinations, you can make some amazing plays and get the bloodthirsty wins you’ve been craving.

How to Get Three Stars on Spiffinmore in Two Point Campus

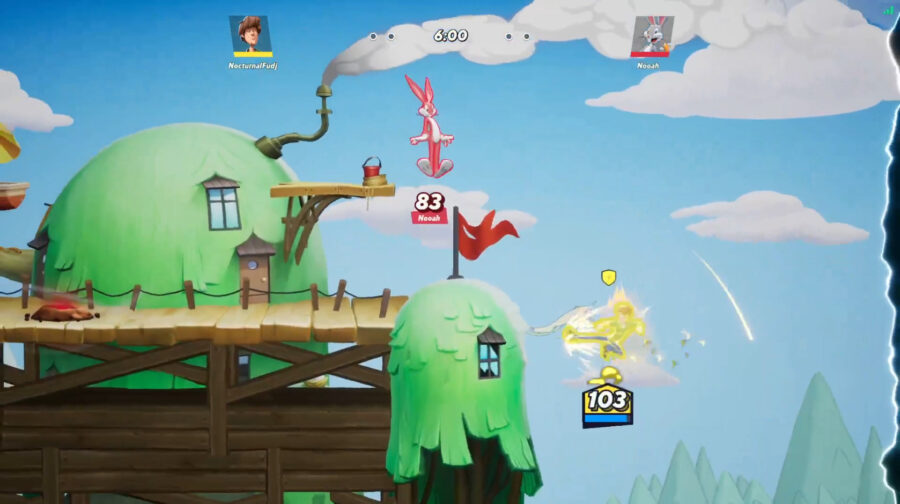
While working as an administrator at Two Point Campus, you’ll have to take over as head of different schools that all have their own special majors. Spiffinmore is the most magical place in Two Point County and players will need to help fledgling students learn how to cast spells and make potions.

How to get the first star at Spiffinmore

When you first load into the level, the game will require that you place the Wizardry class as well as a Lecture Theatre. To do that, you’ll be required to take out a large loan by your rival in this level. The only thing that will be on the map is a library and a Lecture Theater, so you’ll need to use the other building. Before you start class, you’ll want to make sure you have:

  • At least one Staff Room
  • A few Dormitories
  • A couple of showers
  • A bathroom.

This will keep your students relatively happy and also helps you level up your campus to meet the actual first star requirements. 

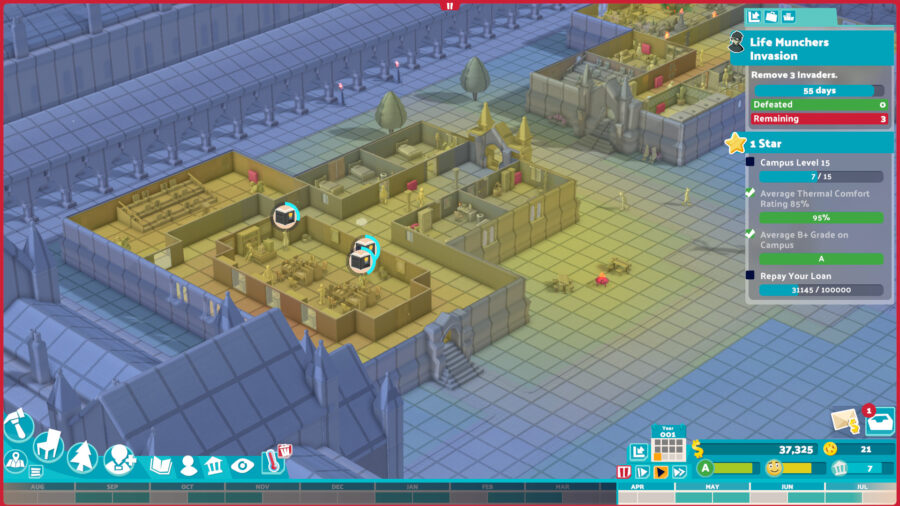
In order to get your first star, you’ll need to:

  • Get your campus to level 15
  • Have an Average Thermal Comfort Rating of 85%
  • Average B+ Grade on Campus
  • Repay your $100,000

The easiest out of these will be to maintain your students’ grades and keep an average thermal rating of 85%. 

In order to keep your students’ grades up, you should also build two Private Tuitions and have at least one teacher for Dark Arts and Wizardry each. Then, after your students attend their first class, you’ll be able to check their grades by clicking on the little icon of a person titled “Personnel Management” and then the group of little people icons titled “Students.”

A screenshot from Two Point Campus showing a list of students and their grades as well as a profile of one specific student

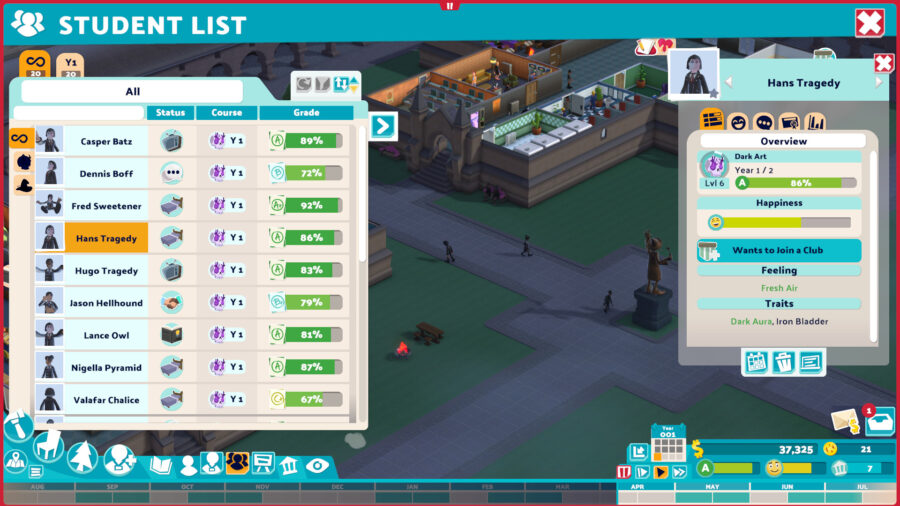
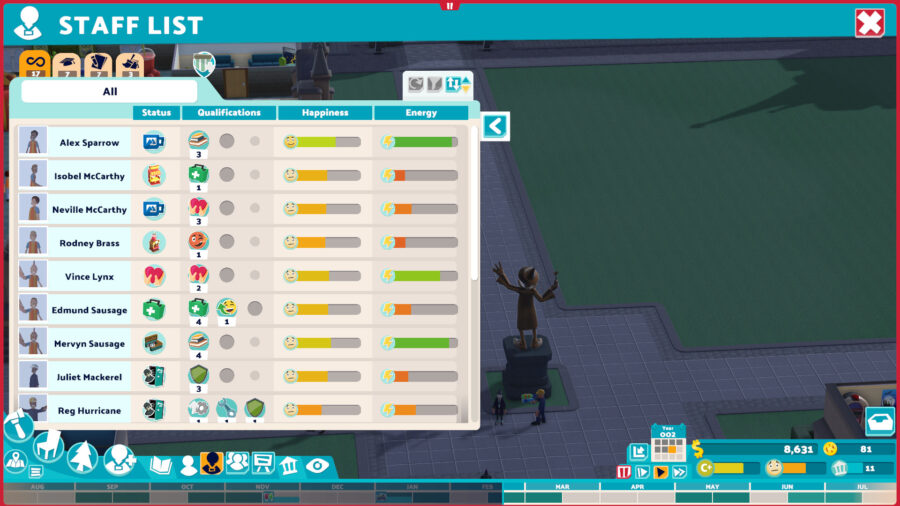
This will show you your Student List with all of your current students’ grades, happiness, and energy. If a student has a C+ or lower, send them to Private Tuition by clicking on their name and the image of a whiteboard under their pop-up profile. This will send them to one Private Tuition class, which should boost their grades. You can always send them for another if it doesn’t.

This will help you make sure that your students are getting higher grades in your class and you can repeat it as many times as you need to. 

You’ll also need to make sure that you’re providing enough warmth for your students and teachers since Spiffinmore is located in a cold part of the county. You can check your campus’s current heat level by clicking on the eyeball in the bottom left of the screen and then the thermometer icon in that menu.

A screenshot from Two Point Campus showing a map of a school showing different areas that are heated, indicated by yellow to red colors.

This menu will show you the different areas in your school that is heated via the light yellow to red color on the map. Areas that are orange to red in color indicate a lot of heat in one specific area. To ensure that your campus is heated enough, make sure that the inside of your buildings is at least a light yellow to provide heat coverage there. 

To get your campus to level 15, you’ll need to purchase new buildings and increase the number of classrooms and other important rooms you have on campus. As your students grow, your campus will continue to grow in level, but it’s much faster if you purchase new stuff for your school and level it up that way.

To get started, consider improving your school with things like:

  • Libraries
  • Dormitories
  • Private Tuition rooms
  • A Research Lab
  • A Training Pod
  • Nurse’s station
  • A food court
  • A club meeting spot

Anything you can add that will impress your students and prove functional in your school will be a great asset to your school.

Lastly, you’ll need to repay the loan you took at the start of the level, therefore showing that you can make a profitable school. In order to do this, you should increase the number of students that you have on campus. At the end of each year, invest more Class Points into one of your classes, or add a new one, and increase your student base.

This will increase the number of people paying for classes, but may also require you to invest in new resources like extra classrooms. When you have more students, repeat the same process to make them do better in school and you’ll be awarded a cash bonus based on the number of students and how much experience they’ve gained. 

You can save up and pay off your loan or pay it month by month until you’re even with the bank. Whichever you do, this one just requires you to be patient and wait for the money to roll in. Once you get close enough, you can take out one of the other loans to help pay off your main loan through the bank icon in the bottom left of your screen and then the money bag.

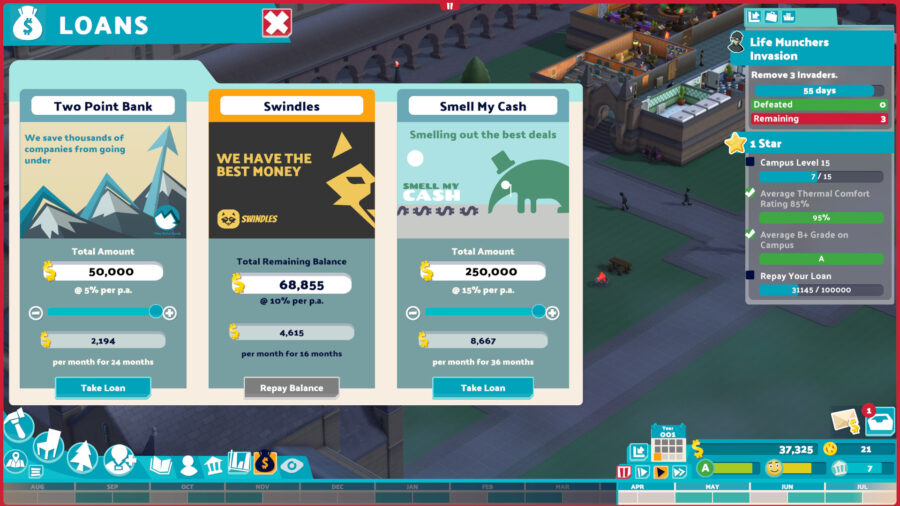
This shows off your current loan status including how much you owe, how much you’re paying per month, and how many months you have left until you’re paid up. As seen in the picture above, the player could take out the $250,000 loan from Smell My Cash and pay off the Swindles balance, completing the level one star objective.

How to get the second star in Spiffinmore

To get the second star, you’ll have to meet a new set of requirements. The second star on Two Point Campus requires:

  • Resolve 20 Pastoral issues
  • Attractiveness rating of 75%
  • A student population of 80
  • At least 10 level 10 Wizardry students

In order to resolve Pastoral issues, you’ll need to build a Pastoral Support room to help students relieve their stress and other bad moods and a qualified Assistant. Once you have the room built, you’ll need to navigate to the Student List again and look for any students that have low happiness. Click on the characters with low happiness and see if they have any negative Feelings.

A screenshot from Two Point Campus showing a student and a staff member sitting in a counseling room

If the character is experiencing bad Feelings, you should click on the icon with a heart in some hands and the character will go seek Pastoral Support when they have free time. This will likely raise their happiness and if it doesn’t resolve the issue you can send them back to get counseling again. Once you’ve cleared 20 issues, you’ll have completed the objective.

Getting a good attractiveness rating will mean that you need to make sure that you have plenty of decorations around your campus as well as someone to pick up the litter. Placing trashcans in every room and in the most used hallways will be a great way to cut down on litter, in addition to having the proper Janitorial staff. 

In order to check the current Attractiveness of your campus, you should click on the eye in the bottom left of your screen and then the flower. This will immediately pull up a screen that shows what areas of your school are the most attractive, indicated by the green color. You can make an area look better by adding decorations or functional items.

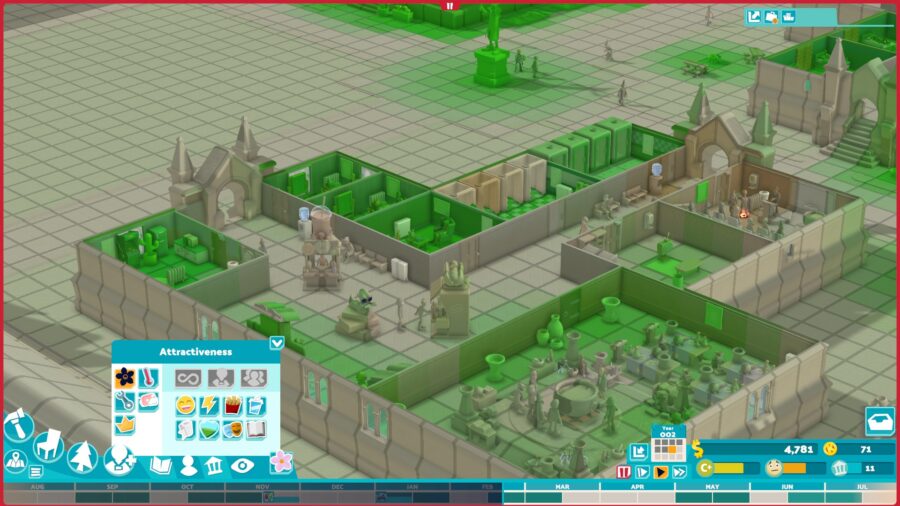
To improve the attractiveness rating for your campus, consider placing:

  • Posters
  • Love furniture
  • Plenty of plants
  • Decorative furniture

Plants are a great way to up the Attractiveness rating in a 4×4 grid. Placing one in hallways can ensure that you’re leveling up your looks without breaking the bank. Keep in mind, though, that the more plants you have, the more janitors you’ll need to maintain them. To complete the objective, just make sure that you’ve got green areas in every room and some outside.

Getting your student population up might be the easiest of these objectives. All you need to do to get more students is invest more into your classes through the Course Management screen. To get there, click the open book icon in the bottom left of your screen and then the image of the diploma from that menu.

 A screenshot from Two Point Campus showing active courses, with Dark Art and Wizardry selected.

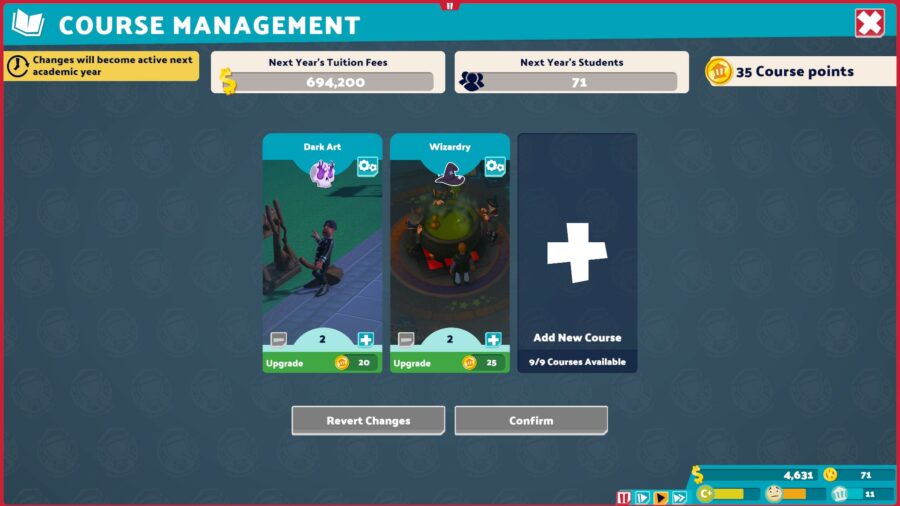
When you click the plus on whichever course you want to upgrade, it will show what’s required but also how many new applicants you’ll get that year. Using this, you can get an idea of how many students will be at your school each year ahead of time. After completing the first star requirements, you should have around 150 Course points to spend.

Using this method, you’ll be able to tell exactly when you have 80 students based on adding up the applicants before the year starts.

To get 10 of your Wizardry students to level 10, you should make sure that you have provided everything for those students to do their work. This could mean adding new cubicles to the Library or making sure the classrooms are stocked with the most current gear. You can also help a Student get to higher levels by upgrading the classroom Lecterns and equipment.

A screenshot from Two Point Campus showing a selected Lectern and its upgrade options

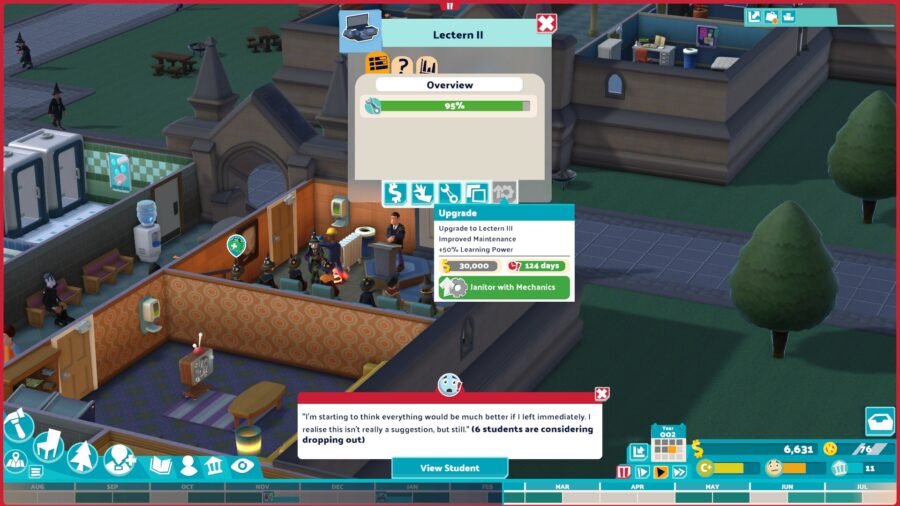
To upgrade them, you’ll first need to make sure you have a research room and a Janitor with the Mechanics skill. If you’ve learned how to upgrade these items on previous levels, you won’t need to re-learn the upgrades at Spiffinmore. Once you have researched the upgrade you want, you can click on the item and the gear with an upwards arrow to start the upgrade.

By leveling up the students’ equipment, you’ll be ensuring that they retain more information and get more experience, translating into them leveling up. 

How to get the third star in Spiffinmore

To get the third start on Spiffinmore in Two Point Campus, you’ll need to meet the following requirements:

  • Get your Campus Level to 22
  • Have a monthly profit of $50,000
  • Have staff happiness of 65%
  • Get 20 students to graduate with an A+

The third star challenges are the most difficult ones for each level, testing the player’s abilities to the max. However, completing these objectives will largely depend on tasks that you’ve done to complete previous stars.

As you’ve upgraded your courses and helped students study in previous objectives, your school will likely already be close to level 22. That being said, continue to level up your courses, equipment, and rooms, and you’ll achieve this objective just by focusing on the other ones.

Making the $50,000 profit is will require careful planning, like ensuring your staff all have something to do. To check if your staff are busy, you can click on the small icon of a person and then the icon that looks like it’s wearing a lanyard. Go through your staff tab and scroll to see if any of your current staff are “Looking for Work.” 

A screenshot from Two Point Campus showing a list of all staff with their qualifications and happiness

Teachers may be Looking for Work while they aren’t teaching a class, so click the Calendar icon on their individual profiles to see what tasks they have during what months. Another option for teachers is to cross-train them in multiple subjects, allowing them to tutor or cover for other subjects instead of hiring an additional teacher.

The same goes for Janitors, as you’ll need staff who’s capable to fight off campus invaders and upgrade your equipment. If you have a few that can accomplish both of these tasks, you’ll be set for most of the game.

Raising your staff’s happiness will require you to meet their various needs and provide them with plenty of breaks. To check what your staff wants you to improve, go into the Staff List and click on a staff member. In their individual profile, click on the smiley face that shows the different needs of your students. 

a screenshot from Two Point Campus showing a staff list as well as an individual profile showing the staff member’s mood and what’s affecting it.

Any bars that are yellow or red will need to be improved if you have any hope of making your employees happy. If multiple staff all share the same concerns, then you should immediately improve those facilities and equipment in your school. There may need to be more break rooms, food options, cleanliness, and healthiness.

If a specific staff member is giving you a hard time, you can give them a bonus using the slider that’s in each of the staff’s individual menus. This will increase how much you’re paying them, but it will also provide an immediate boost to that employee’s income. 

Lastly, getting 20 students to graduate with an A+ will require that you pay special attention to the students in their final years of the Wizarding or Dark Art programs. As discussed earlier in the guide, build one or more Private Tuition rooms and send any students with under an A+ to get tutored. If you do this consistently throughout the year, you’ll ensure you get the graduates.

This may require you to play through a couple more years at Spiffinmore, especially if you don’t have any students in their final year when you begin the quest. If you can correct bad grades in the years before they graduate, you won’t need to try to fix them in their final year. As long as you are diligent about your Private Tuition, you’ll get students with A+ grades.

That’s all you need to know about how to get three stars at Spiffinmore in Two Point Campus. 

Arya Stark MultiVersus Guide (Tips, Strategies, Perks)

In the midst of MultiVersus’ cartoon and superhero legends, Arya Stark stands out as the game’s sole HBO representative. However, the fantasy setting of Game of Thrones makes it a perfect source material for a fighting game. Arya has moves that are typical of a platform fighter swordfighter. She also has some supernatural influence that makes her a unique combatant in her own right. Arya can seem daunting at first, but with proper preparation and practice, she can become one of the best combo-heavy characters in the game.

Arya Stark Moveset Overview


Arya’s moveset revolves around quick movement and evasion. Her attacks on their own don’t do much damage. Her quick movement and combos, though, ensure that you can rack up damage quickly on any opponent.

  • Neutral Ground Attack: Arya’s neutral ground attack has her step back, then lunge forward with her sword, Needle. This attack has decent horizontal launching power, and can also be an evasive move in a pinch. 
  • Side Ground Attack: Arya uses a two slash with her sword and dagger to do medium damage to enemies.
  • Up Ground Attack: Arya swings her sword upwards. This attack can be charged as well.
  • Down Ground Attack: Arya rolls forwards, then slashes her sword behind her. Like her neutral attack, this attack can also be used evasively to get behind enemies.
  • Neutral Air Attack: Arya spins a dagger diagonally below her. This deals decent damage, but doesn’t have much knockback potential.
  • Side Air Attack: Arya charges a forward slash. This move is Arya’s best move to K.O. opponents horizontally. At full charge, it can deal heavy damage as well.
  • Up Air Attack: A two-hit upward spin attack. Arya’s best kill move when killing an enemy from the top blast zone.
  • Down Air Attack: Arya uses a charged downward stab attack. This is excellent for spiking enemies into the pit off the stage. It can also be used to bounce enemies off the stage to start aerial combos.

  • Neutral Special: Arya uses a forward attack to steal her target’s face. If input while she has a face, Arya performs a taunt as that fighter. This taunt sends out a circular shockwave that will stun any enemy in its range.
  • Side Special: Arya throws a knife that can attach to fighters or platforms. Pressing this input while the knife is active makes Arya instantly dash to the knife’s location, hitting enemies during the dash. While the knife is on cooldown, the attack becomes a forward spinning stab that hits multiple times and breaks armor.
  • Up Special: Arya swipes overhead with a dagger. If it hits an enemy, Arya dashes towards them. This dash can easily be followed with an Up Air or Side Air attack to maximize knockback.
  • Down Special: Arya dashes to her ally, giving them both Turn Attack buffs. The turn attack buff makes the user’s next attack break armor, and flip the enemy to face away from the attack. In one-on-one battles, Arya gives herself the buff without dashing.

Arya’s Unique Mechanics

Arya has a couple of unique mechanics that set her apart from other characters. First is backstabbing. When hitting enemies from behind, Arya deals increased damage. This makes certain moves centered around movement, like her Down Ground Attack, even better, as she can use these quick attacks to get behind opponents. This also is what makes her Turn Attack buff useful. After a Turn Attack flips enemies, Arya can follow up with a strong backstab for maximum damage.

In addition, Arya can use her Neutral Special to steal the faces of other fighters. When Arya steals the face of another fighter, her Neutral Ground and Neutral Air attacks are overridden by the fighter who’s face she stole. For example, if Arya Stark steals Lebron James’ face, her Neutral Ground Attack becomes LeBron’s shoulder charge, and her Neutral Air Attack becomes LeBron spinning his basketball around his waist. This can be incredibly useful to give Arya more large area covering moves, something her kit on its own lacks.

It becomes especially useful when Arya’s ally is a fighter with one of these attacks. Arya can steal enemies’ faces, but also those of her partner. This means if Arya is teamed up with Iron Giant, for example, Arya can use his sweeping neutral air, without the constant liability of his large size. If you want to utilize her normal neutrals, though, you can press Neutral Special again to release a stunning shockwave and return her moveset to normal.

How to Win Teams Battles as Arya Stark in MultiVersus

Arya is one of the most frail characters in MultiVersus. Because of this, despite her incredible potential, it’s easy for her to become a liability in team matches. The best way to assuage this is to pair her with one of many defensive combatants:

  • Wonder Woman (Tank)
  • Superman (Tank)
  • Steven Universe (Support)
  • Iron Giant (Tank)

Arya is best utilized just trying to focus on one member of the opposing team, with her teammate drawing attention to themselves whenever possible. Arya’s Side Special will be valuable with this style of play. Use your knife throw to attach to one teammate. Then, dash to them, immediately use Up Special, then either Up Air Attack or Side Air Attack.

Using this combination of dashes, Arya can start a combo and rack up a lot of damage early. While the dagger is on cooldown, get chip damage where you can. Using Down Special to give your opponent and yourself Turn Attack will be helpful in getting bonus backstab damage added on to your enemies. Then, to finish them off, use the dagger dash into Up Special again, then chase them with the same move again off the top to K.O. your enemies.

While the knife throw is on cooldown, don’t be afraid to wait it out. Arya can hold her own in a fight without it. However, when paired with a tank, it’s best to let them occasionally take the frontlines. Otherwise, Arya’s frailty can become a detriment to her team.

How to Win 1v1 Battles as Arya Stark in MultiVersus

1v1 battles tend to come more naturally to Arya. Without a second opponent to interrupt mid-air combos, she stands as an even more intimidating force. Chasing upwards for combos is much less risky when your opponent is straight above you and can’t K.O. you from below.

One move Arya might want to use more sparingly in these fights is Neutral Special, face stealing. Getting an opponent’s face may be worth the risk, depending on their Neutral Attacks. However, the wind-up for the attack is incredibly long. With someone to hide behind, it isn’t really risky. In singles, though, usually the long window of vulnerability for this attack just isn’t worth the benefits of the stolen face.

Arya Stark’s Best Perks (Teams & 1v1)

Arya is best used when utilizing her combo potential and vertical kill power. Using perks to improve Arya’s mobility and knockback, players can do just that. Here are Arya’s best perks for Team and 1v1 battles:

Arya Stark’s Best Perks (Teams):

  • Leg Day Champ (unlocked at Level 7)
  • Up, Up, and A-Slay (can be trained at Level 9)
  • Triple Jump (can be trained at Level 9)
  • Coffeezilla (can be trained at Level 9)
  • Signature Perk: Betrayal (unlocked at Level 8)

These teams perks mostly all focus on improving Arya’s vertical mobility and knockback. Leg Day Champ increases jump height, which helps Arya chase enemies vertically. This is further enhanced by Triple Jump. This perk gives Arya an extra jump if she successfully hits an enemy while in mid-air. Up, Up, and A-Slay increases vertical knockback. This helps Arya kill very early from the top blast zone using an Up Special into Up Air Attack.

Another perk players can consider using is Coffeezilla. This will decrease the cooldown on Arya’s Side & Down Specials. However, this will usually only be best when paired with another cooldown reliant character like Bugs Bunny or Wonder Woman. Finally, Arya’s Signature Perk in Teams in most cases should be Betrayal. This gives Arya and her ally an Enraged buff after hitting her ally with her dagger. Hitting an enemy while Enraged will Weaken them, allowing Arya and her ally to stack on the damage.

Arya Stark’s Best Perks (1v1):

  • Leg Day Champ (unlocked at Level 7)
  • Up, Up, and A-Slay (can be trained at Level 9)
  • Triple Jump (can be trained at Level 9)
  • Signature Perk: Trophy (unlocked at Level 10)

Arya’s best 1v1 perks are essentially the same as her Teams ones. There are two major differences. First, without a teammate to capitalize with her, Coffeezilla no longer becomes worth the perk slot. Second is a different Signature Perk, Trophy. Trophy gives Arya the face of her enemy when she knocks them out. With Neutral Special mostly being too risky to use in one-on-one, this perk gives Arya a chance to utilize some of the benefits of stolen faces with no risk.

Arya Stark’s MultiVersus Season 1 Changes

Arya was mostly treated well by the first Season 1 patch. She got a number of buffs on a lot of attacks in her kit. Here’s the rundown of her main changes.

  • Up Special launches fighters at an angle to allow for easier follow-up attacks.
  • Up Air Attack now more consistently hits the second part of the attack.
  • Ground Side Attack has more speed/velocity on the second slash.
  • Ground Down Attack does the initial dodge roll earlier.
  • Fixed bugs regarding using fighters’ disguises.
  • New in Morty’s patch (August 23): change to Assassin passive ability means Arya takes less damage.

These useful changes make Arya much more viable. They especially make her viable for lower-level players to give her combos a try. As the only assassin class character in the free rotation until August 30, players can give her deadly vertical combos a try for themselves until then.

Batman’s Best Moves, Strategy, and Techniques: MultiVersus Guide

Batman is one of DC Comics’ most recognizable characters, and one of the most approachable, beginner-friendly fighters in MultiVersus. Batman’s moveset uses his wide variety of gadgets at his disposal. These include Batarangs, smoke bombs, and Bat-Bombs. Using these tools, Batman focuses on eliminating his opponents vertically, and is a force to be reckoned with for both new and experienced players.

Batman Moveset Overview

Batman’s tools help provide him a lot of damage potential, while also allowing him to close gaps with opponents when necessary. Many of Batman’s attacks also cause the debuff weaken. In MultiVersus, weaken makes opponents take more damage from any attacks that deal damage. Overall, the best way to take advantage of Batman’s moveset is to apply as much weaken as you can.

  • Neutral Ground Attack: Batman’s neutral ground attack is his Batarang. Hold the attack button to charge how hard he throws, then release to throw. There is a cooldown on the Batarang attack, but it’s significantly shortened if Batman picks it back up. The Batarang weakens on hit.
  • Side Ground Attack: This attack is a basic combo. It ends in an uppercut with slight knockback power. Mostly useful for tacking on damage.
  • Up Ground Attack: Batman can charge a sweeping attack that will hit in a small arc over his head. Decent damage and knockback that is good for trying to hit enemies overhead. Also weakens opponents hit by it.
  • Down Ground Attack: Batman charges up a slide attack. The longer the move is charged, the further Batman slides. Inputting the attack after the slide gives Batman an additional kick that knocks enemies horizontally. 
  • Neutral Air Attack: Batman throws a Batarang. Has a slightly different arc than the throw from the ground, but is otherwise the same.
  • Side Air Attack: Batman charges a forward punch. Pressing the attack again will activate a second jab that rushes forward and weakens the enemy. However, if Batman is close to the ground, getting the second jab off will be difficult.
  • Up Air Attack: Charges an upward jab, similar to the attack on the ground. This aerial attack can also be input again for a second attack. These swipes also weaken enemies.
  • Down Air Attack: Batman flips and kicks downwards. This attack has powerful knockback and is an excellent way to spike enemies. Just be aware of the attacks long wind-up when timing attacks on enemies.

  • Neutral Special: Batman equips a Bat-Bomb. The next attack that Batman connects on an enemy will attach the Bat-Bomb to them. The bomb detonates after a short countdown and knocks the victim upwards. If Batman throws a Batarang with the bomb out, the Batarang will have the bomb attached and stick it to any enemy it hits. This special has a cooldown.
  • Side Special: Batman uses a grappling hook to attach to a surface. This surface could be platforms, the edge of the stage, or even opponents. The grappling hook pulls him in, kicking enemies on the way. A good movement tool, but can be easily telegraphed and punished by enemies.
  • Up Special: Batman charges an uppercut, launching himself and any fighters he hits into the air. This is Batman’s best way to K.O. enemies. Even if the enemy isn’t high enough damage to get knocked out, knocking them into the air is a great way to start upward combos and lead to their death. When in the air, the move can’t be charged, but is still an excellent way to finish enemies.
  • Down Special (Ground): On the ground, Batman’s down special is a smoke bomb. While in the smoke, Batman and his ally is invisible to the opposing team. In addition, all attacks from the smoke weaken opponents. Opponents in the smoke have their movement speed reduced.
  • Down Special (Air): While in the air, Batman’s down special becomes a stomp, coming down from the air with control to change his direction.

Overall, Batman is best when chasing enemies vertically. He has many attacks that can have additional combo hits to maximize damage that knock horizontally. But when finishing opponents, vertical knockback attacks are the way to go.

How to Win 2v2 Battles as Batman in MultiVersus

Batman tends to excel more in solo battles. However, he’s still a great pick for team battles too. As for his teammates, it’s best to pair Batman with some characters that excel with ranged attacks:

  • Bugs Bunny (Mage)
  • Velma (Support)
  • LeBron (Bruiser)
  • Tom & Jerry (Mage)

Batman will best serve his team trying to rush one of the opponents. Keeping stacks of the weakened status condition will help stack damage on enemies. Then, a more ranged teammate of Batman’s can help add the damage even more. 

Batman’s Smoke Bomb can be utilized in teams as well. Both Batman and his ally will be invisible in the smokescreen. In addition, his team has increased speed. These two buffs combine to help Batman’s ranged teammate unleash unexpected ranged attacks to their advantage.

How to Win 1v1 Battles as Batman in MultiVersus

Batman’s combo brawling excels in one-on-one battles. With less enemies to worry about, Batman can chain his attacks together with no problem. The second hits of Batman’s Down Ground Attack and Side Air Attack are much easier to connect in these smaller-scale fights.

After using combos to stack on the damage, Batman can knock enemies out of the top of the stage. At around 90 damage, Batman can start trying to K.O. enemies out of the top. When chasing enemies, try to stay below them and bait out their dodges. Then, finish them off with Batman’s Up Special to finish them off.

Batman’s Best MultiVersus Perks

Batman’s best perks mostly revolve around maximizing his vertical kill power. Some perks can be altered, but there’s a few that players will always want to have equipped to complement Batman’s strengths.

Best Batman Perks (One-On-One/Teams)

  • Up, Up, And A-Slay (unlocked at Level 12
  • Triple Jump (trained at Level 9)
  • Aerial Acrobat (unlocked at Level 2)
  • Precision Grapple (Signature Perk) (unlocked at level 10)

Batman’s best perks stay largely the same in both 1v1 and Teams battles. Up, Up And A-Slay is vital for Batman’s success. Increased vertical knockback helps accentuate Batman’s biggest strengths. Aerial Acrobat increases air acceleration, meaning he moves around in the air faster. This makes it easier to bait enemies with unexpected attacks and movement. Triple Jump lets Batman chase enemies higher with less risk. Finally, Precision Grapple gives a powerful blast. This makes Batman’s grappling hook even more effective, especially when Batman grapples onto an enemy.

Batman Nerfs in MultiVersus Season 1

Batman didn’t get as heavily changed as other characters in the latest MultiVersus patch. However, he did still get slight nerfs from before. Here are the changed that the Caped Crusader got in Season One:

  • Batman’s grappling hook won’t make him overshoot his destination. Before, Batman missing a grappling hook kick would result in him going far past his grapple point. This commonly resulted in Batman being K.O.’d far earlier than he ordinarily would.
  • First hit of the side ground attack has whiff recovery. This means that if Batman misses the first hit of this jab, his enemy could punish it more easily.
  • Batman picking up the Batarang now returns less of the cooldown. This prevents spamming the attack as could happen in the original build of the game.

Overall, despite these changes, Batman is still a strong member of the MultiVersus roster. He has a load of gadgets that make him a fun adaptation. Batman’s fun yet approachable moveset makes him an especially great pick for newcomers to MultiVersus

Shaggy’s Best MultiVersus Combos, Moves, Perks

Shaggy, who is featured prominently in MultiVersus key art and is the default character you’ll be playing as in Training Mode can be accurately described as “the Mario” of MultiVersus. He’s a balanced all-rounder designed to be easy to pick up and play for newcomers and has a bit of everything in his moveset. But don’t let this simplicity fool you! For our green-shirted glutton makes a hell of a knuckle sandwich. Here’s our comprehensive guide on how you can get better with Shaggy in MultiVersus.

Shaggy Basics

As apt as our Mario comparison may have been, let me step outside of the realm of platform fighters and do you one better, Shaggy is the Ryu of MultiVersus. (Street Fighter Ryu, that is – not Smash Bros Ryu, god this stuff’s confusing.) And why do I say this? Because of Shaggy’s best move, and one that is the crux of his kit — his Up Special, Power Uppercut. Yes, it bears a striking resemblance to Ryu’s iconic Shoryuken, but dare I say it might even have more application? Power Uppercut is not just a useful recovery tool and killing option — it’s also a combo finisher, more on that later. This move can be used in almost every scenario that isn’t neutral, and you’ll hopefully be bagging a lot of your kills by reading an opponent’s jump and punishing them with it.

Yes, this is me killing a Tom & Jerry player at 51%.

On top of punishing reads and intimidating kill potential, Shaggy also has a projectile – and one that he spawns with! Shaggy’s Sandwich can be thrown with Down Special whilst on the ground and in the air, it does mild damage and knockback and even heals teammates it passes through once he’s thrown it, he can spawn another one with another Down Special, nice!

And then we come to the cherry (or olive) on top (of the sandwich, if it’s an olive), Shaggy’s central gimmick and the one thing that sets him apart from the other beginner-type characters in most fighting games — Rage Mode. Yes, Warner Bros appear to have given Player First Games the go-ahead to make the memes a reality, Shaggy can in fact power up and take on a very Super Saiyan-inspired appearance with his Neutral Special. No, the screenshots you’ve seen are not fake, this is really in the game, and it’s a hugely important part of playing Shaggy that we’ll get to when we cover his Specials in more detail.

All-in-all, Shaggy has a bit of everything and appears to borrow elements of his design from lots of iconic fighting game characters over the years, he even has a move that’s very reminiscent of the classic Captain Falcon knee from Super Smash Bros. And while he may be simple in concept, that’s not to say he’s without identity. A Bruiser type character with a lot of speed and movement options, Shaggy is what traditional fighting game players would call a Rushdown character. He’s intended to be played aggressively and approach opponents with powerful offensive options. The Sandwich may give him a bit of leeway in backing up and creating distance, but this character really excels when opening up his opponent with his high damage combos and powerful killing options. Let’s get into the meaty middle;

Shaggy’s Combos in MultiVersus

Shaggy is a very combo-centric character with many moves that can lead into many things. To save trying to account for 1000+ situationally dependent combinations, we’re gonna go through Shaggy’s 3 most prominent combo starters, and what you can get off them.

  • Grounded Side Attack/Jab (Combo Meal): Like most characters in MultiVersus, Shaggy gets a lot out of cancelling his multi-hit Jab before the final hit. Shaggy can, if he so chooses, simply perform Jab 1 & 2 straight into Power Uppercut for some safe damage and knockback. This alone is far more optimal than the Combo Meal in full, but if you feel like taking a walk on the wild side you can take this much further. Shaggy’s Grounded Up Attack (Like, Overhead Smash!) also true combos into Power Uppercut, and Jab 1 & 2 true combo into the Grounded Up Attack, so Jab 1 & 2 – Overhead Smash – Power Uppercut is indeed an entirely true combo at early percents. There’s a lot more you could mix in there too, maybe an aerial like Up Air (Flying Slacker Smack) which again, will also true combo into Power Uppercut. (We told you this was a crazy combo finisher.)  Other moves like the spiking, armor-breaking Grounded Down Attack (Power Stomp) can combo out of Jab 1 & 2 and might be worth consideration if your opponent has armor or is at the ledge where it could knock them down into a disadvantageous position, or perhaps you feel like giving Neutral Air a try (Flurrious Feet) as it can also be combo’d out of Jab 1 & 2 and could send your enemy offstage horizontally and has multiple hits, so is a simple way to do more damage if you don’t have the confidence to execute a longer combo in the midst of a tense match. Probably Shaggy’s most reliable and damaging early game combo is Jab 1 & 2 – Grounded Up Attack – Up Air – Power Uppercut. Give it a try in Training Mode!
  • Grounded Up Attack (Like, Overhead Smash!): Grounded attacks will never be as easy to land in MultiVersus as aerial attacks because of the speedy, aerial nature of the game, but their rewards will always be proportionally huge – as is exemplified by Shaggy’s Grounded Up Attack. Of course, this move, much like almost everything else in Shaggy’s kit true combos into Power Uppercut, but it can also true combo into almost any of Shaggy’s other aerials too as it pops the opponent up at such a perfect angle. It helps that the other 2 moves listed here also combo into Grounded Up Attack, so this move is arguably even more important as a combo extender than a combo starter.
  • Down Air (Get Down, Man): Shaggy’s two-handed spike will bounce characters up and off the ground as is par for the course in MultiVersus, but this is particularly important for Shaggy — whose combo game is very vertical. Down Air can hypothetically combo into every one of Shaggy’s other aerials, but ideally you’ll be looking for Up Air which as we’ve covered just above, true combos into Power Uppercut. (And does so at almost any percent.) If you’re looking for stage positioning, though, Down Air into Neutral Air may be preferable to send your opponent outwards and offstage, and at very early percents you can probably get Down Air into Jab, which can then lead into everything just covered.

How to Use Shaggy’s Specials

Though he may be a combo-heavy rushdown character, I’d argue Shaggy’s specials are actually the most important part of his kit overall as opposed to the aerials and normals that dominate most character’s metas. Shaggy’s normals may be helpful for combos and neutral, but Shaggy’s specials have application with combos, neutral, juggling, reads and even a bit of zoning. They’re his best moves across the board in my opinion;

  • Neutral Special (Zoinks!): Is Shaggy’s defining gimmick. When he uses Neutral Special on the ground or in the air he begins charging up power, Super Saiyan style, and if allowed to charge for long enough uninterrupted, he enters Rage Mode. Whilst in Rage Mode, all of Shaggy’s other specials change to more powerful versions that have armor and apply “weaken” that we’ll cover in their own sections. Just using this charge with no intention to actually finish it and enter Rage Mode is a powerful tool in and of its own because it forces the opponent to interact with you, baiting them to approach and try and stop you before you can finish charging, and this can lead to easy punishes if you play around their approach. If Shaggy uses Neutral Special whilst in Rage Mode, he points a finger to his forehead and emits a small but powerful AOE explosion that deals a lot of knockback and is great for covering the ledge in particular. Whenever Shaggy uses a powered-up Rage Mode Special Attack, it then cancels the Rage Mode after.
  • Side Special (Chiller Instinct Kick): Is a fairly simple move that should make immediate sense to players as soon as they see it. Shaggy flies a decent distance across the screen horizontally with his foot out to deliver a kick with reasonably high knockback. When using this move in Rage Mode, the distance, travel speed and knockback are all increased quite substantially. True to his rushdown nature, this move is great for helping Shaggy close distance and can score you a lot of kills off the top if you read an opponent’s aerial movement or recovery option. Speaking of recovery options, this move also works great as one! As the “two specials in the air before you touch the ground” rule in MultiVersus means you can use both this and Up Special to cover a good amount of vertical and horizontal distance as well as your two jumps to make it back to stage.
  • Up Special (Power Uppercut): We’ve already covered a little bit as it’s such a key part of Shaggy’s kit, almost all of your combos will be ending with this move. Aside from that, it’s also a potent recovery option and will really come into its own once you get the hang of reading your opponent; knowing when and where they’re gonna jump and punishing them hard for it. When in Rage Mode, this move doesn’t just hit harder but also hits multiple times.
  • Down Special (Like, Feed The Hunger/Like, C’Mere Man): The first time you use Down Special in any match as Shaggy, you’ll throw the Sandwich you spawned with. From here on out, using this move on the ground and not in Rage Mode will result in Shaggy reaching into the ground and yanking out yet another Sandwich to re-equip. This move becomes a larger and much more powerful projectile when in Rage Mode and the Sandwich as a whole is Shaggy’s only real way to create space from his opponent, and may be a solid edgeguarding tool as well — as Shaggy’s offstage presence is otherwise pretty weak overall. When you use Down Special in the air without a Sandwich equipped however, this becomes a different move entirely — Like, C’Mere Man. This move has Shaggy dive towards the ground with armour and pound it with both fists, creating a small shockwave that does huge knockback to anyone Shaggy makes contact with and will score you a lot of vertical KOs if used correctly. When used in Rage Mode, the shockwave actively travels vertically and Weakens anyone it touches. This move is a powerful mixup that can catch people off guard who are trying to be too aggressive when covering your landing, and gives people a great reason to respect Shaggy coming down. No, not like that. I know he’s a hippie but, c’mon.

Additional Tricks to Know:

Shaggy’s Neutral Air is a great, multi-hit move with a very generous hitbox that pops your opponent out for a great angle at follow-ups, however due to MultiVersus’ frantic, fast-paced nature, you might find when trying to use it whilst holding forward (which you’ll be doing often), you often misinput Forward Air instead. This will put some serious shackles on your neutral game, but can be rectified in the game’s controller settings. Try either setting a second button to “Neutral Attack” (in my case I use the Right Trigger/RT on my Xbox controller, and also use the Left Trigger to jump) or ticking the “Swap Air Side And Neutral Attack” setting so that you can use this hugely important Neutral Air with the free range of movement without fear that you’ll perform a Forward Air instead.

Shaggy is a simple character and there’s not a lot of advanced techniques to learn, but definitely practice his combos in Training Mode (in particular the ones off Grounded Side Attack/Jab) and get used to cancelling your dodges and other moves to get your stuff out as fast as possible and optimise your combos! Your neutral should consist of a lot of Neutral Air, Forward Air, a sprinkle of Down Air, some Sandwich throwing and generally trying to move yourself into a position where you can open an opponent up with a Jab combo!

Perks

As a fast-moving rushdown character, we want perks that will accentuate Shaggy’s mobility and allow him to further excel at smothering opponents. Here are some perks I recommend and have seen other, better Shaggy players doing so too;

  • Lumpy Space Punch increases the damage you deal with melee attacks in the air by 5% (and 10% if stacked with a teammate). This perk will come up often if you like to read opponent’s jumps with Power Uppercut as much as I do, and considering how many of Shaggy’s combos are vertical and have you taking the opponent up into the air with multiple hits, you can’t really go wrong here.
  • Gravity Manipulation is part of a core of perks that will play a part in further accentuating Shaggy’s mobility. It increases your team’s fastfall speed by 10% (20% if stacked), which is very helpful for Shaggy whom — aside from the occasional Neutral Air or Down Special, generally struggles to get down to the ground and can be juggled quite hard.
  • Aerial Acrobat should be an obvious one. It increases your team’s aerial acceleration by 10% (20% if stacked) and will come in hugely handy considering how much time Shaggy spends hopping about the place throwing out aerials, it’ll also influence your Chiller Instinct Kick and make it slightly less reactable, which is a huge plus as the move is generally quite punishable if done from far enough away.
  • Speed Force Assist gives your team +4% base movement speed (and +8% if stacked) is another no-brainer if you’re wanting to build the fastest Shaggy in the west. A whole core of speed-based perks like the trinity we’ve just covered could have you moving so fast that it might even open up new combos that others builds of Shaggy simply aren’t capable of!
  • Hit ‘Em While They’re Down gives your team a 5% damage increase to debuffed enemies (10% increase if stacked), and while it may be a relatively niche option, all of Shaggy’s Rage Mode specials weaken your opponent — so it’s something that could come into play and result in some even earlier-than-expected kills fairly often.
  • Triple Jump is a perk I feel almost foolish for not mentioning in my Bugs Bunny guide, but perhaps it seemed almost too obvious and too…general? This perk is everywhere right now and is used by almost every character (especially in teams, where stacking it just gives both members of your team a permanent triple jump from go.) But even in singles it could still be very useful for Shaggy, while it’ll only give Shaggy a triple jump after hitting an opponent in the air in singles — that’s something Shaggy does quite a lot! I’d absolutely recommend this perk for Shaggy as would I retroactively recommend it for Bugs and preemptively recommend it for every other character in the game as well.

Signature Perks

Not much of a toss-up here.

  • Hangry Man lets you charge up Rage faster if you have a Sandwich equipped by automatically consuming said Sandwich when you charge. It’s a perk I’ve seen almost no one using and not really heard anyone recommend.
  • One Last Zoinks on the other hand is what all the big kids are using. It automatically triggers Rage Mode whenever Shaggy passes 100%, almost guaranteeing that you’ll get it at least one per match, this could even cause your opponent to change strategy and fish for early kills so as to not let you get over that threshold, and by consequence that could lead them to playing desperate and being easily punished. This is just really good. Pick this one.

And bon appetit! I hope this 6-course meal was to your liking and that you look forward to polishing off your opponents on the online ladder as if they were a Scooby Snack and you were a very hungry stoner. Get in, mash on some people, do some cool combos and then kill ‘em at 70 with a ridiculous Bruce Lee kick whilst surrounded by a vaguely Super Saiyan meme aura. Ahh, nothing else like it. 

Have fun, and happy climbing!

Trailer for Marvel TV Show Reveals This One Gonna Be Mandatory

FRESNO, Calif. — Marvel dropped a shocking new teaser for their latest exclusive Disney+ television series, shocking fans by revealing at the end that this one is going to be mandatory.

“God damn it,” said exhausted Marvel fan Timothy Gunkler. “I was watching through the trailer, laughing at the mediocre CGI and the weird plot elements until bam, one of the main Avenger’s showed up near the middle of the trailer. While at first I was a little excited, thinking ‘Oh, wow. Paul Rudd agreed to this,’ when my slight smile faded upon the realization that this show is going to actually matter. They aren’t just gonna ‘Moon Knight’ it where it takes place across the fucking world with little connection to the main stuff in case people don’t want to watch it. They made it very clear that the next movie is going to completely hinge upon this shit, and I’m going to have to watch it now.”

“I’m going to have to invest an hour a week for eight excruciating weeks watching this shit or else I don’t get to be a part of the monoculture,” he continued. “There should be laws against this.”

Marvel Studios President Kevin Feige said this marketing strategy was definitely intentional.

“Well, well, well,” Feige began in a press conference. “Did you think you stupid bastards could just show up to the theaters every once in a while? No fucking way. Oh, what’s that? You’re just going to watch a YouTuber do a recap for the show? Okay, little baby. Can’t call yourself a true Marvel fan though. That’s right. Get your popcorn, get your remote, you’re settling in for six hours a piece for various minor characters that do not matter, and there will be one important plot point in every single one so that you cannot skip them. Clearly you people don’t understand: I fucking own you. 

At press time, Marvel announced that television shows would be unintelligible unless viewers had signed onto the newest season of Fortnite.

Game Store Offers Free Vintage Smells

SAN JOSE, Calif. — A local throwback gaming store is reportedly offering free smells from bygone eras, local shoppers have confirmed. 

“Oh man, what a cool store,” said Todd Westinghouse, a customer that recently checked out Level Two Games for the first time. “They had all kinds of old consoles and games I haven’t thought about in years. I bought a Sega Game Gear! All the employees were pretty cool too. If I had one complaint about my experience, it’s that the store sort of smells like someone spilled some Hi-C Ecto Cooler in an old gym bag and left it there for five years or something. I was holding my breath by the end and ran the hell out of there before I even got to look at all the games. Other than that, this place is great, though.” 

The owner of the store said he wasn’t aware that he’d been recirculating old retro smells 

“Oh, I didn’t realize my store had a funk to it, as you call it,” said Chuck Blonde, owner of Level Two Games. “I spend most days here, so I guess I’m sort of numb to it. How did you describe it again? Like I poured used cat litter into a VCR and put it in the microwave? That’s a little much, don’t you think? I mean, yeah, the cat somehow took a shit in the VCR last week, but I didn’t put it in the microwave or anything. You’re being absurd.” 

Although repulsive to some, other customers say the vintage aromas add to the authentic nature of the experience. 

“Sure, you could emulate any old game system you want for free at home and use software to tweak the experience to your liking,” said Al Kern, a frequent customer of the store. “But you can’t download a ROM that will make your room smell like sweaty coins and stale pizza. This place is the real deal. Sometimes I come down here just to huff the inside of the Atari cartridges. You just can’t do that anywhere else.” 

As of press time, Blonde had firmly reminded everyone not to huff the inside of the Atari cartridges.

TV Character Has Longer Hair in This Scene So You Know It’s a Flashback

ATLANTA — A character in the hit television series Anaesthesia Blues was shown with longer hair in one scene so that viewers would know that it was a flashback scene, according to those familiar with the situation.

“At first, I was like, whoa, why does Marcus look slightly different? Then he pulled out a flip phone, and I was like, whoa, why did Marcus get rid of his iconic iPhone to start using one of those old Nokias? Then he started complaining about President George W. Bush, and I was like, whoa, why is he so hung up on such an old president? Then Lindsay showed up in the scene, and I was like, whoa, is she a ghost? Didn’t she die three seasons ago? That’s when I realized that Marcus’ hair was shaggier than normal, so it must have been a scene that took place in a year before the show started,” said Anaesthesia Blues viewer Lex MacDonald. “I appreciate when the show gives me little hints to help me figure out when the scene takes place.”

According to longtime Anaesthesia Blues writer Caine Schneider, Marcus’ longer hair was an intentional voice to help viewers understand the scene better.

“The longer hair was crucial to setting the date of the scene, because, as everyone knows, your hair is longer when you’re younger,” Schneider explained in a behind-the-scenes interview that followed the airing of the show’s newest episode. “Everything else about the character can stay the same, though, of course. It doesn’t matter if the actor is 20 years older than they should be in that scene, so long as they wear a floppy wig — that’s how you know it’s in the past. If we ever do a scene in the future, we’ll make sure to give Marcus a comb-over. It’s like how you know a scene is in Mexico if it’s orange, but for time.”

At press time, Anaesthesia Blues was reportedly in danger of being canceled by HBO Max due to its extensive hair and make-up budget of one shaggy wig.

Parent Reading Steam Reviews to Determine If Genital Jousting Is Appropriate for Children

CHESAPEAKE, W. Va. —  A concerned parent has reportedly spent hours scouring the Steam reviews for Devolver Digital’s Genital Jousting in an effort to determine if the game would be appropriate for her sons to play, sources have confirmed. 

“Oh, now this one here is interesting,” said Carol Morris, mother of three young gamers, reading another in a series of Steam reviews out loud to no one in particular. “It says ‘Genital Jousting provides an absurd look at the status quo and the things we value in our lives, as our hero John gets ready for his high school reunion and takes stock of where he’s at in his life. Also, John is a set of dick and balls and an asshole that works at a dildo factory shoving dildos up his asshole all day.’”

“So getting kind of mixed signals on that one,” she said.

The game, released in early 2018, is a physics based party game which also features a short story mode. The game is rated M for mature and garnered mostly positive reviews. 

“While Genital Jousting clearly won’t be for everybody, those that give it a shot will find an inspired puzzle game akin to a more sophomoric Untitled Goose Game,” read GameSpew’s positive review of the title. “The satirical looks at office culture, consumerism, and dating life pair nicely with the sight gags like when you put a match up your asshole and use it to light candles or when you hurt your asshole and put a Band-Aid on your asshole. A truly one of a kind game.” 

The game’s developers said they designed the game with a number of different audiences in mind, potentially even children. 

“I know it’s easy to laugh off a title like Genital Jousting, but we really wanted to do two things; make a fun video game, and challenge what it is that a video game could be,” said Evan Greenwood, creative director with Free Lives Ltd. “It’s not really my place to say whether it’s appropriate for a lady’s children or not. I guess it all depends on if you’re more comfortable with them playing some violent shooter, or a thoughtful little game that tells a nice story?”

“Where, yes, you steer around as a big red schlong and nads that leaves a slimy trail everywhere it goes,” he continued. “That’s in there.” 

As of press time, Morris decided to go ahead and purchase Genital Jousting for her sons, and informed them that she would sit with them while they played the game to make sure they understood all of the mature content. 

Hey! This article is sponsored by Devolver Digital. Genital Jousting may not be appropriate for children, but it is very appropriate for YOU, an ADULT. So you should check it out on Steam right now and play it, OK? It’s 75% off right now and it’s got dicks in it.

Priceless 14th Century Renaissance Painting Restored by Whacking it With a Wrench a Few Times

AUSTIN, Texas — The Aurora Baptiste, a previously dilapidated Renaissance-era painting in the possession of a local art gallery, has finally been restored by mechanic Chip Conagher after he smacked it with a monkey wrench three times.

“It was real easy gettin’ it fixed up once it came into the shop,” said Conagher after submitting his invoice for parts and labor to repair the 45 million dollar painting. “I just fixed it the same way I fix anything, by givin’ it a few good thwacks. Most things can be fixed that way.”

Conagher then went more into detail on his work process, which he says has helped him repair cars, generators, jukeboxes, sentry guns and fighter jets, among other things.

“Usually when something unfamiliar comes into the shop needing fixing, it at least has 2 or 3 cartoon band-aids in the shape of an X hidden somewhere on it,” he explained. “And then you get to point gently at that area with your wrench and say, ‘there’s your problem right there,’ which in my opinion is really the best part of the job.”

The global art community has come out in droves to praise for Conagher’s unorthodox preservation efforts, heralding the restoration as a perfect recreation of the original piece. 

“I’d be lying if I said I didn’t cry when I first saw the finished product,” said professional art critic Renée Trombowski. “You would barely even know that it was just bludgeoned with a wrench!”

At press time, a highly in-demand Conagher had reportedly been called into a local hospital to attempt to revive a flatlining heart surgery patient.