
Are you one of the many players that couldn’t beat the Diablo 4 beta world boss Ashava? Here are all of her secrets laid bare! Take down Ashava with our helpful world boss guide.
Ashava’s Moveset
Ashava, the Pestilent has an array of normal attacks consisting of:
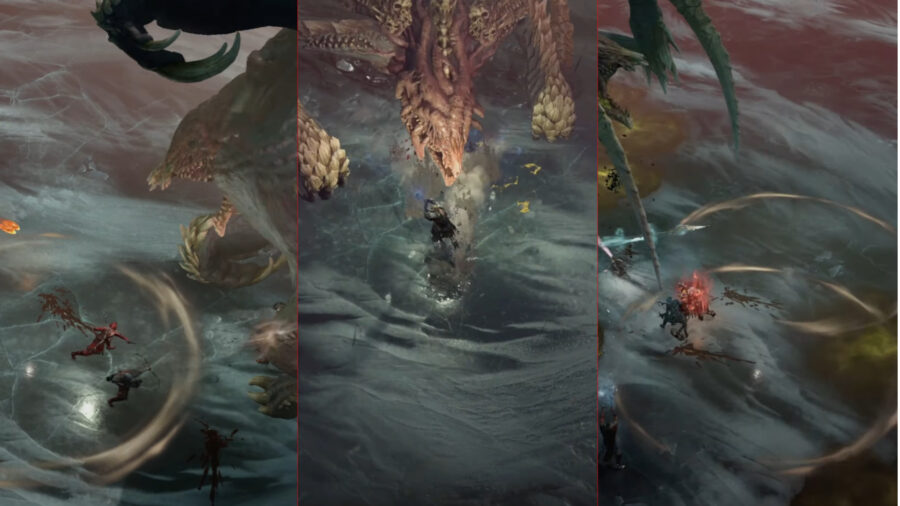
- Ground Pound. Telegraphed by a quick backstep, before winding an elbow all the way back and up, then hammering the spot she was previously standing on. Panel one below.
- Lunging Chomp. Telegraphed very briefly by dipping her head low and snapping her neck to gaze at a target right before biting. Often an insta-kill. Panel two below.
- Pounce Stomp. A leap followed by a heavy landing on a target. Telegraphed by crouching low and back on her hindquarters, like a cat. Knockdown effect.
- All while dealing persistent poison damage, hence the titular ‘Pestilent.’
Area attacks include:
- Sweep. A near 360 degree circular plow of a wide zone, using either one of her forearm blades, that sweeps backwards. This is immediately followed by a partially overlapping 180 degree second sweep forwards with the other arm’s blade, in the same direction; the latter starts more or less where the previous one ended.
This attack knocks around unshielded players at best, and is an outright insta-kill at worst if caught in the sweep. Telegraphed by drawing an arm almost all the way back to her opposite shoulder, elbow tucked under chin, like a shinobi, before lunging far outward to stake the ground. If she leads with the right arm, then the sweep will be clockwise; if the left, then counter-clockwise.
- Exhaled/Vomited Poison Clouds that become…
- …Poison Pools on the ground, and both of which do sustained damage. Telegraphed by raising herself almost upright with green bile drooling heavily from her gaping maw; her torso and the ground beneath her will also radiate a bright glow briefly.
Spewed in a short arc directly in front of her. These two moves will always occur in tandem, and appear to unlock only when her health is reduced below the first inverted red triangle (which flips and turns gray) above her health bar.
- Plow Back. As seen in the title image, Ashava stakes the ground with both blades and rapidly plows it up all the way back towards her hind legs, like a skier, thus ripping up any players on her flanks. If not an insta-kill, this pulls or drags players around for a knock around effect.
Telegraphed by rearing up almost upright with both blades raised. This move appears to unlock only when her health is reduced below the second inverted red triangle (which flips and turns gray) above her health bar. Panel three above.
How To Beat Ashava
Every single attack can be evaded merely by staying behind and between her hind legs as much as possible. For melee fighters, this is the Plow Back’s only safezone. Even the Sweep attack’s damage is confined to the middle and outer edges of the circle. When she leaps away, close the gap as quickly as you can. Be mindful of her rapidly stepping back into you and immediately pounding the ground, i.e. the Ground Pound, which happens on occasion.
If you have gear or skills with any kind of barrier, bubble, dome, or shield, use them to tank most of Ashava’s physical attacks. This includes weapons that confer short-term protection for dealing damage to Elite enemies. Stepping into an ally’s dome is also possible, in a pinch. You can be shoved out of the dome by the Sweep attack, or any move that can knock you around.
Poison resistance gear, gem enhancements, and elixirs will also mitigate the near persistent poison effects.
In the inevitable event of death, prefer to revive and be revived by allies. That way you won’t lose the 10% durability on gear like when you opt to use the checkpoint resurrection system instead. Once your gear durability is completely exhausted, you will be forced to town portal in order to repair. If you’re solo, or with no party member present in the arena to anchor you to that particular shard (session/instance/zone), you will lose all damage progress performed so far.
The task of reviving fallen allies should be relegated to underpowered players for maximum efficiency.
How To Stagger Ashava (Diablo 4 Beta World Boss Guide)
Under Ashava’s health bar is a slender secondary bar in gold that can be filled–from the center outwards in either direction–by dealing Crowd Control damage to her. The Crowd Control status effects are:
- Chill
- Daze
- Fear
- Freeze
- Immobilize
- Knockdown
- Knockback
- Slow
- Stun
- Taunt
- Tether
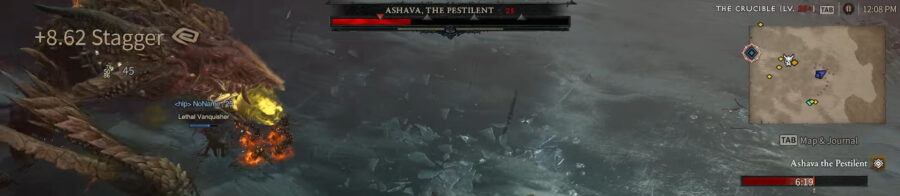
While Crowd Control is normally intended to cause an immediate status effect on large groups of lesser enemies, its effect is different on Ashava and World Bosses in general. Once this gold Stagger bar is filled, she will flop forward on her belly and be incapacitated for twelve seconds, and also permanently shatter one of her forearm blades. The latter effect appears to be simply cosmetic and doesn’t prevent further use of Sweep or Plow, nor does it negate the damage from them. Use the opportunity to whale on her with anything and everything you’ve got.
How To Loot Exploit Ashava For Legendaries
As mentioned, Ashava normally spawns four times over the course of the Open Beta, dropping Legendaries each time. When the event begins and after Ashava appears, a fifteen minute timer will begin counting down on the right side of the screen, at the end of which she will escape. This timer is global, which means every other shard with an ongoing Ashava encounter is at the same point in that countdown. After slaying Ashava as quickly as possible, pick up your drops and immediately town portal, and then return through it to the Crucible before the event window closes. You will most likely be in a fresh shard with a different set of random players that haven’t slain Ashava yet, thus giving you a second opportunity at farming her for drops, in the same event window. When doing this with a party, all of you must leave (but not necessarily return) together, in order to reset the shard correctly–anyone partied up that hangs back in the Crucible acts as a shard anchor of sorts.
https://old.reddit.com/r/diablo4/comments/11v3dof/world_boss_zones/jcr6oot/
If it fails to give you a shard with an ongoing boss battle, try town portalling again. Rinse and repeat. If it keeps failing, it’s most likely because either all potential shards still battling Ashava are full, or the event window itself has closed. It might help to make note of how much time is left on the countdown right before you finish off Ashava the first time, so you can determine how much more time to invest in searching for a shard to farm. Even better, you can simply add fifteen minutes to the World Boss spawn times for your time zone.
If in a party, disband it before individually town portalling back and forth–this will give each of you a chance of stumbling upon an ongoing boss battle, thus spreading your bets. Once successful, just invite everyone back into the party and finish the fight. Ashava battles often come down to the wire, so don’t hesitate to persist till the last few seconds.
This might be patched out at some point, though it’s difficult to see how, given the shared open world design of Diablo 4. Exploit it to your heart’s content while you still can.
Diablo 4 Beta World Boss Guide – Tips And Thoughts
- With up to 12 allies allowed in The Crucible to take on Ashava, her power scales based on the number of players, rather than their level. Even a less than full stack of competent players chaining Crowd Control can accomplish this kill fairly quickly.
- If you fail to pick up your weekly “Ashava’s Spoils” or if it fails to drop for any reason, check the lost and found in your Stash in town. This may also hold true for players that get disconnected right at the end of a boss battle, which happens fairly often.
- Based on the exploit above, if you town portal for any reason during an ongoing battle with Ashava, you will most likely not return to the same encounter (your slot in that shard having been cleared for someone else to join), thus losing your progress with her HP meter. As stated previously, having at least one party member remaining in the arena as an anchor will mitigate this.
- This may actually be a legitimate (and cheesy) exploit in its own right–if you’re not having much luck with slaying Ashava in one shard, keep town portalling between shards till you find an instance where she’s closer to being downed. Cheap and filthy, but alleviates the pain and suffering of a World Boss run with little to no aid from allies. You should be able to make a judgment call based on the amount of damage done versus time elapsed, with top tier teams downing her in just over seven of the fifteen minutes allotted.
- Shard-surfing–to coin a term–could also be used to shop around for the composition of an Ashava kill-team at the very start of the timer: greater or fewer players, higher or lower leveled, class synergy, Crowd Control bar fill rate, etc. Helpful if you happen to get a bad hand in the shard you’re in when the event begins.

- Ashava’s health bar has four inverted red triangles above it, at equidistant points. As her health is whittled down below each, the triangles flip over and turn gray, dispensing health potions onto the ground (as with any boss). These points could also be used as indicators for the deployment of new moves in her attack routine; although nothing yet apparent seems to trigger from the final two triangle inversions.
- What happens when you fail to kill Ashava within the fifteen minute countdown? She just flees the same way she entered the Crucible, leaving you with nothing to show for your time and effort.
Happy hunting and farming!


